Account
Everything that is yours rather than the workspace's: your name and face, the address you sign in with, your password, your second factor, and the list of devices that are signed in as you.
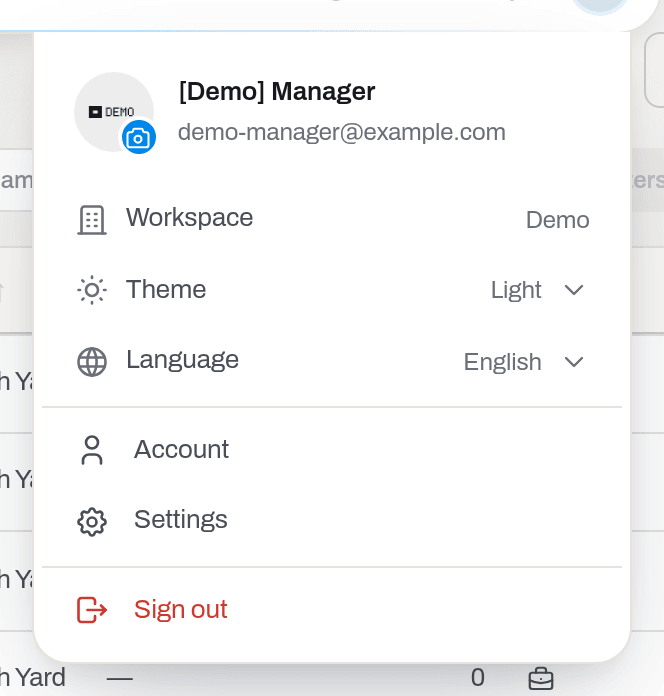
Where: capsule → your face (Account menu) → Account (/account). It is not a section of the nav and there is no grant to lose — every role has it, down to a viewer.
Who can do what
| Role | In Account |
|---|---|
| Viewer | Everything on this page — it is your own account, not the workspace's |
| Operator | The same |
| Manager | The same |
| Admin | The same, plus two-factor authentication is required rather than optional |
Note
Account is not Catalogues in Settings. What is on this page belongs to you and follows you into every workspace you are a member of. What belongs to the company — people, roles, alert recipients, the logo — lives in Settings and is for managers and admins.
At a glance
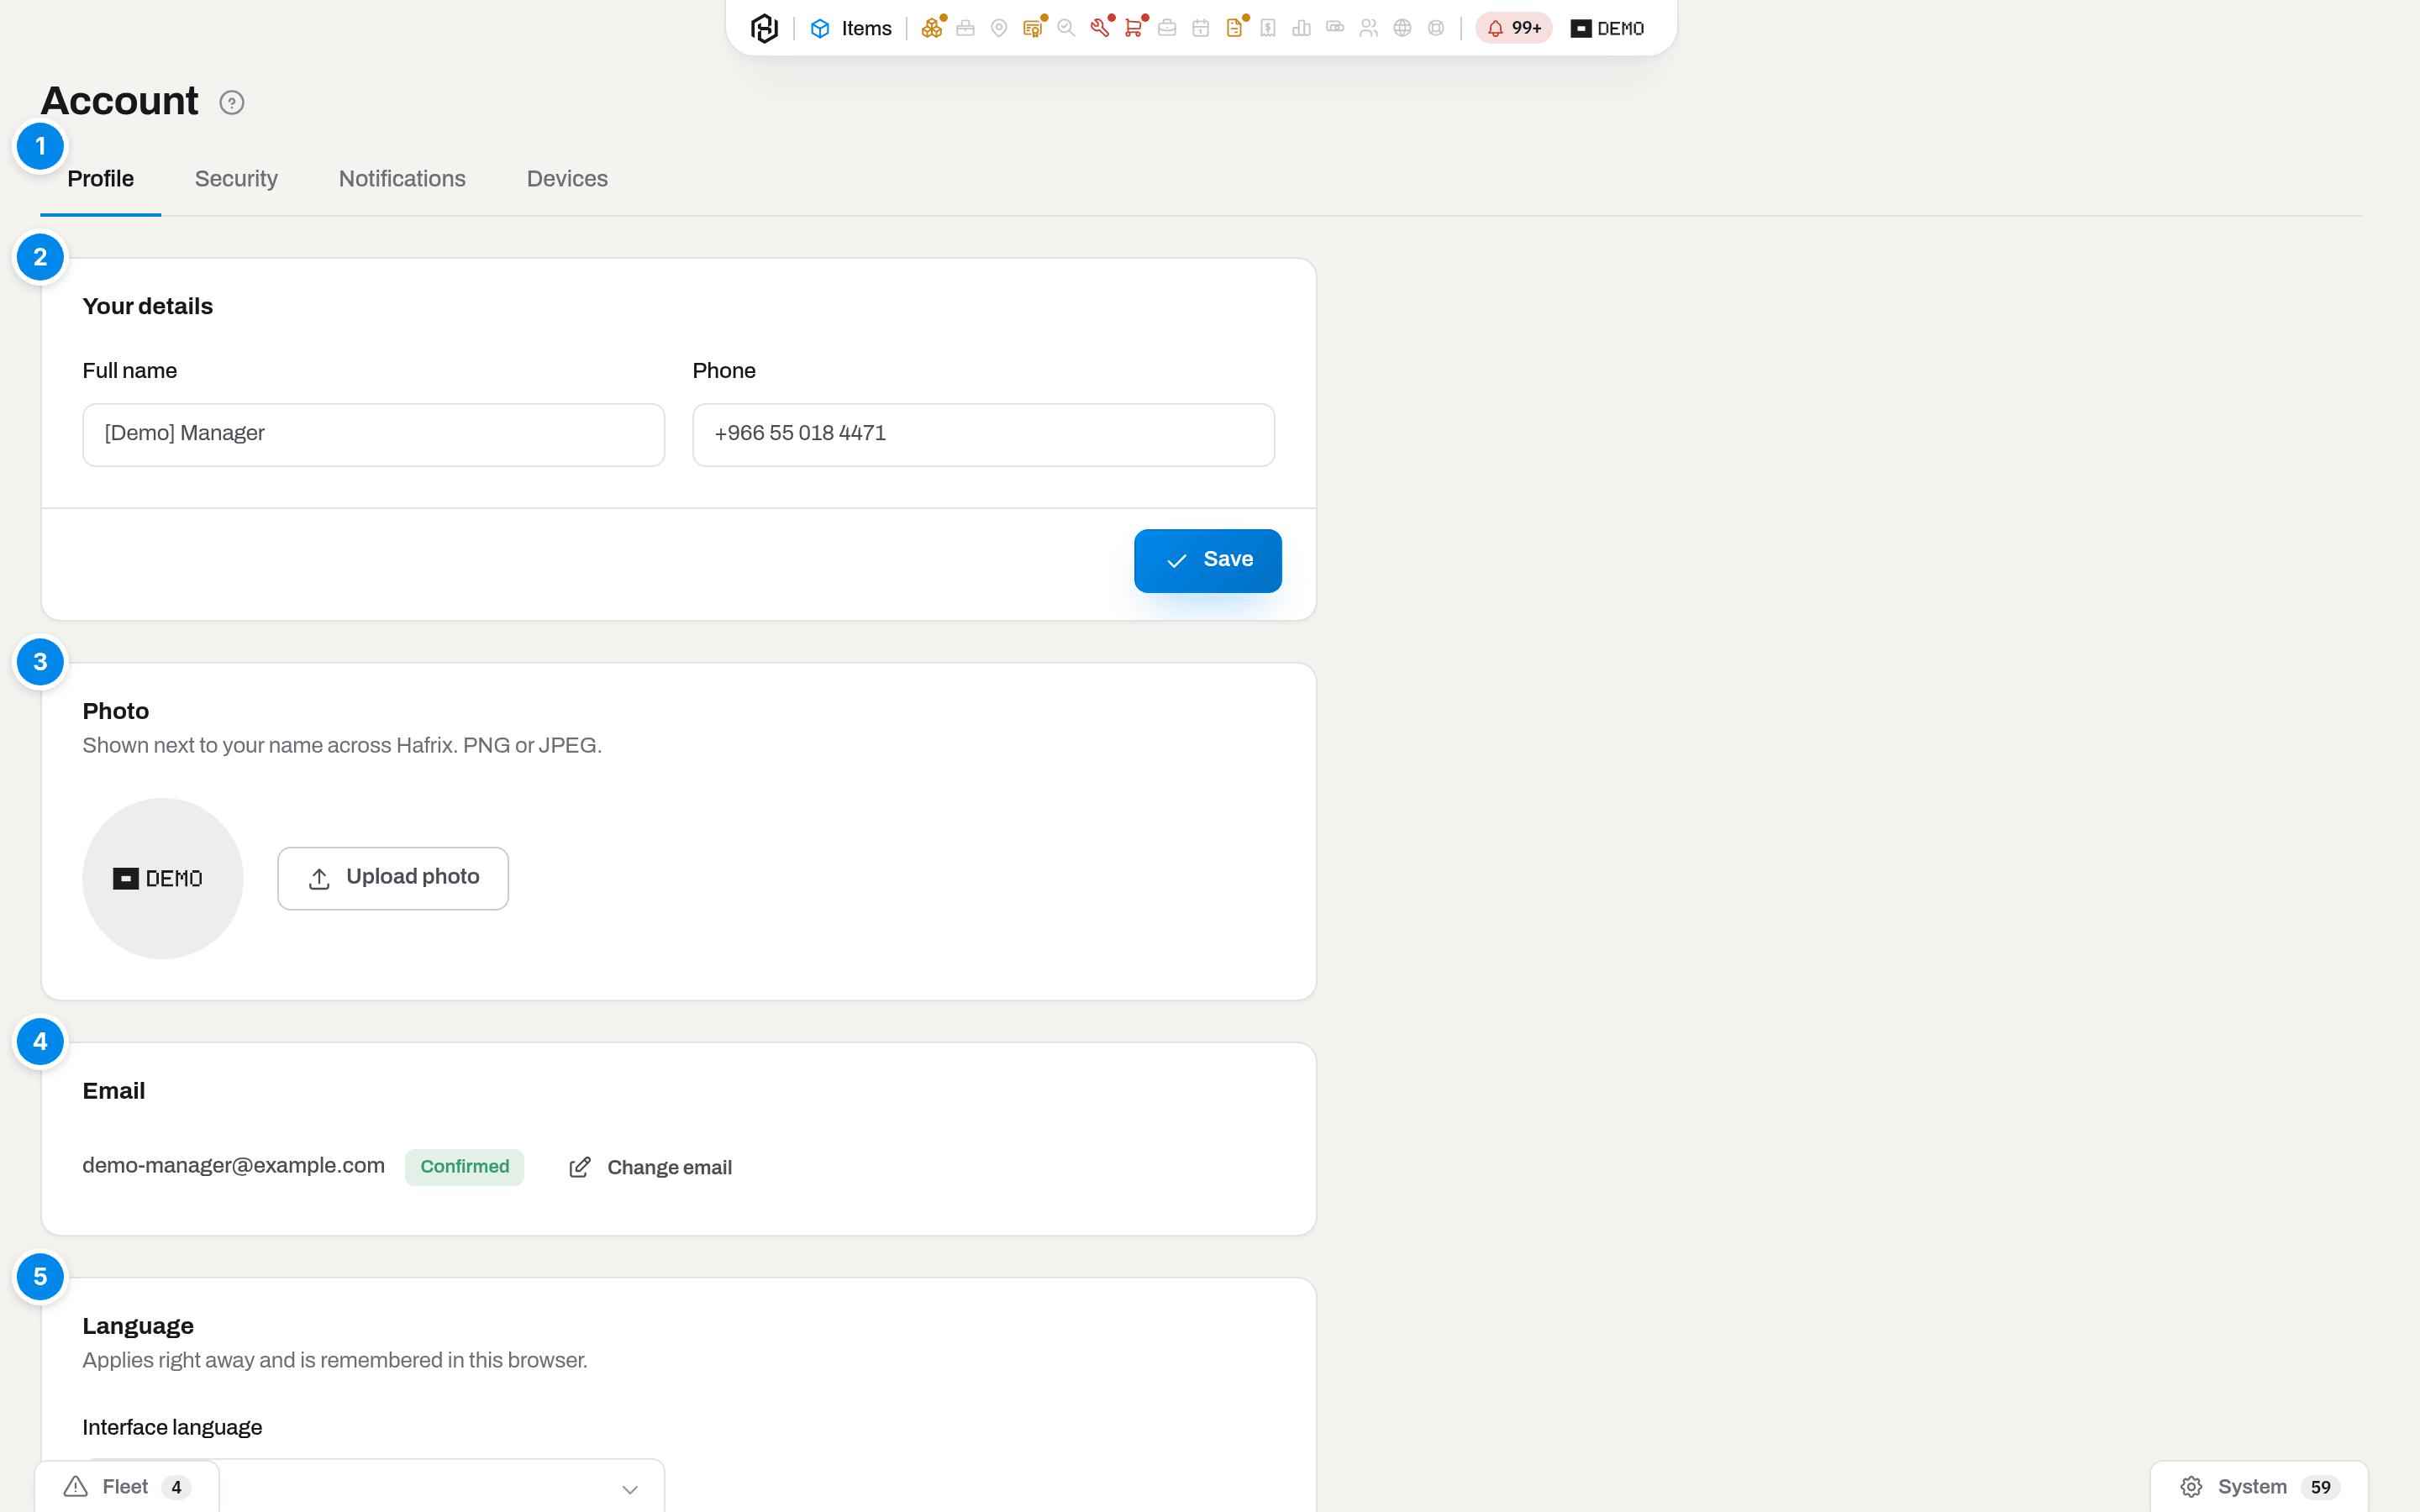
- Profile / Security / Devices — three tabs, and the tab is in the address, so a link (or an email from us) can open the one it means.
- Your details — Full name and Phone, and the Save button that writes them.
- Photo — the face shown next to your name across Hafrix.
- Email — the address you sign in with, with the badge Confirmed or Not confirmed and Change email.
Security holds the password, two-factor authentication and Recent activity; Devices holds the list of sessions.
Key concepts
Confirmed and not confirmed
The address is what you sign in with, so Hafrix wants proof that you can read mail sent to it. Accepting an invitation or signing a company up through a link counts as proof — those addresses are Confirmed from the first day.
An address that stays Not confirmed still signs you in, but password recovery and security notices have nowhere to go, so a Confirm your email address row sits in your notifications until you fix it.
A new address is never taken on trust: the change is stored aside, an email goes to the new address, and only opening the link inside 24 hours moves you over. Until then you keep signing in with the old one.
Two-factor authentication
With it on, the password stops being enough: sign-in asks for the six digits your authenticator app shows for Hafrix. The app can be Google Authenticator, 1Password, Authy — any TOTP app.
Recovery codes are the way back in when the phone is gone: ten codes shaped ABCDE-FGHJK, each good once. They are shown once, when 2FA is turned on and whenever you re-issue them. Nothing on this page will show them again.
A recovery code opens exactly two doors, and both of them are doors in: the code screen at sign-in (Lost your phone? Use a recovery code) and the same link on the password-reset page. It is not accepted by Turn off or New recovery codes on this page — those two take the six digits from the app and nothing else.
For an admin two-factor is not a choice. From the first password sign-in a seven-day window starts, the card says Required for your role — set it up before {date}, an email arrives two days before the end, and after the deadline sign-in stops until it is set up.
The full week is given once. It is there for the person who did not know the requirement existed yet. If two-factor has ever been on for this account, every later window is 24 hours — turning it off buys a day, not another week. The card and the email both name the exact moment, to the minute, and the sign-in holds to the same one.
Turning two-factor off deletes the device on our side, and your phone never learns about it: the Hafrix entry stays in the authenticator app and keeps showing six digits that nothing checks them against any more. Setting the second factor up again always means a new entry — see Set up two-factor again.
What signs you out, and from where
| What you do | This device | Other devices |
|---|---|---|
| Change password (this page) | stays | all signed out |
| Reset the password through Forgot your password | signed out | all signed out |
| Sign out on a row of Devices | stays | that one signed out |
| Sign out other devices | stays | all signed out |
| Sign out in the profile menu | signed out | stay |
| Nothing at all, for 14 days | signed out | signed out |
A signed-out device does not find out until its next request — and then it is out.
How to
Change your name and phone
Who: anyone signed in.
- Open Profile → Your details.
- Edit Full name and Phone.
- Click Save.
Result: the note Saved appears next to the button. The new name shows in the profile menu, on the records you touch and in the emails Hafrix sends about you.
If it fails: the address is not edited here — it has its own card and its own confirmation, see Change your email address.
Choose the department you open in
Who: anyone signed in, in a workspace that has departments.
- Open Profile → Your details.
- Pick a department in Default department. No default clears it.
- Click Save.
Result: Items, Stock, Maintenance, Alerts, Jobs and Dispatch open in that department instead of the whole fleet, and the address carries it. All departments in the toolbar still shows everything, for as long as you keep the tab open. The quicker way to the same setting is Make this my default next to the department chips — see A department is a lens, not a fence.
If it fails: there is no Default department field — your workspace has no departments; an admin sets them up in Set up departments. This setting changes what you open in, never what you may open: your role and your groups decide that.
Set or remove your photo
Who: anyone signed in. This is your face, not a workspace setting, so no role is checked.
- Profile → Photo → Upload photo (it reads Replace photo once you have one). PNG or JPEG.
- To take it off, click Remove photo and confirm Remove your photo?
Result: a toast says Saved — or Deleted, if you removed one — and the face changes everywhere at once. Without a photo Hafrix shows the workspace logo in the circle; without a logo, your initials.
If it fails: The file is larger than 2 MB. — your browser shrinks a large picture to 512 px before sending, but a file it could not read goes as it is; open it and save it smaller. Only PNG or JPEG images. — the type is read from the file itself, so renaming a .webp to .png will not get it through.
Tip
The camera badge on your face in the profile menu uploads a photo too. Removing one is only here — a menu closes at the first click, and removal asks a question first.
Choose how a row click behaves
Who: anyone signed in. It is your own setting: it follows you to every browser and machine, and changes nothing for anyone else.
Result: by default, in every list — the catalog, checklists, jobs and the rest — a click on a row or tile only highlights it, so it does not get lost while you read across a wide table; it does not open the card. Click the row's or tile's name, click the row again, or press Enter to open it. A click on another row moves the highlight, and so do the ↑ and ↓ keys, like in a desktop app; Esc clears it. When you come back from a card, the row you left from is highlighted again, ready for the arrow keys.
- Open Profile → Lists.
- Tick Row click opens right away.
Result: every list now opens the card on the first click again, the way lists worked before this setting existed.
If it fails: a single tap always opens the card on a phone or tablet — on touch screens there is no second click to wait for, so this setting does not apply there. The highlight is not a selection: the checkboxes for bulk actions work as before and do not move it.
Confirm your email address
Who: anyone whose Email card shows Not confirmed.
- Profile → Email. The note reads This address is not confirmed yet — password resets and security notices need it.
- Click Send confirmation link — or Send the link again if one is already on its way. The note Link sent. confirms it went.
- Open the link in the mail. It works for 24 hours, and the newest link is the only live one.
Result: the badge turns Confirmed, Email confirmed appears in Recent activity, and the Confirm your email address row leaves your notifications.
If it fails: This address is already confirmed. — nothing to do, reload the page. Too many confirmation emails for this address. Try again in an hour. — three per hour is the limit. If the mail never arrives, look in the spam folder before asking for a fourth.
Change your email address
Who: anyone signed in. Your current password is part of the form — the address is the way into the account, and a stolen tab must not be able to take it.
- Profile → Email → Change email.
- Fill in New email and Current password, then click Send confirmation.
- Read the mail at the new address and open the link within 24 hours.
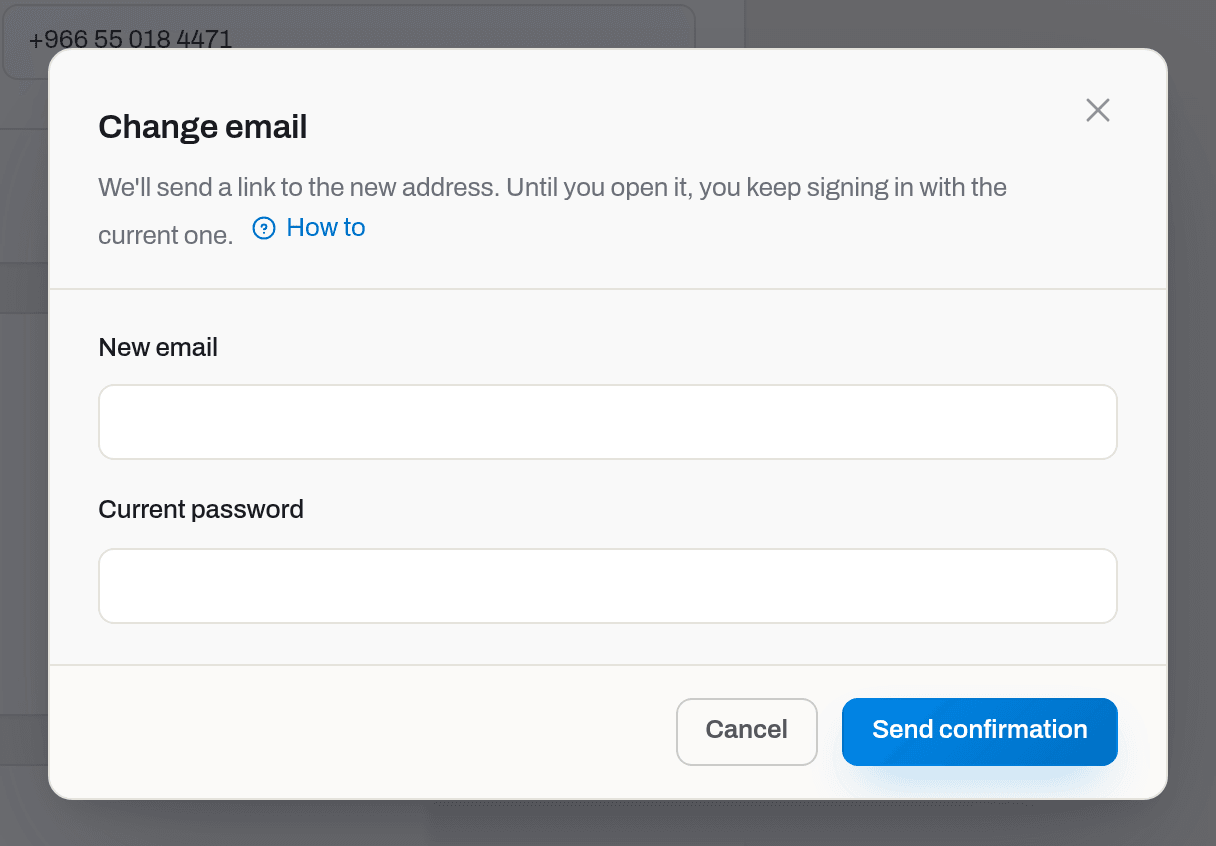
Result: the card notes Confirmation sent to {email}. and then Waiting for confirmation at {email}. The link works for 24 hours. You keep signing in with the old address until the link is opened; after that the badge reads Confirmed, Email changed joins Recent activity, and the old address gets the email Your Hafrix account email was changed — which is how you find out if the change was not yours.
If it fails: This is already your email address. — to re-confirm the address you already have, use Send confirmation link instead. Password is incorrect. That email address is already in use. — somebody else in Hafrix signs in with it; an address belongs to one person.
Change your password
Who: anyone signed in.
- Open Security → Password.
- Fill in Current password, New password (at least 12 characters) and Confirm password. The eye button on each field shows the password you typed, and the strength bar under New password is a guide only — the server, not the bar, decides whether the password is accepted.
- Click Change password.
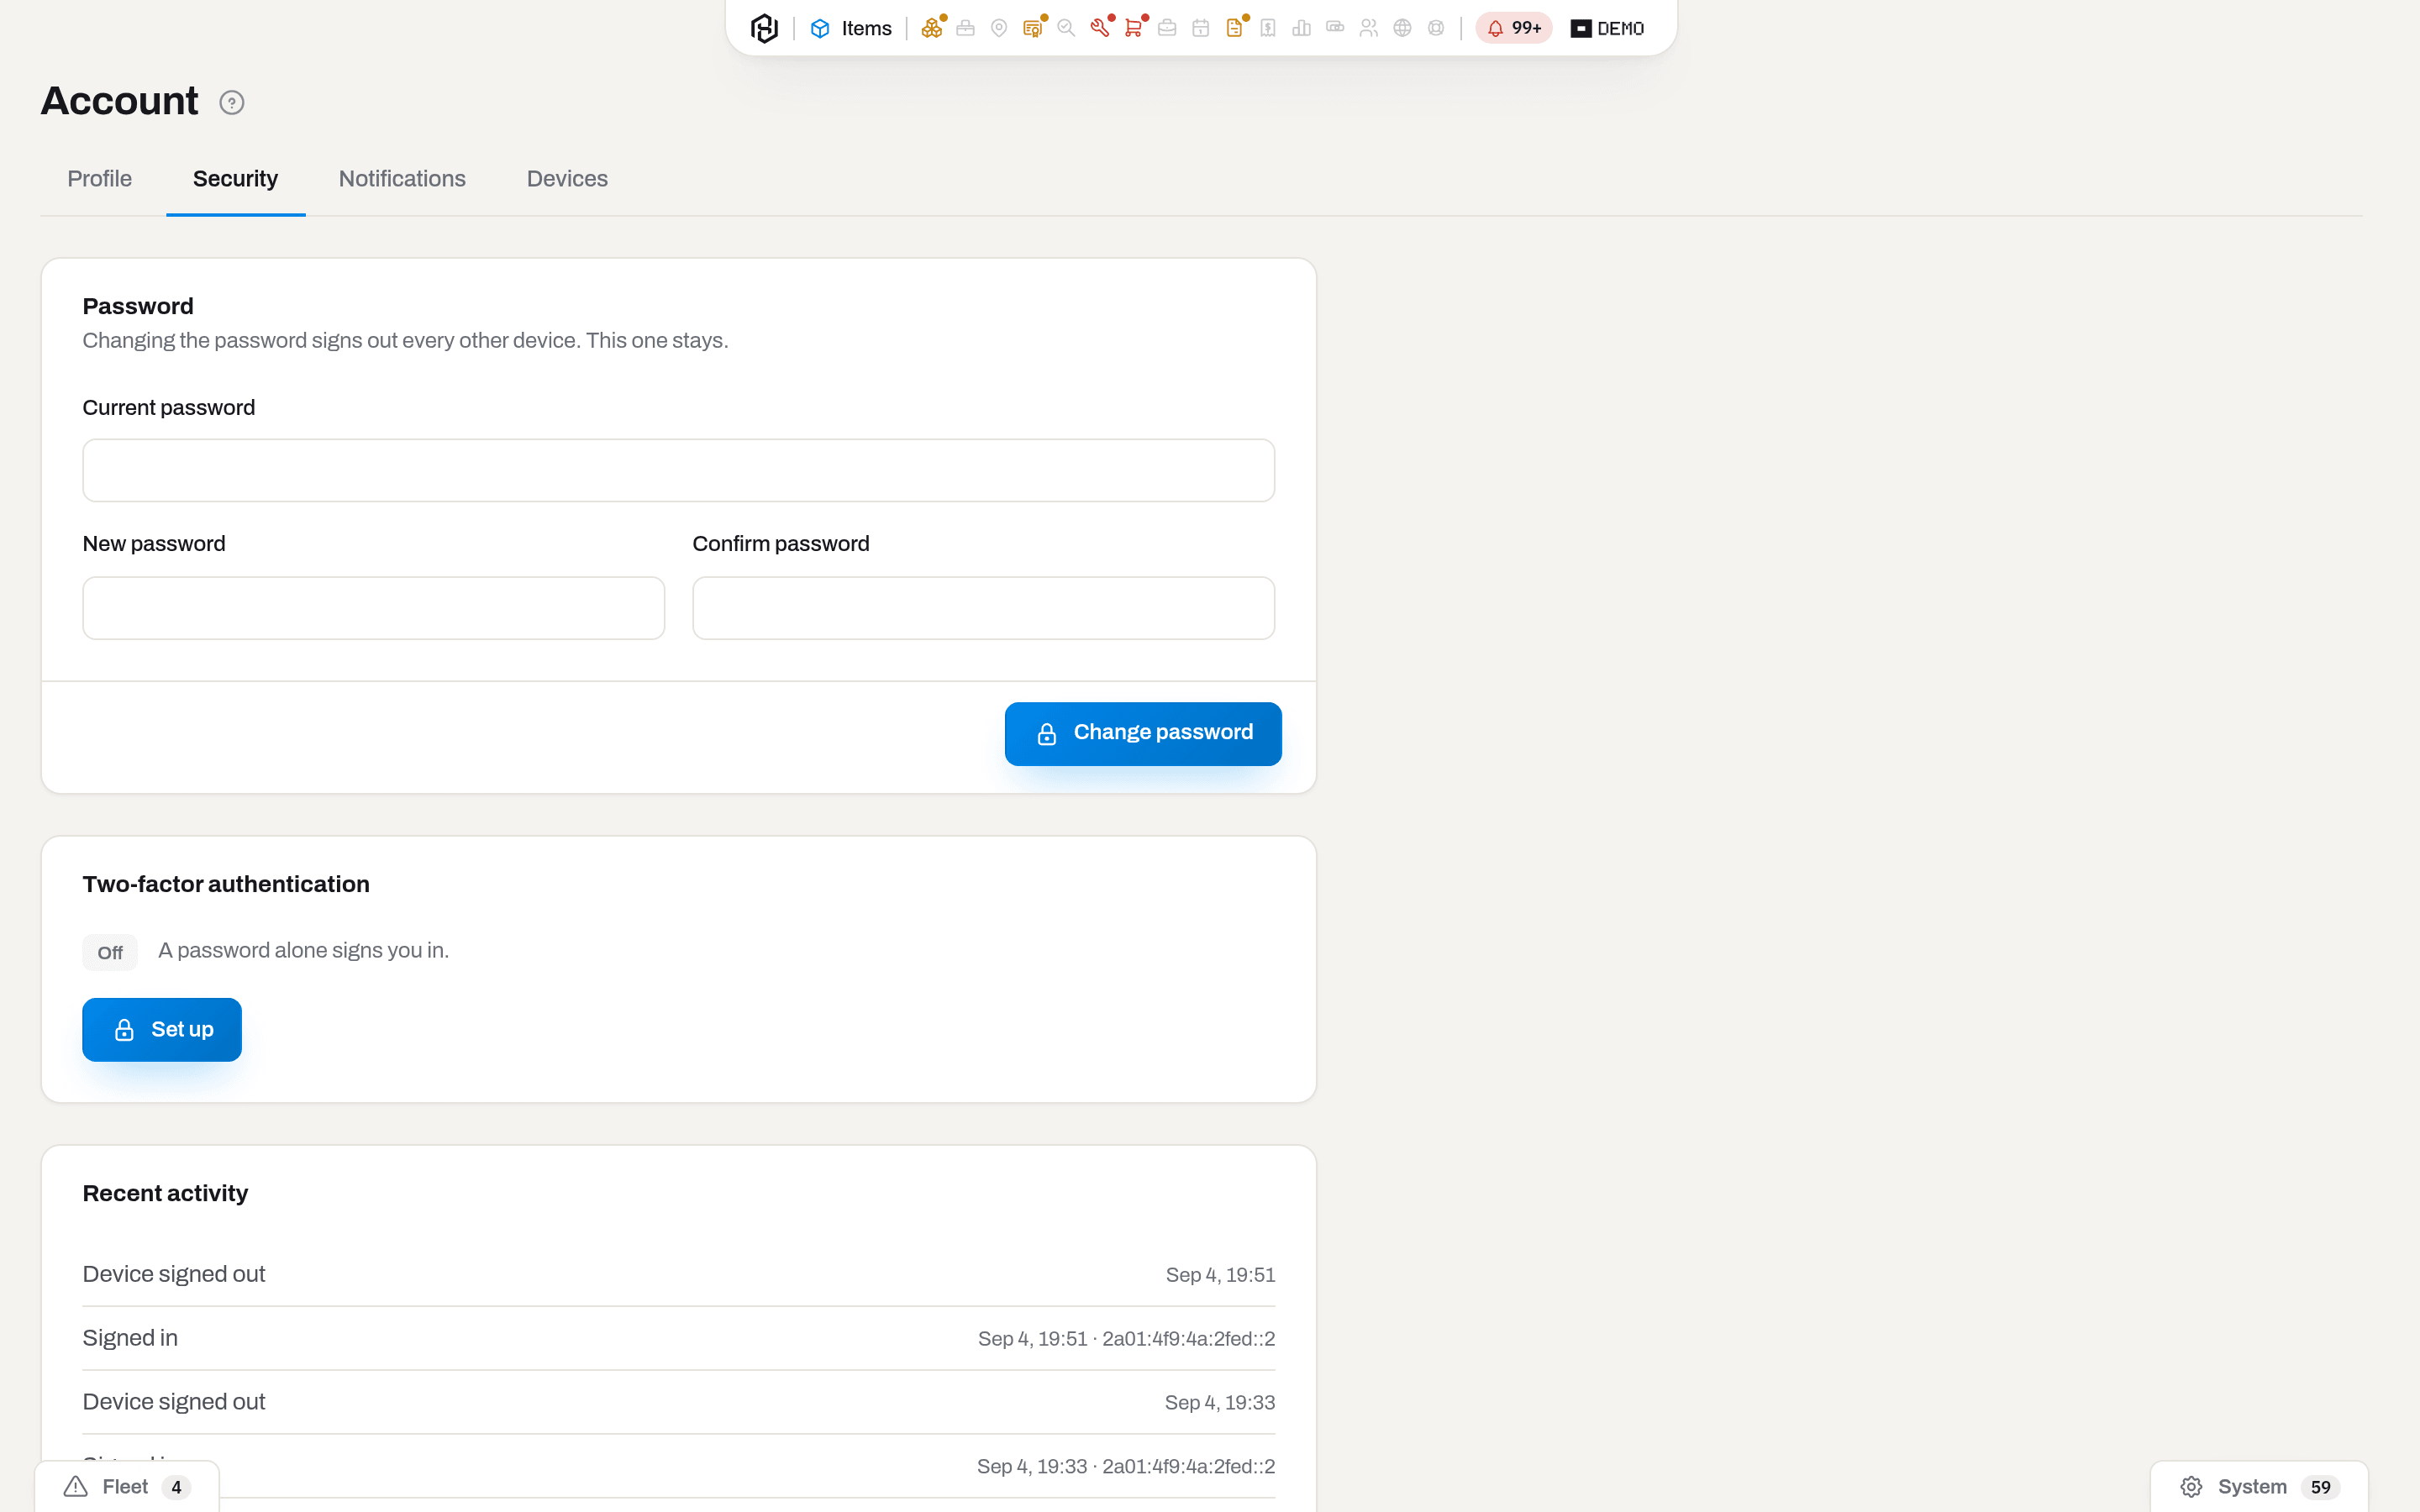
Result: the note Password changed. appears, and every other device is signed out — this one stays. The email Your Hafrix password was changed goes out, and Password changed joins Recent activity.
If it fails: Current password is incorrect. The new password must differ from the current one. Ensure this field has at least 12 characters. A password found in a known data breach is refused with This password has appeared in a data breach. Choose a different one. A mismatch between the two new fields shows The passwords do not match. in red and keeps the button disabled — that one never reaches the server.
Tip
Locked out rather than logged in? The password is reset from the sign-in page, not from here — see Getting started.
Turn on two-factor authentication
Who: anyone signed in. Required for admins.
- Security → Two-factor authentication → Set up. The card turns into the setup form.
- Scan the QR code with your authenticator app. No camera? Copy the key under No camera? Type this key into the app instead: and type it into the app by hand.
- Type the current Six-digit code from the app and click Turn on.
- Ten recovery codes appear. Click Copy codes, put them somewhere that is not this browser and not your mailbox, then click I saved them.
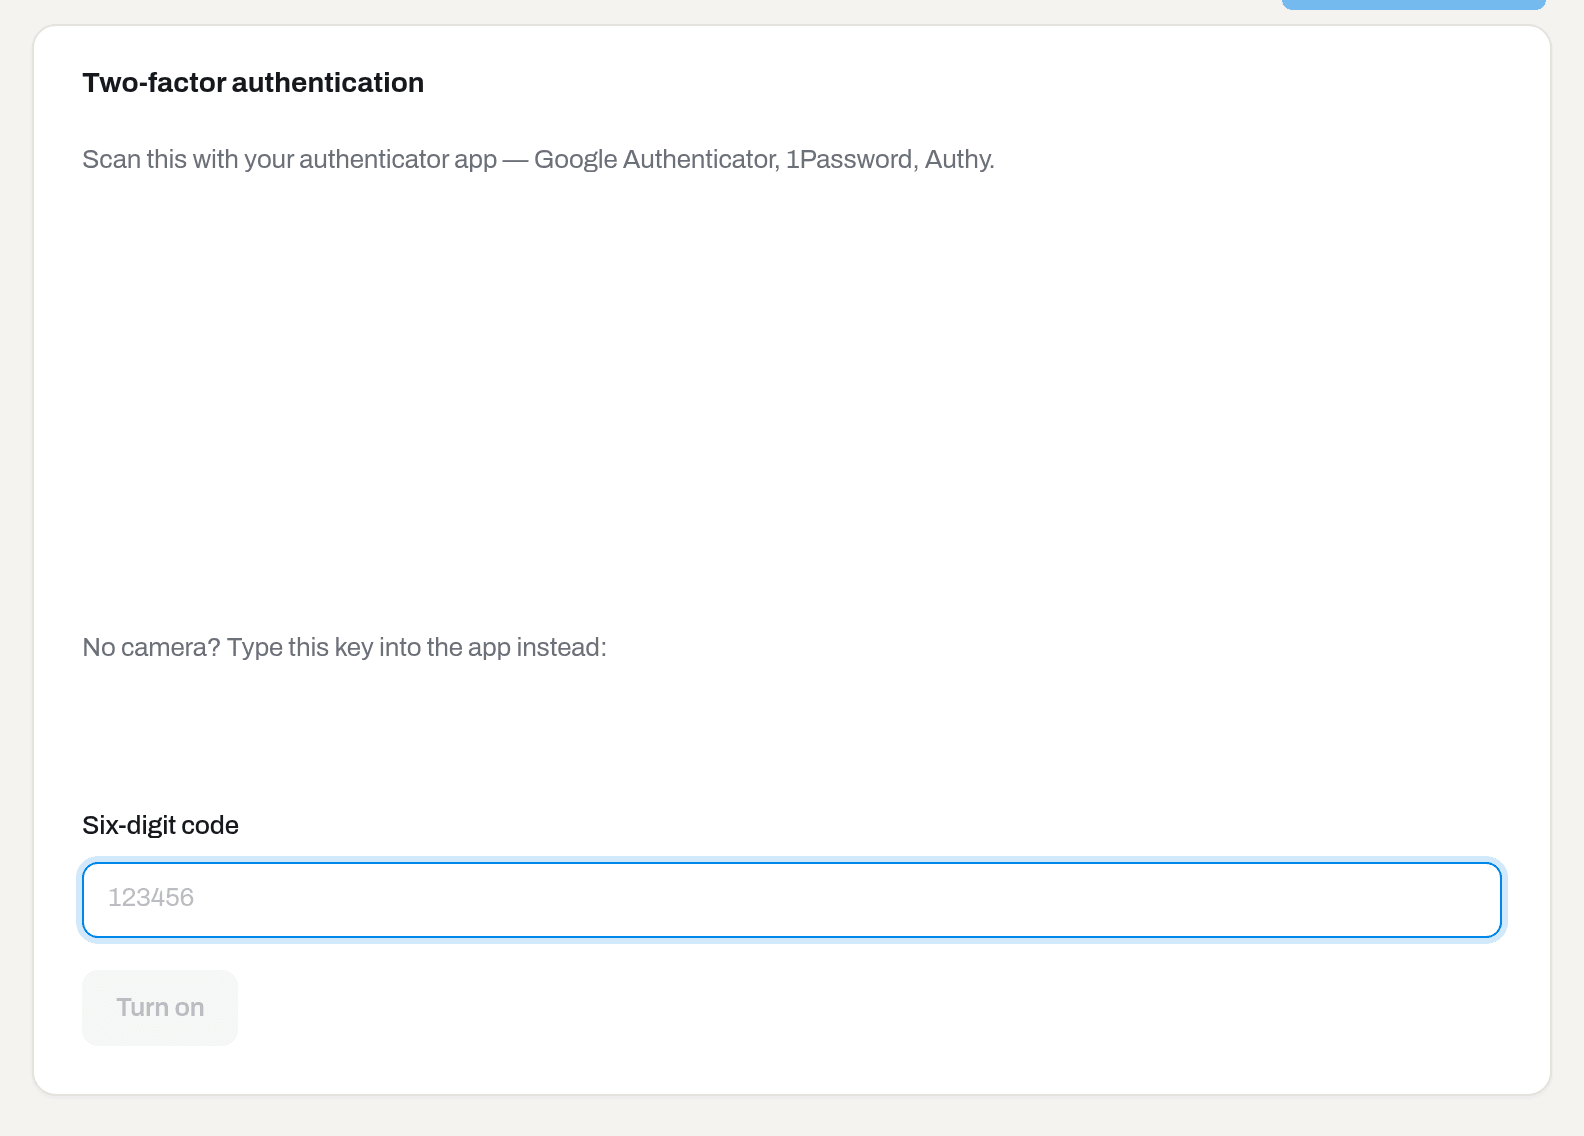
The QR square and the key line under it are left blank in this screenshot on purpose: both carry the secret your app will hold, they are different for every account, and they belong on your screen only. On your own page the square holds the code you scan, and the line under No camera? holds the same secret in letters and digits to type in by hand.
Result: the badge reads On with Sign-in asks for a code from your authenticator app. The email Two-factor authentication is on for your Hafrix account arrives, Two-factor enabled joins Recent activity, and this session stays signed in — the next sign-in is the first one that asks for a code.
If it fails: That code didn't match. Check the app — codes change every 30 seconds. Take the freshest code; if it keeps failing, the phone's clock is off — turn on automatic time on the phone and try again. Five wrong codes lock the account for 15 minutes, exactly as five wrong passwords do.
Warning
The recovery codes are shown once and never again. Leaving this screen without saving them leaves you with one way in — the phone. If that is already what happened, re-issue them below while you still can.
Issue new recovery codes
Who: anyone with two-factor on.
- Security → Two-factor authentication → New recovery codes.
- Fill in Your password and a current Six-digit code, then click New recovery codes.
- The ten new codes replace the dialog. Save them and click I saved them.
Result: the previous set stops working the moment the new one is issued — count the old ones out. No email is sent for this.
If it fails: That code didn't match. Check the app — codes change every 30 seconds. — the same message answers a wrong password here, on purpose: an attacker guessing at the form should not learn which half was right. A recovery code in place of the six digits is refused as well: this dialog needs the app itself.
Turn off two-factor authentication
Who: anyone with two-factor on.
- Security → Two-factor authentication → Turn off.
- Fill in Your password and a current Six-digit code, then click Turn off.
Result: the badge returns to Off with A password alone signs you in., the email Two-factor authentication was turned off on your Hafrix account goes out, and Two-factor disabled joins Recent activity. For an admin the window starts again from this minute — 24 hours if two-factor has been on before, the full seven days only the first time — and the email names the new deadline outright rather than a number of days. Turning it off does not remove the requirement. The Hafrix entry in your authenticator app is now dead and will not say so: delete it there, or the codes it goes on showing will meet you at the next setup.
If it fails: That code didn't match. Check the app — codes change every 30 seconds. — the dialog takes only the six digits from the authenticator app; a recovery code typed in here is refused. If the app is gone with the phone, turning the second factor off is not something you can do yourself — see the FAQ below. Two-factor authentication is not on for this account. — somebody, or another tab, has already turned it off.
Set up two-factor again
Who: anyone whose second factor was turned off and is asked for it again. For an admin that is not a request: once the window runs out — 24 hours after a repeat switch-off — sign-in stops at Set up two-factor authentication again and goes no further.
The part that decides whether this works is not on the screen, it is on your phone. Turning two-factor off deleted the device on our side; the old Hafrix entry in your authenticator app knows nothing about that and keeps producing a fresh six-digit code every thirty seconds. Those codes are dead — the secret they are built from no longer exists, and sign-in refuses every one of them. From your side it reads as two-factor keeps falling off: the app shows a code, the sign-in says it does not match.
- Open your authenticator app and delete the old Hafrix entry. Do it first — two entries under one name are told apart by nothing, and you will reach for the wrong one.
- Scan the new QR code, or type the key by hand, exactly as in Turn on two-factor authentication. The screen says the same thing above the code: Your authenticator app still holds the old Hafrix entry, and the codes it shows are no longer accepted.
- Type the six digits the new entry shows and click Turn on.
- Save the ten recovery codes. They are new as well — the previous set died with the previous device, and the codes you wrote down last time are refused too.
Result: the same as a first setup — the badge reads On, Two-factor enabled joins Recent activity, and the email Two-factor authentication is on for your Hafrix account arrives. This time the email carries one extra line: the old entry is still in your app and its codes are not accepted. If sign-in sent you here, it lets you straight in — the password you have already typed is not asked for twice.
If it fails: That code didn't match. Check the app — codes change every 30 seconds. — the first thing to check is which entry you are reading. If the app still lists two Hafrix rows, the codes from the older one will keep failing until you delete it. Five wrong codes lock the account for 15 minutes, exactly as five wrong passwords do.
Sign out a device
Who: anyone signed in.
- Open Devices. Each row is one open session: Device, IP, Last seen, Signed in. The one you are reading this on carries the badge This device.
- Click Sign out on the row you do not recognise — or Sign out other devices in the corner of the card to clear every row but this one.
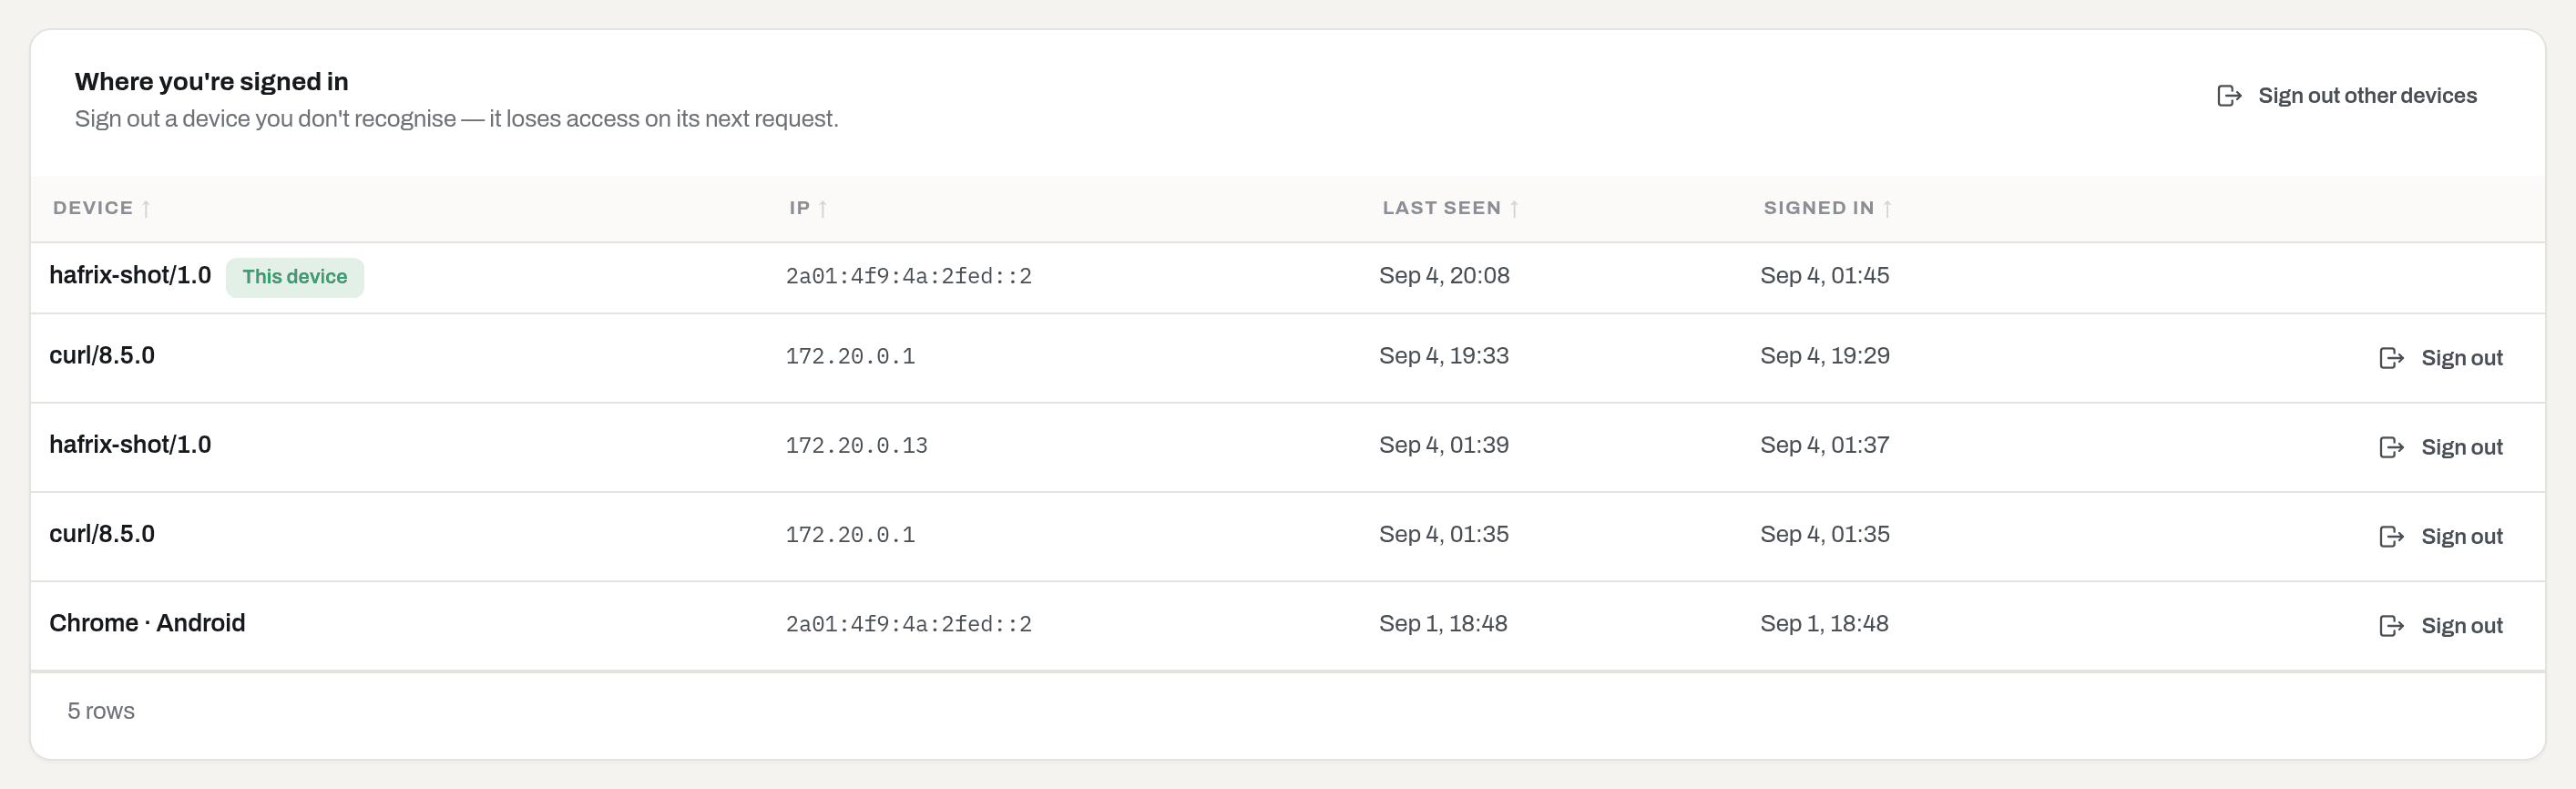
Result: the row disappears, that device loses access on its very next request, Device signed out joins Recent activity, and the email A device was signed out of your Hafrix account tells you where the sign-out was done from.
If it fails: there is no Sign out on the row marked This device — leave this browser through Sign out in the profile menu instead. Sign out other devices is greyed out when there is nothing else to sign out. A device name reads Unknown device when the browser told us nothing usable; judge it by IP and Last seen instead.
Tip
A device you do not recognise is worth a password change straight after — that alone signs out every other session, this list included.
Choose what reaches you by email
Who: anyone signed in. The choice belongs to this workspace — the same person in a second workspace decides again there.
- Open Notifications. One switch under Email copies, on to begin with.
- My documents — a shift of yours sent back for a fix.
- The switch saves itself; Saved appears in the corner of the screen.
Result: the email stops. Nothing stops arriving in the bell — the feed is where the news lives, and the email only repeats it for the days you do not open Hafrix.
If it fails: the fleet digest and company announcements are not on this page, and there is no Unsubscribe in those letters either. They are a company decision, not a personal one: who receives the fleet letters is the recipients list in Settings → Alerts (or, with no list, the managers and admins), and an announcement reaches everyone who works here. Ask your admin to change the list or your role.
Important
Account emails are not on this page and cannot be turned off: a sign-in from a new device, a password change, two-factor turned on or off, a recovery code used, a change of address, a device signed out, ownership handed over. They are the only way you learn that someone reached your account.
Fields
| Field | Where | Meaning | Required |
|---|---|---|---|
| Full name | Profile → Your details | How you are named across Hafrix and in its emails | no |
| Phone | Profile → Your details | Contact number; free text, no format is imposed | no |
| Photo | Profile → Photo | PNG or JPEG up to 2 MB, shrunk to 512 px on the way | no |
| New email | Change email dialog | The address you want to move to; must not belong to anyone else | yes |
| Current password | Change email dialog · Password card | Proof that it is you at the keyboard | yes |
| New password | Security → Password | At least 12 characters, different from the current one, and not found in a known data breach | yes |
| Confirm password | Security → Password | The same thing twice; a mismatch blocks the button | yes |
| Six-digit code | Two-factor setup and dialogs | The code your authenticator app shows right now | yes |
| Your password | Turn off · New recovery codes | Asked together with the code — a stolen password alone must not undo 2FA | yes |
| My documents | Notifications → Email copies | Whether a returned shift is also emailed to you | — |
What the system tells you
| When | Feed row | Who gets it | |
|---|---|---|---|
| Your address is not confirmed | Confirm your email address | — | you |
| Two-factor is required for your role and still off | Set up two-factor authentication | Set up two-factor authentication before {deadline}, two days before the window closes | you |
| You change the password | — | Your Hafrix password was changed | you |
| You ask to change the address | — | Confirm your new email for Hafrix, to the new address | you |
| The confirmation link is opened and the address changes | — | Your Hafrix account email was changed, to the old address | you |
| You turn two-factor on or off | — | Two-factor authentication is on / was turned off … | you |
| A recovery code is used anywhere | — | A recovery code was used on your Hafrix account, with how many are left | you |
| A device is signed out from Devices | — | A device was signed out of your Hafrix account | you |
| You sign in from a device we have not seen before | — | New sign-in to Hafrix from {device} | you |
Two-factor never leaves an account quietly. Whoever turns it off and however — this page, the support desk, a command run on the server — the same three things happen: Two-factor disabled joins Recent activity with the time, the email above arrives at your address, and the workspace audit trail records it for every workspace where you are an admin. If the card ever reads Off and you did not touch it, the trail says when it happened; write to care@hafrix.com the same day.
Everything in the table above is also written into Security → Recent activity, which keeps the last hundred events with the time and the IP: Signed in, Failed sign-in, Account locked, Signed out, Device signed out, Password changed, Reset link requested, Password reset, Email confirmed, Email changed, Workspace switched, Two-factor enabled, Two-factor disabled, Recovery code used. It is your own record and it follows you across workspaces. The workspace keeps an audit trail of its own as well, and an admin sees your sign-ins, failed sign-ins and two-factor changes there — but nothing else from this list.
Note
Nothing on this page raises the usual toast that the rest of Hafrix raises after a save. Your account answers on the spot instead: the note Saved or Password changed. next to the button, and a red line under the field when the server says no. The photo is the one exception — it is a file you hand over and wait for, so it does toast.
Related
- Getting started — the first sign-in, the invitation, the password reset and what the sign-in asks when two-factor is on.
- Roles & access — what your role opens, and why a section may be missing from the capsule.
- Catalogues in Settings — the other half: people, roles, invitations, alert recipients, the company's own settings.
- Interface basics — the capsule, lists, cards, dialogs and where notifications appear.
FAQ
Where is the Account entry? I only see section names. — In the capsule, behind your face on the far right: click it, then Account. Emails from Hafrix link straight to the tab they are about.
I changed my name — why do old records still show the old one? — They do not. The name is stored once and read everywhere, so a record written last year now shows your new name too. What does not change is the text of emails already sent.
Can an admin reset my password or turn my two-factor off? — No. Nobody, in any console, changes your password or your second factor for you; both need the account itself. What an admin can do is change your role or remove you from the workspace.
I lost the phone with the authenticator app. — On the code screen click Lost your phone? Use a recovery code and use one of the ten codes you saved; the same link is on the password-reset page. That gets you back in, and only in: Turn off and New recovery codes on this page both insist on a live six-digit code, so with the app gone you cannot move the second factor to a new phone yourself. Nobody can do it for you either — there is no such button for an admin of your workspace, and none in the Hafrix console. Write to support. If the phone is merely being replaced and still works, carry the account over in the app first, while it can still show you a code.
Why is a recovery code refused when I turn two-factor off? — Because Turn off and New recovery codes check the six digits from the app and only those; a recovery code typed into that field is measured against the app and fails. Recovery codes are for getting in — at sign-in and at a password reset — not for taking the second factor apart.
Devices lists more rows than I have computers. — A row is a session, not a machine: two browsers on the same laptop are two rows, and so is every re-installed browser. If they bother you, Sign out other devices clears the lot; every session also ends on its own — after 1 hour without anything you do (screens refreshing themselves do not count), and in any case 24 hours after its sign-in, however busy it has been — and you sign in again.
Which workspace does this page belong to? — None. The account is one, the workspaces may be several, and switching workspace in the profile menu changes neither your password nor your devices.
Updated 2026-09-21
New to Hafrix?
See this workflow in your operation
Explore the platform behind these guides: equipment inventory, rentals, maintenance and operational finance. Tell us which workflow you want to see.