Items
Every serialized asset and every consumable card the yard owns or rents in — what it is, where it is, whether it is ready to go out, and what has happened to it.
Where: capsule → Fleet → Items (/items). If the entry is missing, your group has not been granted this section — see Roles & access.
Who can do what
| Role | In Items |
|---|---|
| Viewer | Open the list and the cards, switch views and columns, Export |
| Operator | + New item, edit an item, select rows and run every action in the selection bar |
| Manager | + the money side of an item (see Item card) |
| Admin | + nothing extra here — an item is never deleted, by anyone |
At a glance
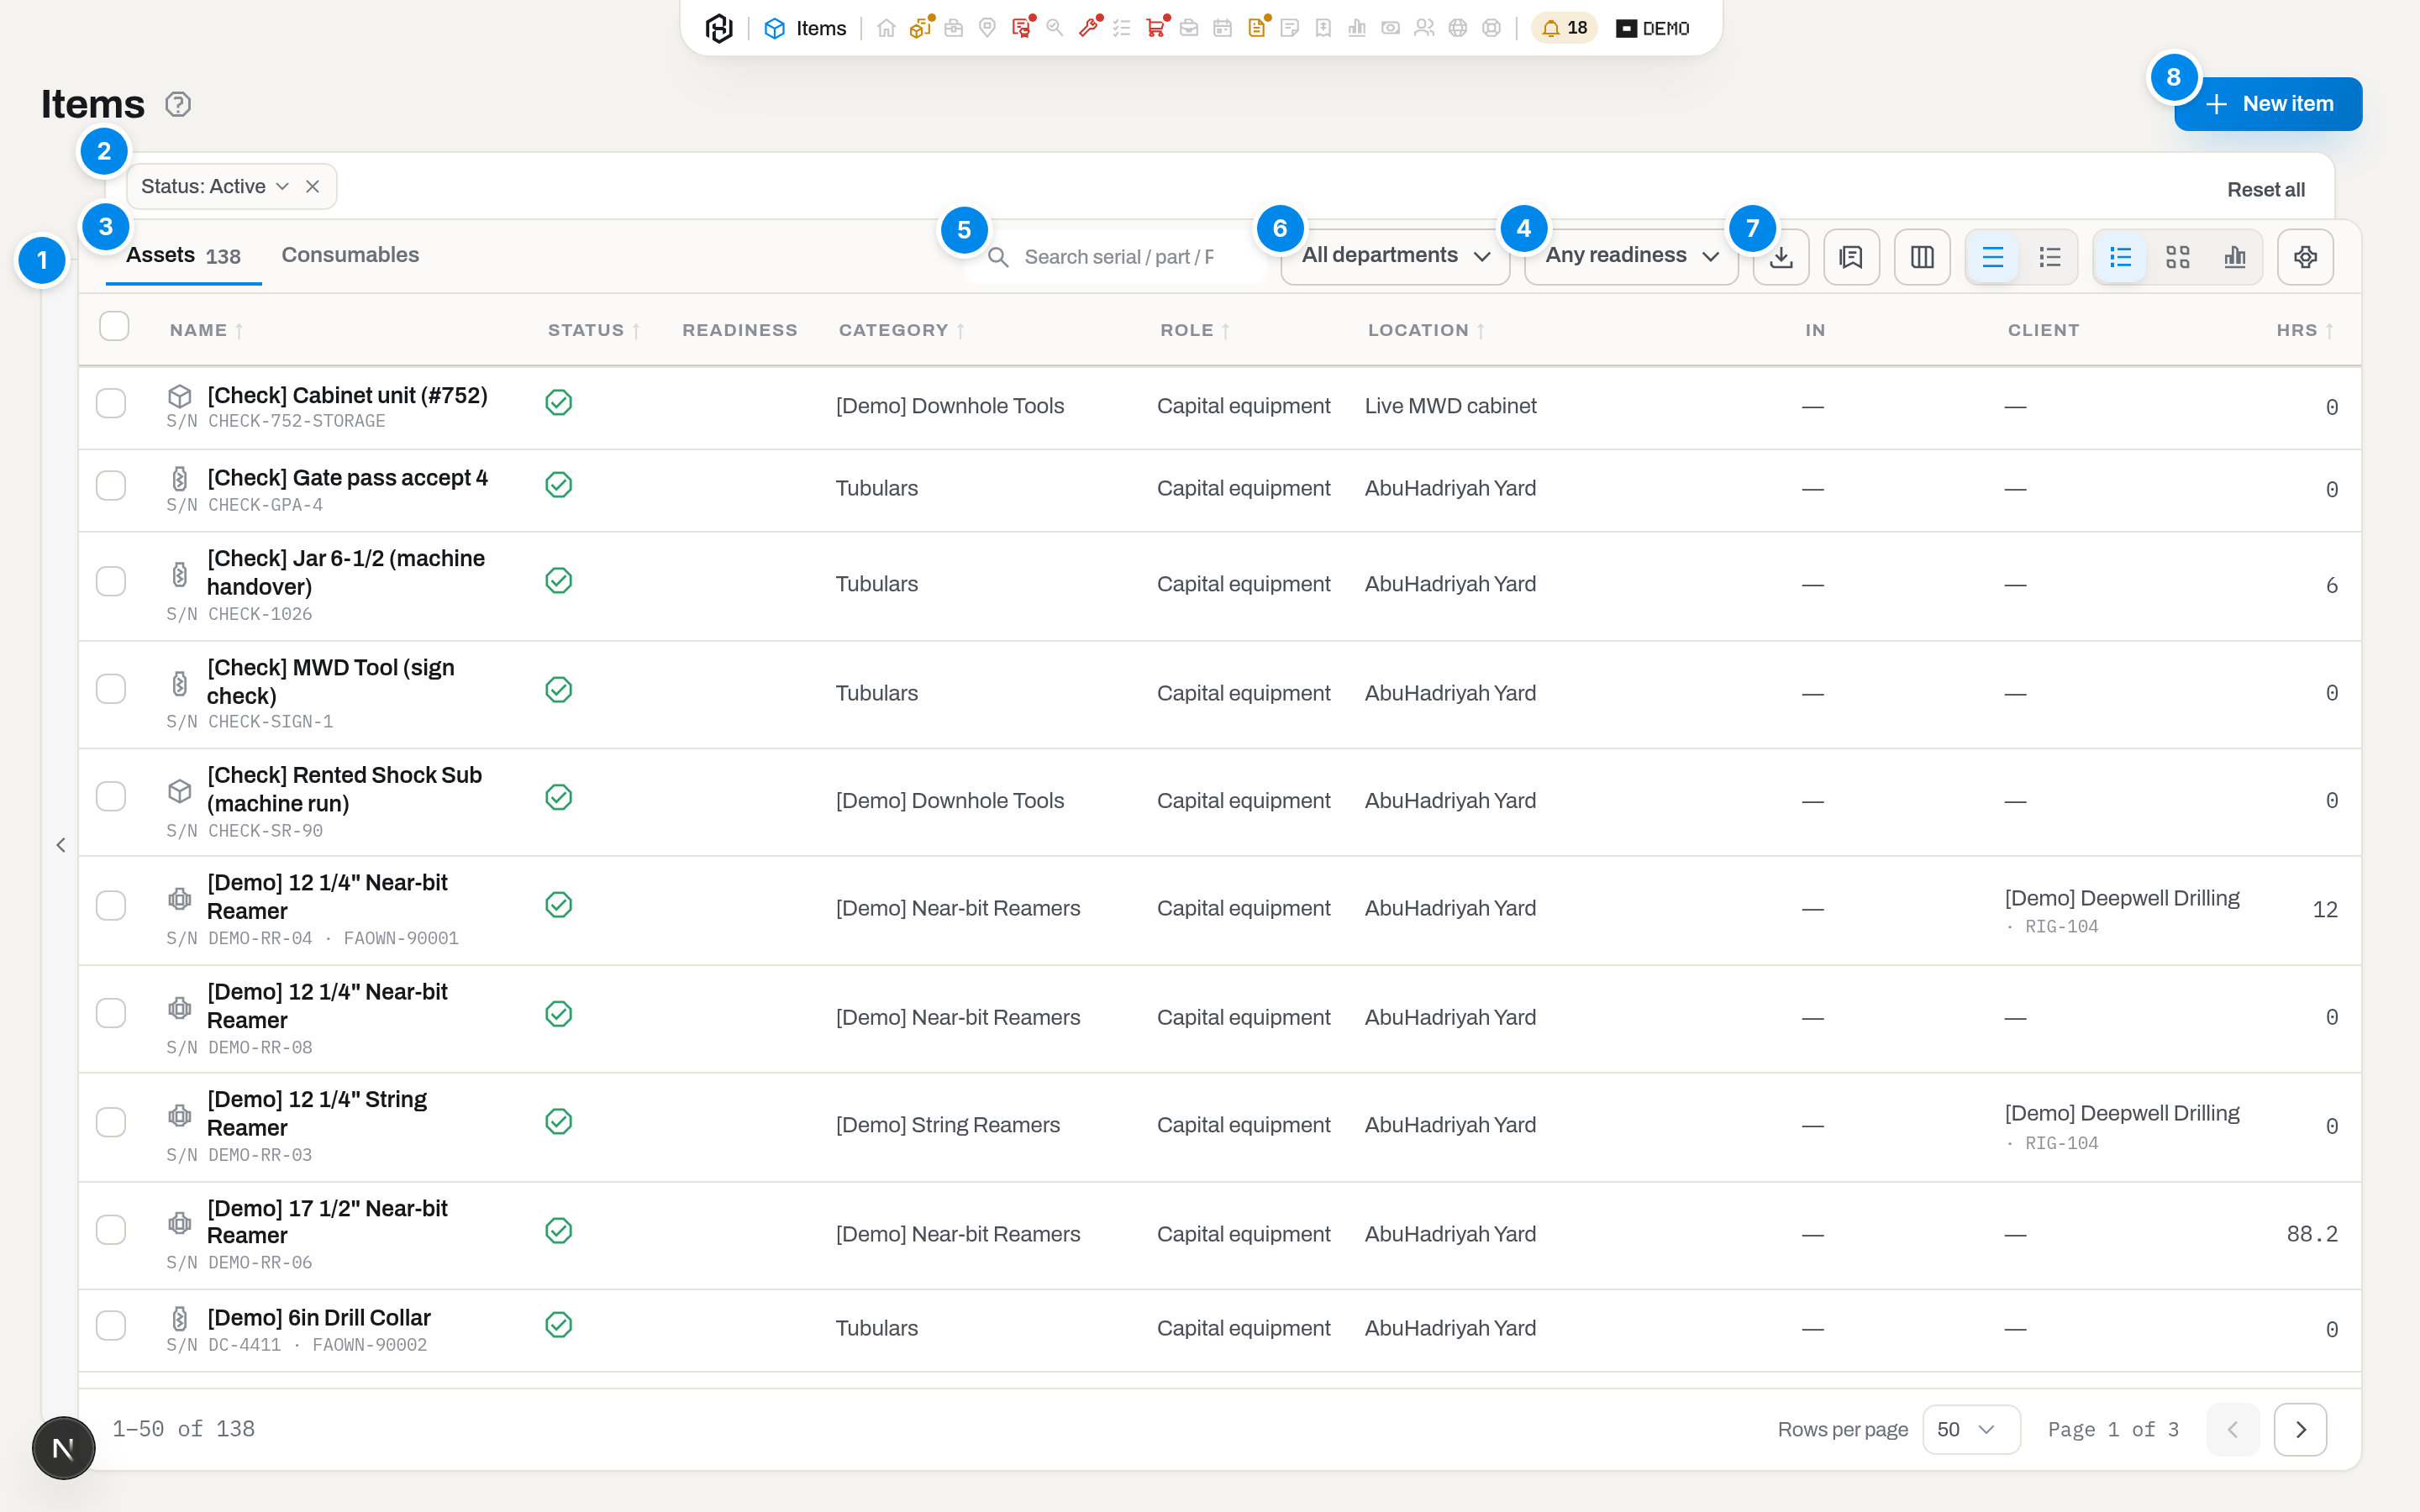
- Filters — a rail at the left edge of the list: a handle on its own outer edge opens it, and a click tucks it back to a thin 22px strip carrying nothing but the handle's chevron — no filter icon, no count. Below 1200px wide the strip is gone and a Filters button, first in the table's header, opens the same panel as an overlay instead. Inside, conditions are grouped: Ownership quick views, Quick views (Customer tools, Cutters), Category, Basics (Status, Role, Serial number), Fleet (Location, Container, Ownership, Custody, Owner, Assignment, assets only) and Characteristics. The long lists — Category, Location, Container and Owner — open to a search box: type a few letters of any word to narrow them, move with the arrows and pick with Enter. The list narrows but stays in view and recounts itself as you pick, so you can see what a condition costs you. A group can be collapsed, a set field is outlined and carries a × that drops that one condition. On a wide screen the panel has no reset button of its own — Reset all lives in the tray (2); in the narrow overlay, where there is no tray, Reset all and a close × sit at the top of the panel. Every visit to Items starts with the panel tucked away. See Show or hide the filters panel.
- The active-filters tray — a strip that rides out from under the top edge of the list card whenever a condition set in the rail is set, and tucks away with the list rising back up when none is: one pill per condition, each
Label: Value ⌄ ×— the × drops it, clicking the text opens a menu of that field's other values (the same look as the department menu) so you can change it without opening the rail. A numeric characteristic is its own pill with two Excel-style cells, from and to (Filter by a characteristic). Reset all, at the right of the tray, clears every condition at once and returns the list to how it opens — it is there whenever anything differs from that, including a Readiness pick alone, which has no pill of its own. See Change or remove an active filter from the tray. - Assets / Consumables — tabs on the table's own header: two different things in one section, a serialized unit with a history or a stock card with quantities. Switching clears the filters that only make sense for assets.
- Readiness — a dropdown in the table's own header, right after your department button and only shown on Assets: the button reads Any readiness until you pick one, then Readiness: Ready (or whichever you chose); each option in the menu carries its own count, and clearing it does not leave a pill in the tray — the rail no longer holds this condition.
- Search — Search serial / part / PO / code / model / name…: matches serial, part no., name, asset ID, manufacturer's number, code, model and any former number the unit carries. A unit that has been renumbered is still found by the number written on the old paperwork.
- Your department — a button right after the search box, in the table's own header (not under the page title any more): click it to switch, or open All departments — A department is a lens.
- Export, Views, Columns, density, list/tiles/Overview and the department-view gear — the rest of the table's header row, all square icon buttons of one size; hover any of them to see its name. Export opens a menu of Excel, CSV and PDF (Export the list). Columns shows or hides characteristics (Show a characteristic as a column); the gear resets the table to what your department is set up to see, or, for an admin, changes it. List / Tiles / Overview is one three-way switch — see the tip below.
- New item — top of the page, its own row above the table, 32px tall and nothing else beside it. Operator and above sees it; a viewer does not.
Rows tinted yellow or red need attention — the Readiness column says why. A click on a row highlights it; click its name, click the row again, or press Enter to open the card (Choose how a row click behaves). The back arrow on the card brings you to this list, to the row you left, highlighted and ready for the ↑ ↓ keys, with your filters intact.
Tip
List / Tiles / Overview is one switch in the table's own header, three icons wide (rows, a grid of squares, a bar chart). The first two flip between the table and the same rows as cards — useful when you are looking for a shape rather than reading numbers. Overview, the third, replaces the rows with a board of widgets — the fleet in numbers (See the section as a board).
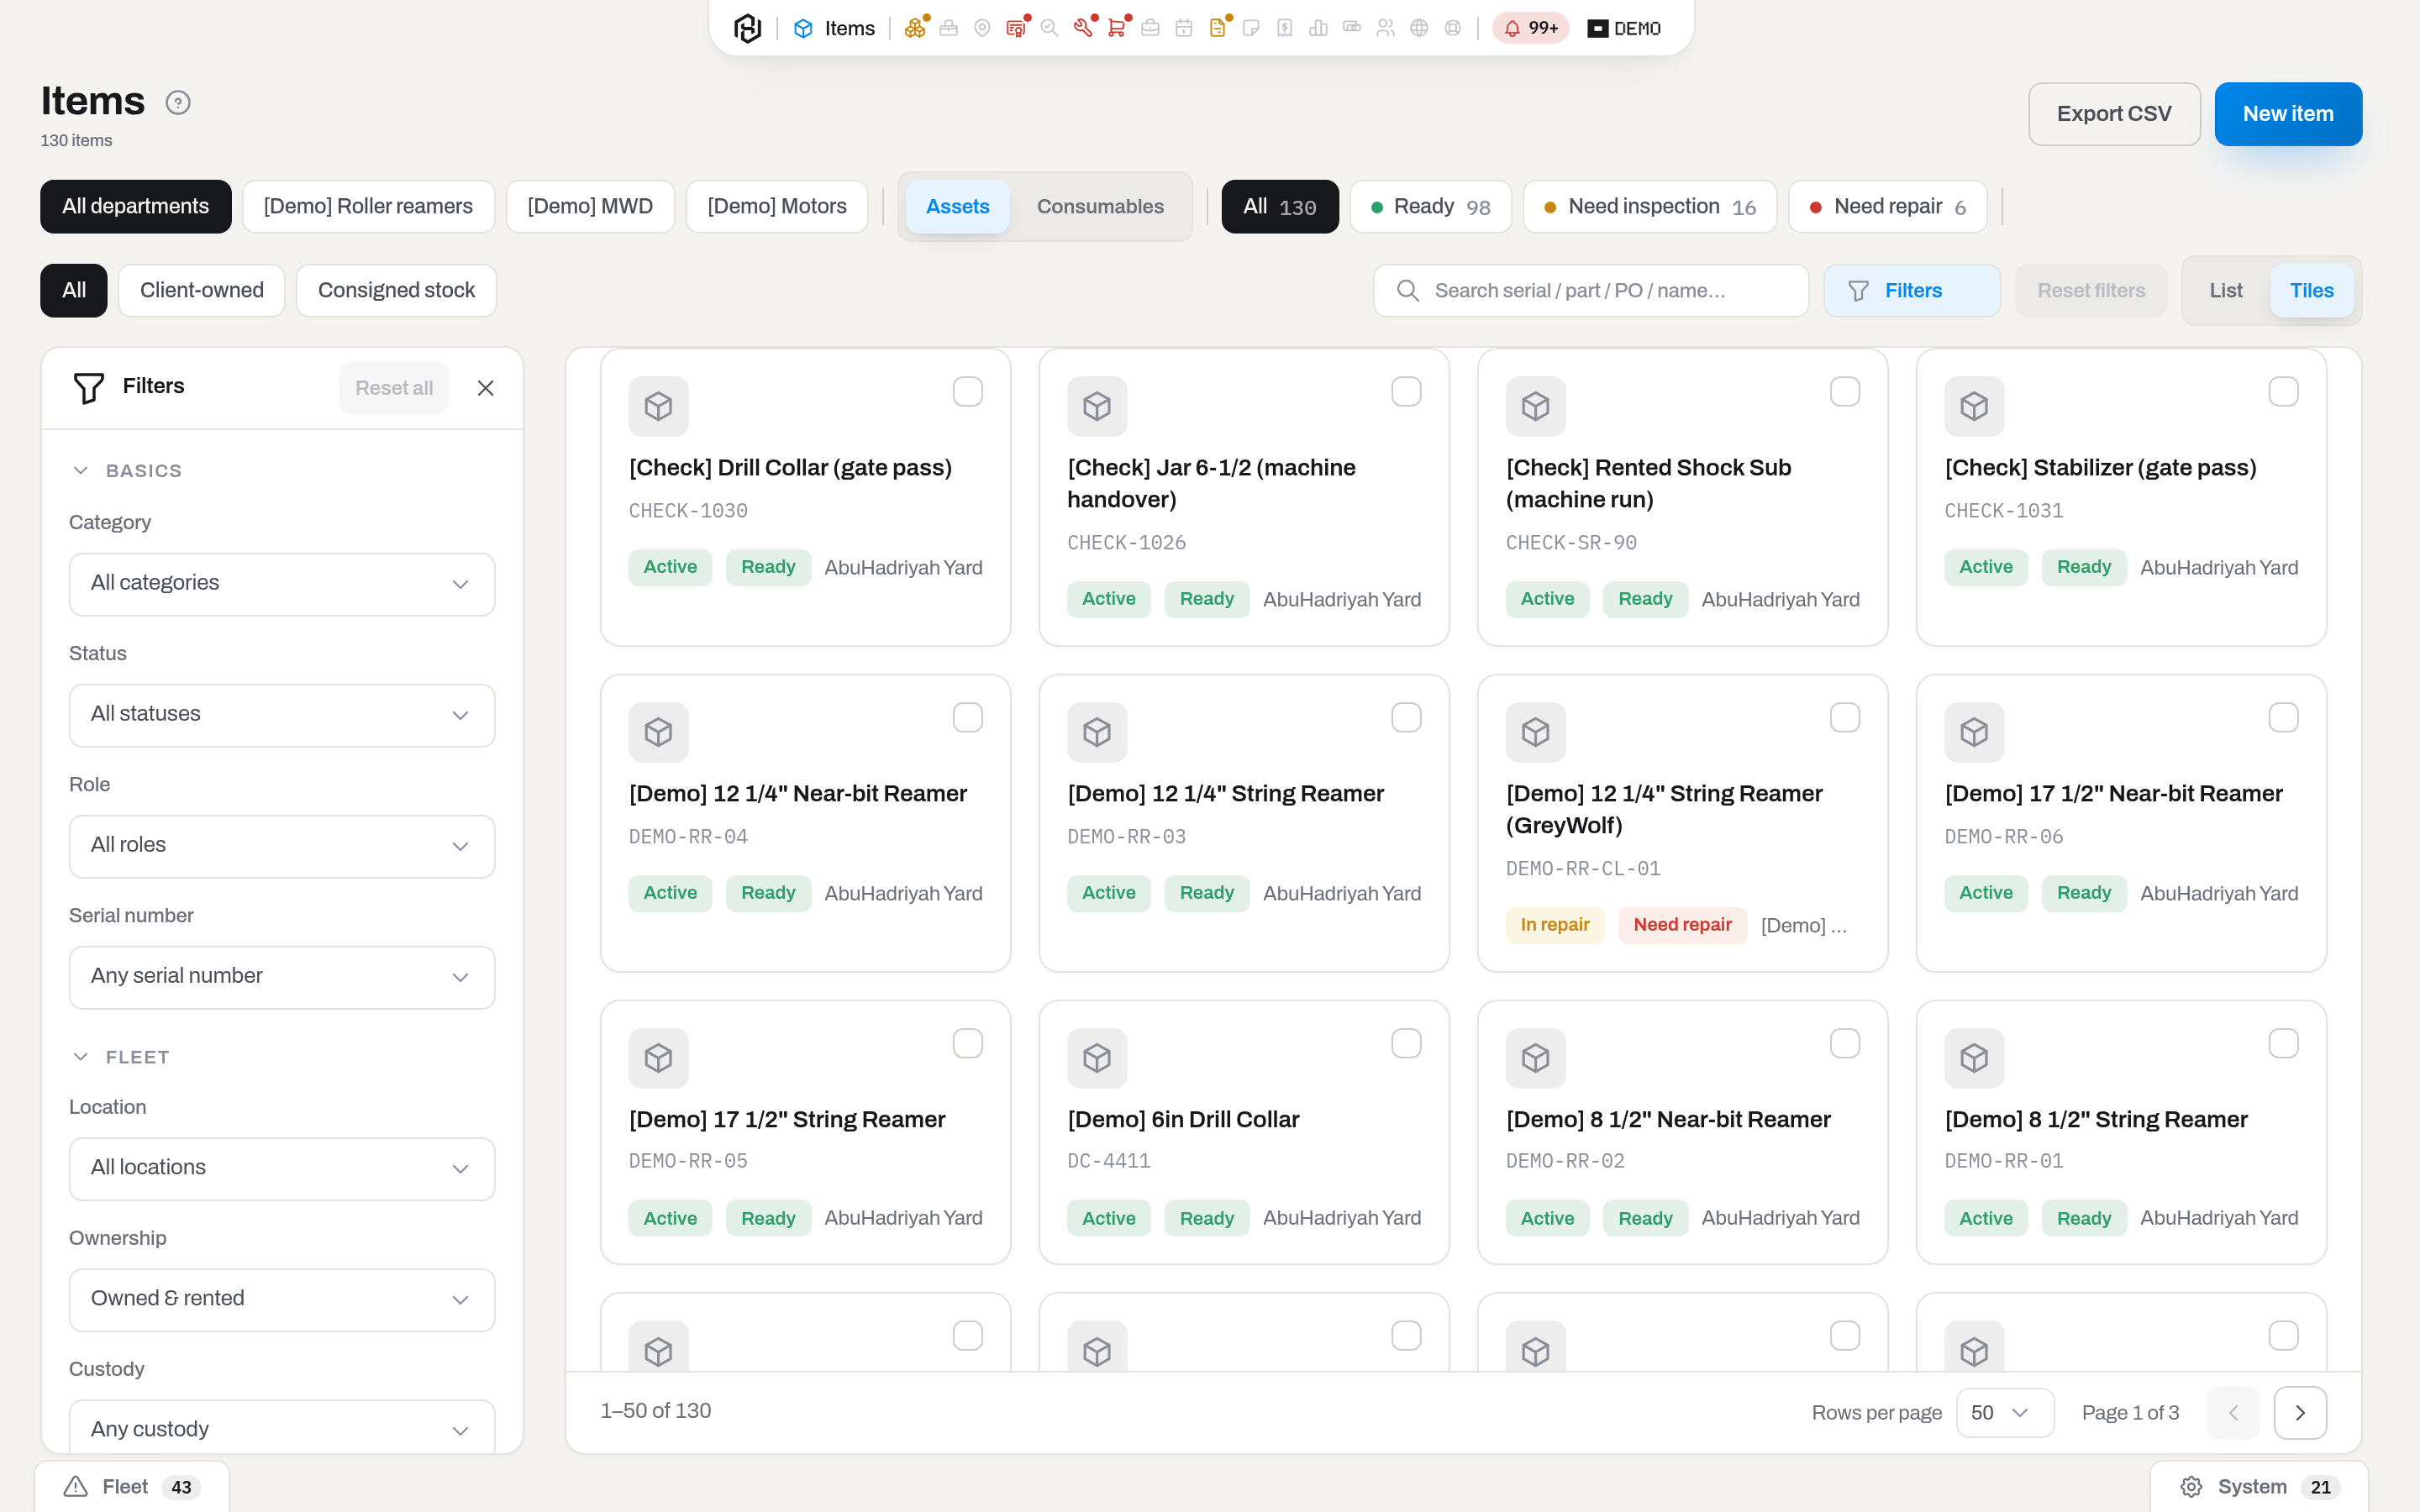
An item with a cover photo shows it across the whole tile, centred, instead of the category icon — set one from Set a cover photo on the item's card. Over the picture sit the name, the serial number right under it, and the location on a line of its own. The strip along the bottom edge is the item's state at a glance: its icon is the status, and a second one — the readiness — appears only when something is off (hover an icon for the word); its colour is the more urgent of the two — green when all is well, amber when something is due, red when the item needs repair or a certificate has lapsed. On a phone the tiles sit two to a row.
A click on a tile lights it the same way a row lights up; click the tile's name to open its card, or click the tile again — see Choose how a row click behaves. The tile you came back from glows along its bottom edge too. The ← → ↑ ↓ keys move the glow across the grid, Enter opens the card and Esc clears it — the same keys as in the list.
Key concepts
Assets and consumables
Counted as answers one question: how do we count this? Either as serialized units — one card per physical unit, with its own location, timeline, certificates, hours and book value — or as a quantity — one card per part number, with quantities per location and no individual history. That is why the two tabs offer different columns and different actions: quantities are moved in Stock, not here.
It is not the same question as Role (what the thing is to the business). A serialized unit can be a spare, and a stock card can be something the accountant treats as capital. Both are normal, and every combination is allowed.
Note
If your own spreadsheet has a column called Type with values like Asset / Inventory / Consumable, that column is our Role, not Counted as. A part number with four serial numbers written into one line is still four serialized units, not a card with a quantity of four.
Changing how something is counted is an action on the card, not a field in the form — see Turn a serialized unit into a stock card and the way back.
Status and readiness are two different things
Status is what a person declared. Readiness is what the system computes from certificates, inspections and repairs — an Active item is not Ready while a certificate has expired or an event of the work cycle owes an inspection. An item that is out of the fleet (Disassembled, Obsolete, Scrap, Lost, Sold) has no readiness at all: the status already says everything.
| Badge | Meaning | What changes it |
|---|---|---|
| Active | In service, can be booked and moved | Change status, on the card or from the selection bar |
| In repair | On a work order | Opening and closing a work order in Maintenance |
| In inspection | Away for certification | Change status |
| Disassembled | Taken apart; the parts live on as their own items | Change status |
| Obsolete / Scrap / Lost / Sold | Out of the fleet; kept for history and for the register | Change status; Sold also asks for the proceeds |
| Readiness | Meaning |
|---|---|
| Ready | None of the below: papers in date, no inspection owed, not in the shop |
| Need inspection | A certificate has expired, the unit is away being certified, or it has worked since its last inspection of that type |
| Need repair | The last inspection came back Fail, or the unit is In repair — do not send it out |
A department is a lens, not a fence
If your workspace has departments — roller reamers, mud motors, MWD — a button showing your department's name sits in the table's own header, right after the search box. Click it to open a menu with All departments and one entry per department; a pin marks the one that is your default. Pick one and the list keeps only the gear of that department: the categories it was given and everything below them.
It narrows what you look at; it does not close anything. All departments brings the whole fleet back for anyone, and a colleague who opens /items without picking one sees the same fleet they saw before departments existed. What a person may open is still decided by their role and their groups — see Roles & access.
The same button sits in Stock, Maintenance, Alerts, Jobs and Dispatch, and they all read the same registry.
One department can be your default. Every one of those lists then opens in it — and the address says so, /items?department=roller-reamers, so the link you copy shows a colleague exactly what you were looking at. All departments steps out to the whole fleet for as long as you keep the tab open; it does not change your default, and the address says that too (/items?department=all). To make the department you are looking at your default, open the menu and click Make this my default; to clear it, go to Account → Profile. Your admin can set it for you as well.
If the department that was your default is removed from the workspace, nothing disappears: the list shows the whole fleet and says so above the rows. Open the menu, pick another department, and make it your default.
Departments are set up by an admin: Set up departments.
Whose it is, and who is holding it
Two questions, two separate answers, and you need both.
Ownership says whose the thing is:
| Ownership | Meaning |
|---|---|
| Owned | Yours. It depreciates, it can go idle, it counts in utilization and in the money reports |
| Rented in | Somebody else's, rented to you — yours to send out, but never on your balance sheet |
| Client-owned | A customer's tool that you keep, service or store. It has an Owner — the company it belongs to |
Custody says who is holding it right now. It is computed, never typed:
| Custody | Meaning |
|---|---|
| On job | Out with a client, against a rig |
| At client site | Sitting on a location that belongs to a customer |
| In our shop | In repair, in inspection, or standing in a workshop or lab |
| At our site | On one of your own locations |
Put the two together and the two arrangements that used to have no name become plain data:
- consignment — Client-owned + At our site: the rig bought the cutter sets, they live on your shelf, and you fit them when the tool comes in;
- reverse consignment — Owned + At client site: your tool, parked at the customer's base between wells.
A client-owned unit is deliberately not part of your fleet: it is never depreciated, never reported as idle, never counted on the utilization board, never listed as missing from your fixed-asset register — and it can only be booked or assigned to a job for its own owner. Everything else works the same: it moves, it logs hours, it carries certificates, it goes on work orders — and a work order on it is billed to its owner unless you say otherwise.
The quick views above the list get you there in one click: Client-owned for everything that is not yours, Consigned stock for the part of it that is standing on your own shelf.
Note
A location only has a Client if it is of type Client site. That is what tells a customer's warehouse from your own yard — see Locations.
Quick view: Customer tools
Where: the Customer tools quick view, in the Quick views group of the Filters panel.
Everything client-owned that is physically in your shop right now — in repair, in inspection, or simply sitting on a workshop location. It is the same two questions as above (Whose it is), narrowed to one combination: Client-owned ownership and In our shop custody.
The view adds four columns you would otherwise have to bring in by hand:
| Column | What it says |
|---|---|
| Owner | The company the unit belongs to |
| In shop, days | Whole days since the open work order on it was received — blank if there is no open work order |
| Work order | Its number, linking to the work order, with the current step underneath |
| Client PO | The client's own reference for the job, taken from the work order |
Result: the address carries the filters behind the chip (/items?ownership=CLIENT_OWNED&custody=IN_SHOP), so the link opens the same list for a colleague. It is a view, not a separate setting — it clears the same way any other filter does.
Components: what stands inside an assembly
Some tools are made of serialized parts that come off and go back on: cutter sets in a reamer body, a rotor and a stator in a mud motor. The system keeps that as a period, not as a snapshot — from the day the part went in to the day it came off.
That is the whole point. A cutter set lives through nine runs in different bodies, and the question the workshop asks is never "what is in this body" but "what has been in it, and where did this set wear out".
An assembly is a category matter, not a per-unit one: a category whose Composition is Assembly takes components; a box (Monolithic) takes contents. A box you fill with Move; an assembly you fill with Install.
What each row of the Components card carries — the part on top, the rest in the line under it, and what is left of its life as a bar on the right:
| Part of the row | What it says |
|---|---|
| Component | The part — click through to its own card |
| Slot | Which seat of the assembly it occupies, if the type declares seats |
| Installed | From when, and until when if it has come off |
| Worn here | Hours and KREV the part accumulated in this assembly — not over its whole life |
| Remaining | What is left of its life budget, or the reason it came off — and, when a work order took it off, that order's number linking to it |
Usage cascades down. One entry of hours on the body is one entry for every part standing in it at that moment: each part gets its own Usage row, its own hours and its own KREV. Nobody types the same run four times, and each cutter set still spends its own 200 hours. A part can be set to not wear with the assembly when you install it.
Backdating works properly. Log a run from last month and the hours go to the parts that were in the body then, not to the ones in it today. Take that entry back and the same parts get their life back.
Note
Installing a part never changes who owns it. A customer's cutter set fitted into your body stays the customer's — see Whose it is.
Quick view: Cutters
Where: the Cutters quick view, in the Quick views group of the Filters panel.
Every component — a category built to fit into an assembly's slots (Components above), whether or not one happens to be installed right now — pulled out of the general list and sorted by what runs out first. At Sawafi that is cutter sets, and the name follows.
The view opens sorted by Life left, lowest first, and adds four columns:
| Column | What it says |
|---|---|
| Life left | The remaining budget on the measure closest to zero — a dash if the category carries no life budget |
| Installed in | The assembly it currently stands in, linking to that unit — a dash if it is off, sitting in stock |
| Custody | Where it physically is right now |
| Owner | Who it belongs to, blank if it is yours |
Result: the address carries the filter and the sort (/items?is_component=true), so the link opens the same list, in the same order, for a colleague. It is a view, like Customer tools above, and it clears the same way any other filter does.
KREV: the fourth measure of wear
Hours say how long a tool turned; KREV — thousands of cartridge revolutions — says how hard. An hour at 60 RPM is not the hour at 120 RPM, and a cutter set is worn out by revolutions.
You never type KREV. You type RPM on the usage form and the server works it out from the hours, the revolutions and the tool's gear ratio, always with the same formula. If you leave RPM empty it falls back to the Default RPM on the tool's specification and marks the number as an estimate. If it has neither, no KREV is recorded at all — an invented zero would say "there is life left" exactly when there is not.
KREV sits beside hours, runs and calendar everywhere they appear: life budgets, service plans, remaining life and the alert queue.
A serial number we issued ourselves
Sometimes the number on the paperwork is already taken. A workshop that hits this writes the unit down with a suffix — OSCA388590 becomes OSCA388590-1 — and reads the real number off the iron later. The card is real; only its number is a placeholder.
The system keeps that distinction visible instead of letting it fade. A card whose number was made up carries a Provisional S/N badge on its header, says (provisional) under its name in the list, and can be pulled out of the fleet at any time with Filters → Basics → Serial number → Provisional only. Hover the badge to read why the number was issued — the import writes that line, and so can you.
Nothing else about the card is special: it is booked, moved, inspected, invoiced and depreciated like any other unit, and the register line it answers to is already attached to it.
Replacing the number. Open the card, press Edit, and type the number you read off the unit. The The serial number is provisional tick clears itself as you type, the badge disappears when you save, and the made-up number moves into Former numbers — the papers printed during that month still find the card by it. If the shop had to invent a second number instead of a real one, leave the tick on and say why.
Note
A provisional number is not the same as a renumbered unit. Renumbering means the unit legitimately changed identity; a provisional number means nobody has looked at the iron yet. Both keep their history in Former numbers.
Asset tag: your own number for a unit
The asset tag is the number you give a unit, kept apart from the serial number stamped on the iron. It shows on the card header as Tag next to S/N, the search box finds a unit by it, and no two units in your workspace can share one.
Most tags are typed in by hand: open the card, press Edit and fill Asset tag. The system issues a tag itself in one case only — when an opening-balance import brings in a tool that has no serial number, or more units than the source listed serials for. Such a tag looks like T-000123, is marked (generated) on the header, and the unit's history records that it was issued.
A unit that still needs someone to go and look at it carries a badge next to its name:
- Tag not attached — the system issued the tag and no label is on the unit yet. Print the label, attach it, then open Edit and tick Label attached to the unit. If the unit already wears a label with another number, type that number into Asset tag: the badge and the (generated) mark clear when you save.
- Serial to confirm — the unit came in without a serial number. Read it off the unit and enter it under Serial number; the badge clears when you save.
To collect the round in one list, open Items and pick Filters → Basics → Identity check → Tag not attached (or Serial to confirm): the rows are exactly the units that still wait for someone with a label printer or a notebook.
Role: what the thing is to the business
Capital equipment, Spare & tooling, Consumed material or Goods for sale. Class is how it is accounted for; role is what it is to the business — a filter and a column, not a permission. The one exception: Goods for sale cannot be booked onto a job — it is stock waiting to be sold, not a unit of fleet, and it moves through a sale line or the sales book instead.
How much of it is on the shelf
The Consumables tab carries an On hand column, and it is the one number a stock card is usually opened for. It adds up every storage location the card has — the lab, the yard, the rig container — so it answers do we still have any to give out, not where. For the where, and for every movement behind the number, click through to Stock.
Retired cards stay out of the way. A consumable card is never deleted: when it is no longer needed, it is retired as Obsolete and keeps its history. The Consumables tab therefore shows only Active cards until you say otherwise: pick Obsolete or All statuses in the Status filter to see the retired ones. Either choice shows as a filter chip; clearing the chip returns to Active only.
What is already in a kit is not counted here. Handing a consumable to a kit is the moment it is spent: the cost leaves the shelf, and the quantity lives on inside the box so you can still tell whether the kit is complete. Counting it as stock is how 312 in the lab and 50 in each of two boxes turns into a shelf of 412 that nobody can find. It has not vanished, though — where a card has some, a muted +50 stands next to the number (hover it for the full wording), and the card itself lists it under In kits, below the shelves and without a price.
Two answers look alike and are not: 0 means the card has a stock line and the shelf is empty; an em dash means the card has no stock line in any location, which is what a catalogue entry looks like — something you keep in the register to reorder, that has never been on your shelf. A card that only ever lived in kits shows an em dash too, and that is the honest answer: there is nothing to give out. The number turns red when any shelf of that card is under its minimum level.
Sorting by the column is done by the server, so On hand ascending really does bring the emptiest cards of the whole register to the top, not just of the page you are looking at.
The unit it is counted in
Every card carries a Unit — pcs, m, L, kg, set, roll, whatever the yard actually says. It is free text on purpose: there is no oilfield-wide list of units, and a fixed one would force other on the first reel of cable. The field opens to the units already used on your own cards — pick one, or type a new one and press Enter (or the Use "…" row) — so the same thing does not become pcs on one card and EA on the next. A new consumable starts at pcs; a serialized asset starts empty — one unit is the card, and printing 1 pcs on every line of an equipment order helps nobody.
The card is the only place this is decided. When a line of a purchase request, an order or a receipt points at a card, it shows that card's unit and the field is read-only; only a line typed as free text — something the catalogue does not know yet — carries a unit of its own. Change the unit on the card and every screen follows it, Stock and the printed order included.
How to
Find an item
Who: Viewer and above.
- Pick the tab — Assets or Consumables.
- Type into the search box, or use the Filters panel on the left to narrow by Category, Status, Role, Serial number (provisional ones), Identity check (tag or serial to check on the unit), Location, Ownership, Assignment, and by any characteristic your categories declare — see Filter by a characteristic. The rows beside the panel follow every pick, so you never filter blind.
- Click a column header to sort by it — on the Consumables tab that includes On hand, the quantity across all shelves (what the number means); use Columns to bring in Serial, Asset ID, Mfg. no., Code, Model, Own or any characteristic — all of them are hidden by default. To see which box each unit lies in, and to list what is inside one, see See which box an item is in.
What the search box matches. Every number the unit carries on paper — the serial number (including the numbers it used to carry before it was renumbered), the part number, the asset ID, the manufacturer's number, the code and the PO number it was bought on — plus the name, the model and the description. Names match from the start of a word, so you need not finish it: stabil finds the stabilizers, re finds the reamers. On the Consumables tab the PO number is not on the card but on the receipt, so a stock card comes up for any purchase order it was ever received on. Part of a number is enough: 3553 finds the unit bought on PO-3553-8. A size is part of the name, so type it the way it is written on the tool: 8 1/2 brings up the 8 1/2" cutter sets and reamers, and a decimal size such as 1.875 works the same way. A size written with a hyphen and one written with a space are the same size: 8 1/2 and 8-1/2 both find the 8 1/2" reamer and the stabilizer named 8-1/2. So it does not matter which paper the number came from — a Sage register, a purchase order, a request from the shop — the same card comes up.
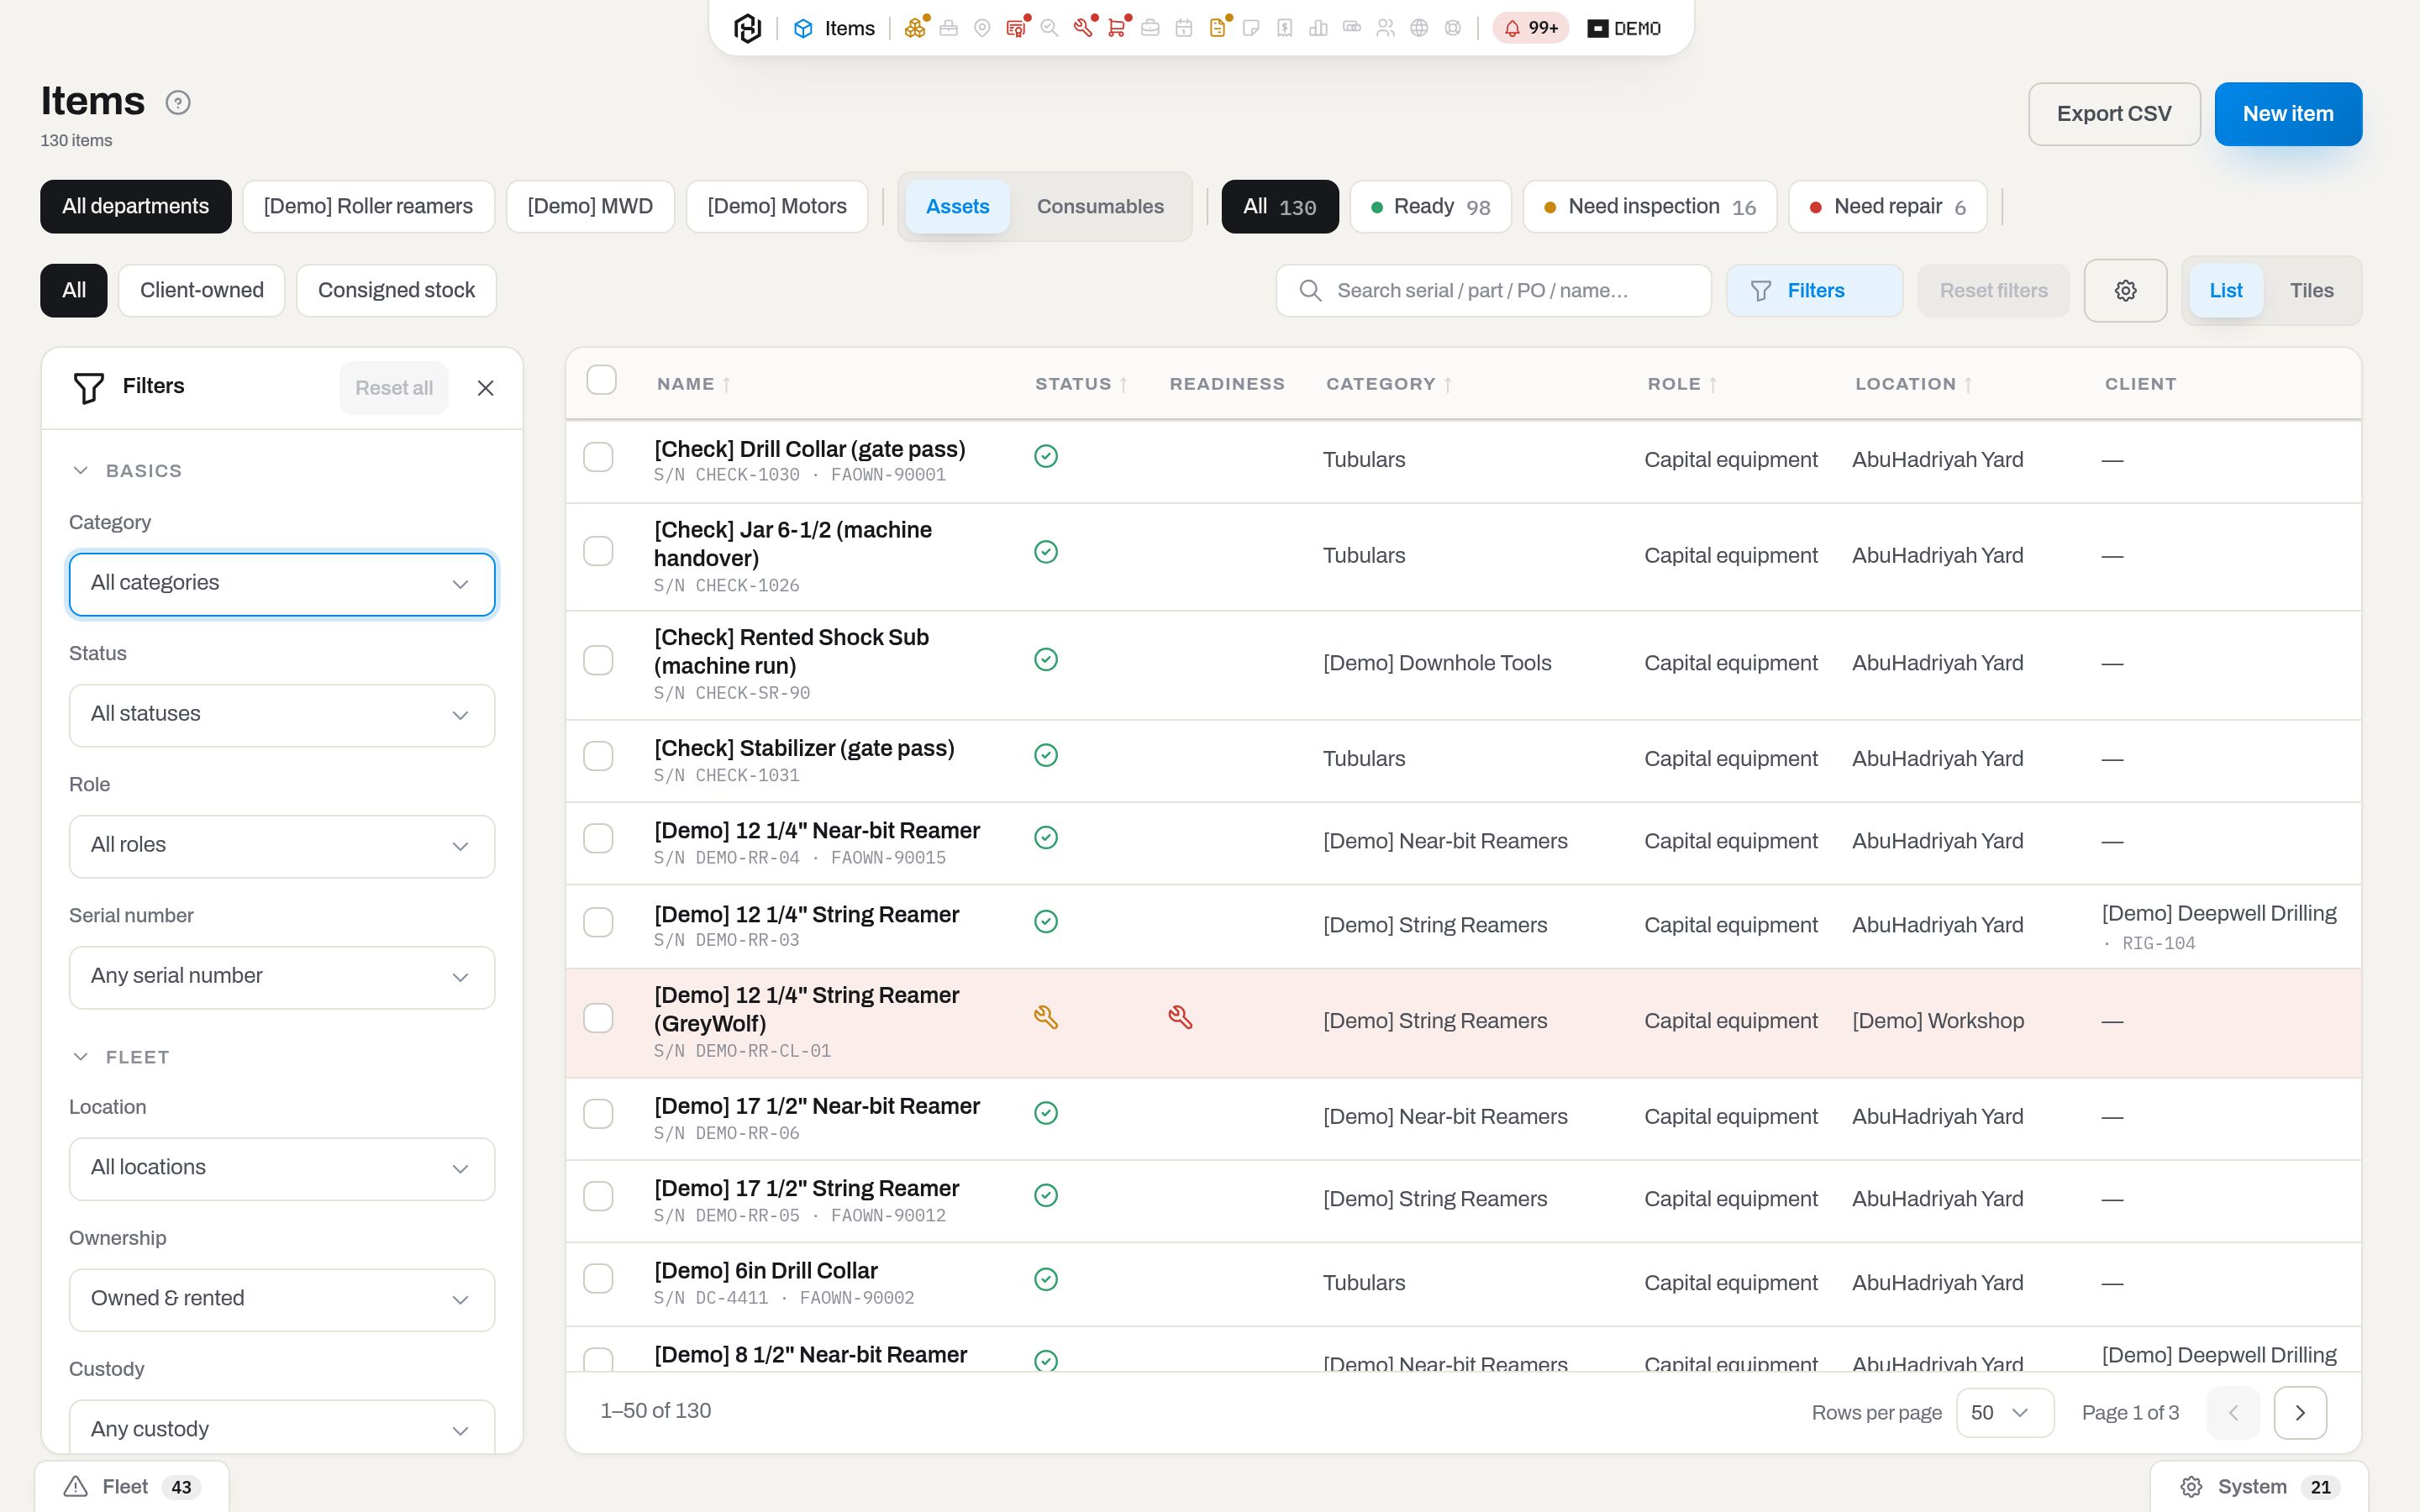
Result: the address bar carries the filters, so the list can be bookmarked and shared; the footer counts the rows. Opening a card and closing it returns you to the same page and the same row.
If it fails: No items match the filters. — click Reset all above the table; a stale Location filter left over from the Assets tab is the usual reason. A filter field you remember and cannot find is a different story — your department may open on a view without it, and All departments shows the full screen (Narrow the list to your department).
Show or hide the filters panel
Who: Viewer and above.
- Click the handle, the thin 22px strip on the rail's own outer edge — the panel slides back under the list and only the handle stays out. It carries a single chevron and nothing else: no icon, no count, in either state. The chevron points to where the panel will go — → while it is out, ← once it is tucked away.
- Click the handle again to slide the panel back out. Hovering does nothing — the panel moves only when you click. From the keyboard, Tab to the handle and press Enter or Space.
- Below 1200px wide the panel has no strip: it is an overlay, opened by the Filters button, first in the table's header, and closed by the × at its top, the same button, a click outside it, or Esc. On a phone it slides over the list at up to 360px wide, and the header's tools wrap onto a second row instead of being cut off.
Result: the panel stays the way you left it while you work in the list. Every new visit to Items starts with it tucked away, so the table gets the full width; the conditions you set are still in the address and in the tray.
Change or remove an active filter from the tray
Who: Viewer and above.
- Set any condition — from the Filters rail, a quick view, or a toolbar select — and its pill appears at the end of the tray that rides out above the table (pills keep the order you set them in, not the order of the rail). The tray is hidden and the list sits higher when nothing is set.
- To change a condition without opening the rail, click the text of its pill — a menu of that field's other values opens and picking one updates the pill where it stands.
- To drop just that one condition, click the × on its pill. To drop everything at once, click Reset all at the right of the tray — the address bar loses every filter parameter it carried.
- A characteristic (Size, OD…) is its own pill with two cells, from and to: click a cell to select its number, type, and Enter accepts while Esc puts back what was there before; Tab moves to the other cell. An empty cell shows a pale
minormax; a field with neither bound reads Size (in): not filled. Clear both bounds and the pill leaves the tray. - More pills than the tray is wide: scroll it sideways with the mouse wheel or by dragging the strip itself (the cursor turns to a hand). A soft fade sits over whichever edge still has pills hidden past it, and a newly added pill scrolls itself into view.
Result: every pill mirrors the exact same condition the Filters rail shows, both ways — clear one in the tray and its checkbox or field in the rail clears too, and the other way round.
See which box an item is in
Who: Viewer and above.
The list answers where the thing lies, so you no longer have to open a card to find out.
- Open Columns and tick In. On a fleet that keeps kit boxes it is already on.
- The column reads top down — Kit-45 · Box 3-45: the box number first, because that is what people ask for, and the compartment after it. An item that sits straight in the box shows the box alone; an item on a shelf shows — and its place is in the Location column instead.
- Click the box number to open its kit card; closing it brings you back to the same page and the same row.
- To go the other way — what is in this box — open Filters, and under Fleet pick the box in Container. The list then shows everything inside it, including whatever lies in its compartments, and the address bar carries the pick, so the answer can be bookmarked or sent to the shop.
Result: a barrel wrench in Kit-45 is told apart from the identical one on the MWD Lab shelf without opening either card.
Note
In is not the Kit type characteristic. Kit type describes the box itself — MWD kit, sub basket, tool box — and is empty for everything that is not a box. The kit number is what the In column shows.
If it fails: the Container filter is on the Assets tab only. A consumable's boxes are not there — see See how much of a consumable sits in boxes below (#in-boxes). The list holds boxes only — an assembly (a reamer, a motor) is not in it: what sits inside an assembly is on its card, under Components. A box that is missing from the list is not marked as one: open its card and tick Is a container (see Kits).
See how much of a consumable sits in boxes
Who: Viewer and above.
A stock card is one line — Mud Seal, 6" — but the shelf behind it can be split: some in Kit-45, some in Kit-53, the rest on the shelf. This is where that split shows up.
- Open the Consumables tab. The In boxes column reads 2 boxes for a part sitting in two of them, and — for one that has none.
- Click the count to expand it: one line per box, the box number first and the compartment after it, same order as See which box an item is in above. The quantity sits at the end of the line, right-aligned. Click the box number to open its kit card.
- To see only what is split into boxes, or only what never left the shelf, open Filters, and under Fleet pick In boxes or Only on the shelf in the In boxes field.
Result: the seals in Kit-45 and Kit-53 are told apart from the shelf without opening 93 cards.
Note
A box whose line reads zero is not counted — it is the trace of a hand-out, not an address. The quantities you see in boxes are the same number as the muted +N next to On hand: spent from the shelf, still visible, still somewhere.
Show a characteristic as a column
Who: Viewer and above.
- Open Columns, in the table's own header row.
- Tick the characteristics you want to read in the table — OD, Length, Connections, whatever your categories declare. The unit is part of the heading: Length (ft).
- The list offers the fields your own categories declare. Everything else the workspace has — the fields of other departments — sits behind Show all fields at the bottom.
- Click the new column's heading to sort the fleet by it.
Result: the column shows the value the way it was typed — 6 1/2", 171.45 mm, 30' 5 3/4" — and hovering it shows the same value in the unit of the field. Sorting compares the value, not the text: a diameter typed in millimetres lands between two typed in inches, and a count of 10 comes after 9 rather than before it. Your choice of columns is remembered for this table only, and columns released later still appear on their own.
Which characteristics the list offers first follows the lens you are working in (see Narrow the list to your department): a workspace can declare dozens of fields, and a department usually works with a handful. Switch the lens to the whole fleet and every field is offered directly. A field you ticked yourself is never lost — change the lens and back, and it is still ticked.
If it fails: the Columns list has no characteristics at all, not even under Show all fields — no category in this workspace declares a specification schema yet. Add one in Settings → Catalogs → Categories (see Catalogs); a schema declared on a parent category is inherited by everything below it.
Filter by a characteristic
Who: Viewer and above.
- In the Filters panel on the left, unfold Characteristics and pick a field under Add a characteristic. Your department's fields are listed first; the rest of the workspace is grouped under Other departments.
- For a measurement or a number, type the bounds into from and to. A measurement accepts field notation —
6in,6 1/2,25ft,350 bar— and a bare number is read in the unit of the field. - For text, type a fragment; for a list, pick a value; for a yes/no field, pick Yes or No.
- Tick Not filled to find the items where the field is still empty. It replaces the bounds — a field cannot be both empty and above a threshold.
- Use the × next to a condition to drop it, or Reset all to clear the panel.
Result: the address bar carries the condition (?attr.od__gte=6in), so the filtered list can be bookmarked and shared. Comparison runs on the value, so OD from 6in finds the unit typed as 6 1/2" and the one typed as 171.45 mm alike. A list field offers every value declared anywhere in this workspace, so items in a category with its own wording are found too. The count in the filters panel's header includes the characteristics, and Export and Select all {count} matching use exactly the same conditions.
If it fails: an empty list where you expected rows — a measurement filter matches only items where a number could be read. A value kept as text (slick in a diameter field) counts as not filled, and so does an item whose category does not declare that field at all.
Set a characteristic on many items
Who: Operator and above.
- Select the rows — or turn on Select all {count} matching.
- In the selection bar, under Set, open Characteristic and pick the field — your department's fields first, the rest under Other departments.
- Type the value the same way you would on the item card, and click Save.
- Leave the value empty to clear that characteristic on every selected item.
Result: the dialog reports {done} done, {failed} failed. Each item reads the value through its own category: a measurement is stored in the unit that category declares — one entry of 31 ft is correct for a string of pipe and for a coiled tubing reel measured in metres — a number is stored as a number, and Yes / No as a real flag the item card shows ticked or clear.
If it fails: Unknown attribute keys on a row — that item's category does not declare the field, so it is left untouched and stays selected. Either move it to the right category or declare the field on a parent category, where everything below inherits it. … is not one of … on a row — the field is a list, and that item's own category does not offer the value you picked: the list in the dialog covers the whole workspace, while each item accepts only what its own category declares.
Narrow the list to your department
Who: Viewer and above.
- Click the department button in the table's header, right after the search box, and pick a department from the menu — the pinned one is the one you open in by default.
- Filter, search and sort as usual; everything works inside the lens.
- Open the menu again and click Make this my default to open in this department from now on — in Items, Stock, Maintenance, Alerts, Jobs and Dispatch alike.
- Pick All departments from the menu to step back out to the whole fleet.
Result: the address carries the lens (/items?department=roller-reamers), so the link opens the same view for a colleague. The footer, the quick-view counts and Select all N matching all count what the lens shows, not the whole fleet. All departments is in the address as well (/items?department=all) — it is a view of the whole fleet, not a lens that was forgotten.
If it fails: Unknown department — the department was removed from the workspace after your link was saved. Open the menu and pick All departments, or one that is still there. If the removed one was your default, the list says so above the rows and shows the whole fleet until you choose another.
Note
If a button, filter field or column you expect on Items is missing, it may not be broken — your admin may have set a view for your department, so that it opens on what that department actually uses. Switch to All departments to confirm: that lens always shows the full, factory screen. What a department sees is changed by an admin: Set a view for a department.
See the section as a board
Who: Viewer and above.
Overview, the third icon of the List / Tiles / Overview switch in the table's header, swaps the rows for a board of widgets — the fleet in numbers, and every number a link back into the list or into the section that owns it. The list is still the section: Overview is a view you switch into, and Items opens on List. The board counts assets only; consumables live in Stock.
- Click Overview in the switch. Filters, search and columns belong to the rows, so Overview replaces them with the board — nothing else in the page changes.
- Read the board. The department lens applies: each number is counted inside the department you have chosen, and a link from a widget opens the list narrowed to the same department.
- Click List or Tiles in the same switch to go back to the rows, on whichever of the two you left them.
| Widget | Shows | Links to |
|---|---|---|
| Items by category | The largest categories in the lens, each with its count | The list, filtered to that category |
| Items by status | How many units are Active, In repair, In inspection and so on | The list, filtered to that status |
| Certificates | Expired and expiring certificates, and the first ones that are burning | Compliance |
| In repair and inspection | Units in the workshop, and how many work orders are open | Maintenance |
| Recently added | The last units put on the books | The unit's card |
| On rent and in the field | How many units are with clients, and which clients hold the most | The list, filtered to assigned units |
A widget you have no right to is neither on the board nor on offer: Certificates needs Compliance, In repair and inspection needs Maintenance. The board is yours to arrange — drag by the header, resize or remove through the header menu, bring back through Add widget — exactly as on Overview, and the arrangement is saved for you and follows you to another computer. The board you start from is the department's: an admin can set the order and sizes a department opens the board with (Set a view for a department), and Reset to department layout brings you back to it — your own arrangement is cleared, the department's stays.
Result: the address carries the view (/items?view=overview), so the link opens the board for a colleague too, with the same department lens.
Add or remove a widget on the board
Who: Viewer and above.
- To remove one: open its header menu (the ⋮ next to the drag handle) and choose Remove from board.
- To bring one back: click Add widget above the board, find it in the list and click Add.
Result: the widget leaves or joins the board right away, and the change is saved. The board of Items is its own: removing a widget here does not touch the board on Overview, and Reset board clears only this section's arrangement.
Add an item
Who: Operator and above.
- Click New item (top right).
- Choose Counted as — Serialized units — a card per unit or Quantity — a card per part number. Picking a Category switches it to whatever that category normally is. On an existing item the field is read-only: see Turn a serialized unit into a stock card.
- Fill in Name (required) and Category (required); for an asset also Location (required).
- Add what you know: Code, Serial no., Part no., Asset ID, Manufacturer's number, Manufacturer, Model, Unit (see The unit it is counted in), Acquisition cost and its currency, Acquired at, PO no., Description, Notes.
- If the unit is rented from someone, set Ownership to Rented in and fill in Vendor and Rental rate.
- If the category carries a specification schema, fill in the Attributes — {category} block; lengths and diameters accept field notation (
30' 5 3/4") and are converted for you. - Click Create item.
Category, Location, Owner and Vendor search as you type: type a few letters of the name instead of scrolling the whole list. The same goes for the box, the owner and the client in Move, Change ownership and Assign.
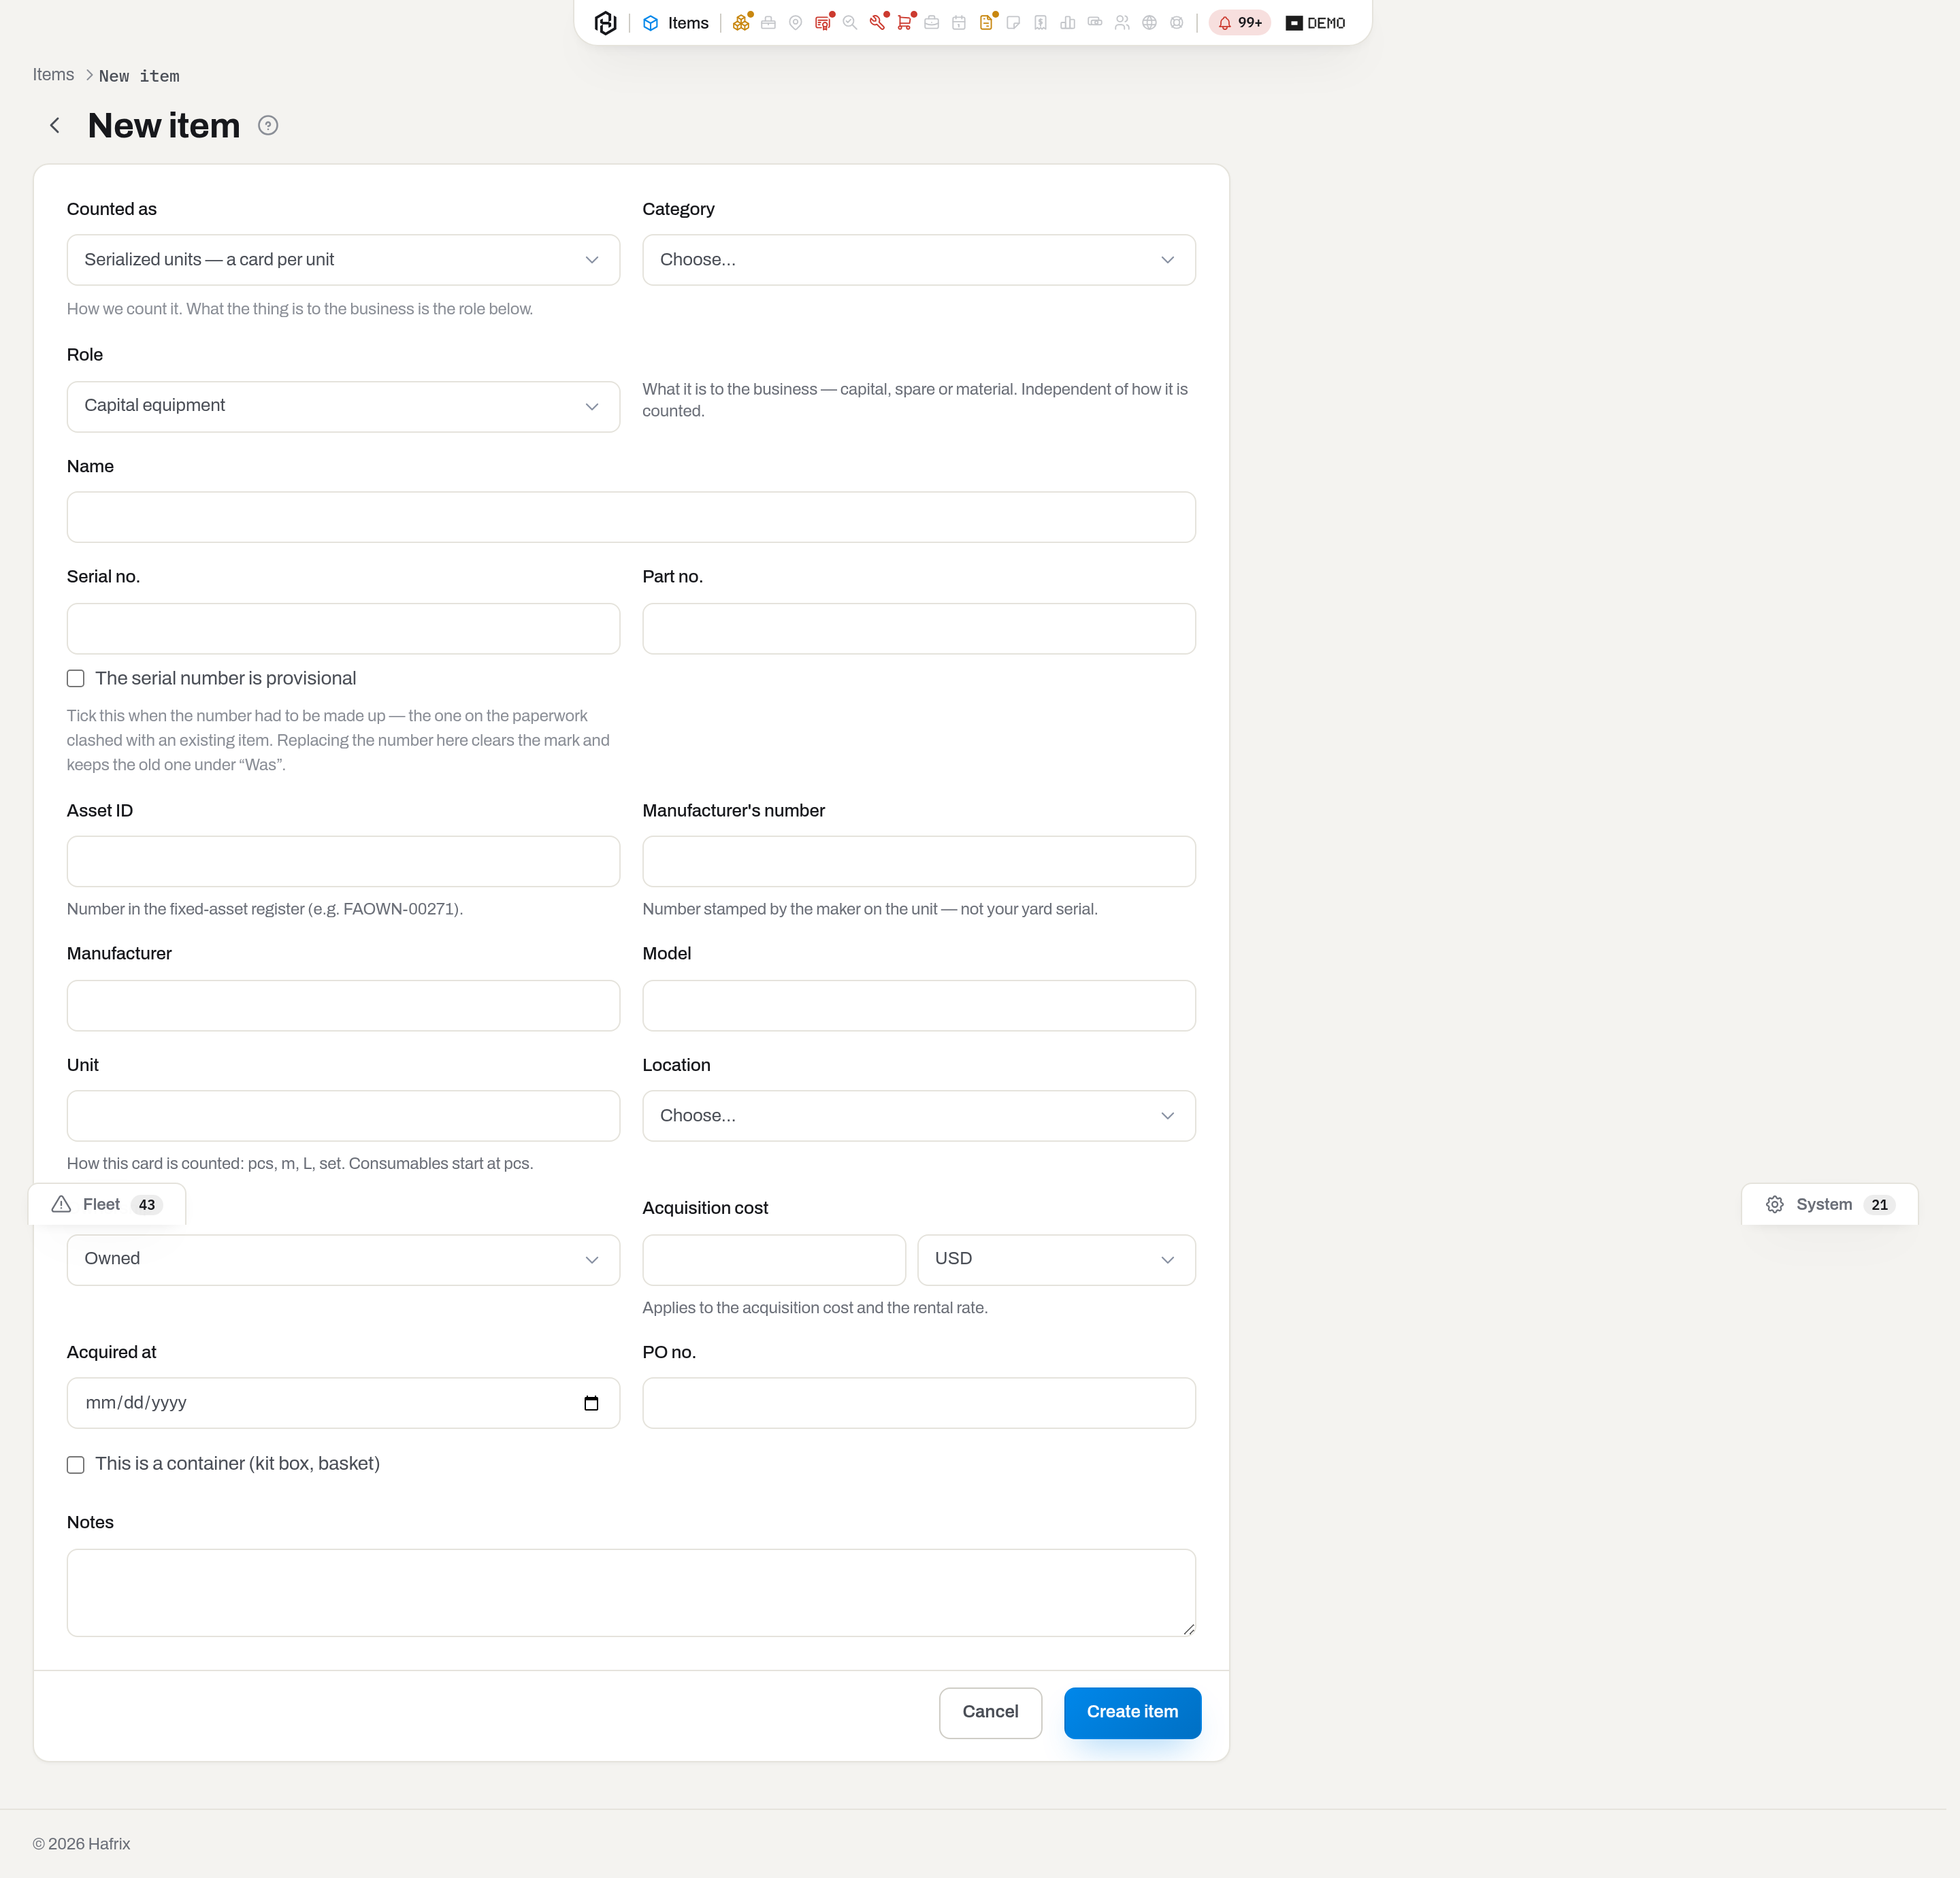
Result: the item is created and its card opens. It appears in the list with status Active, and its Activity timeline starts with a Created row.
If it fails: Requires tenant role 'operator' or higher — ask an admin for the role. A red field means a required value is missing; a serial number that already exists in the fleet is refused — search for it first, it is probably already registered.
Edit an item
Who: Operator and above.
- Open the item card and click Edit.
- Change what you need and click Save changes.
Result: a toast confirms the save; the list shows the new values and the Updated column shows you and the time.
If it fails: the Location field is disabled and shows a container name — the unit is inside a kit box, so move it with Move instead of editing.
Work on many items at once
Who: Operator and above. A viewer has no checkboxes.
- Tick the rows you need. A bar appears at the bottom with the count.
- To take the whole result of your filters rather than the visible page, click Select all {count} matching in that bar. The dialog title then names the whole result — Assign 512 items — not the rows ticked on the page, so read that number before you confirm.
- The bar follows the same rule as the item card: Set names the fact you change, Add a record names the record you add.
- Set → Status lists the statuses; Location — Move, Remove from assembly; Customer / rig — Assign, Reserve for a job, Return; Characteristic lists the fields. Picking a row opens the usual dialog with that choice already made.
- Add a record → Log usage, Note, Inspection, Work orders.
- Print → Print labels, Print reports; Export stands next to it, with the same Excel / CSV / PDF menu as the header. Nothing is hidden under a "more" button: every action sits under the fact or the record it belongs to.

Result: each item is processed on its own, and the dialog reports {done} done, {failed} failed. Rows that failed stay selected, so you can fix the reason and repeat.
If it fails: Nothing done — {count} rows failed — read the reason next to a row: an item already on a rig cannot be assigned again, one that has left the fleet cannot be booked. On the Consumables tab Set offers only Status and Characteristic, Add a record only Note, plus printing and export — quantities move in Stock. Some rows are hidden while Select all matching is on (Reserve for a job, Inspection, Work orders, Print), because they need a fixed, named set. Rows that lead into another section — jobs, compliance, maintenance — appear only when your role may act there.
Move items to a location or a box
Who: Operator and above.
- Select the items and click Move in the selection bar.
- Pick a Destination location — or Into container, to put the units inside a kit box or a basket. The list holds boxes only — an assembly takes its parts through Install on its own card, not through Move. One or the other, never both: picking one clears the other, and the Move button stays disabled until one is chosen.
- Click Move.
Parts that are fitted into an assembly are greyed out in the list with Installed in an assembly — the dialog tells you before you send, not after. They stay selected: take them off the assembly instead (see Take a part off an assembly) and the rest of the move goes through as it is. With Select all matching on, only the rows you can see are greyed out, while the move itself covers the whole filter — the dialog cannot colour what it has not loaded, so read the {done} done, {failed} failed count as the real answer.
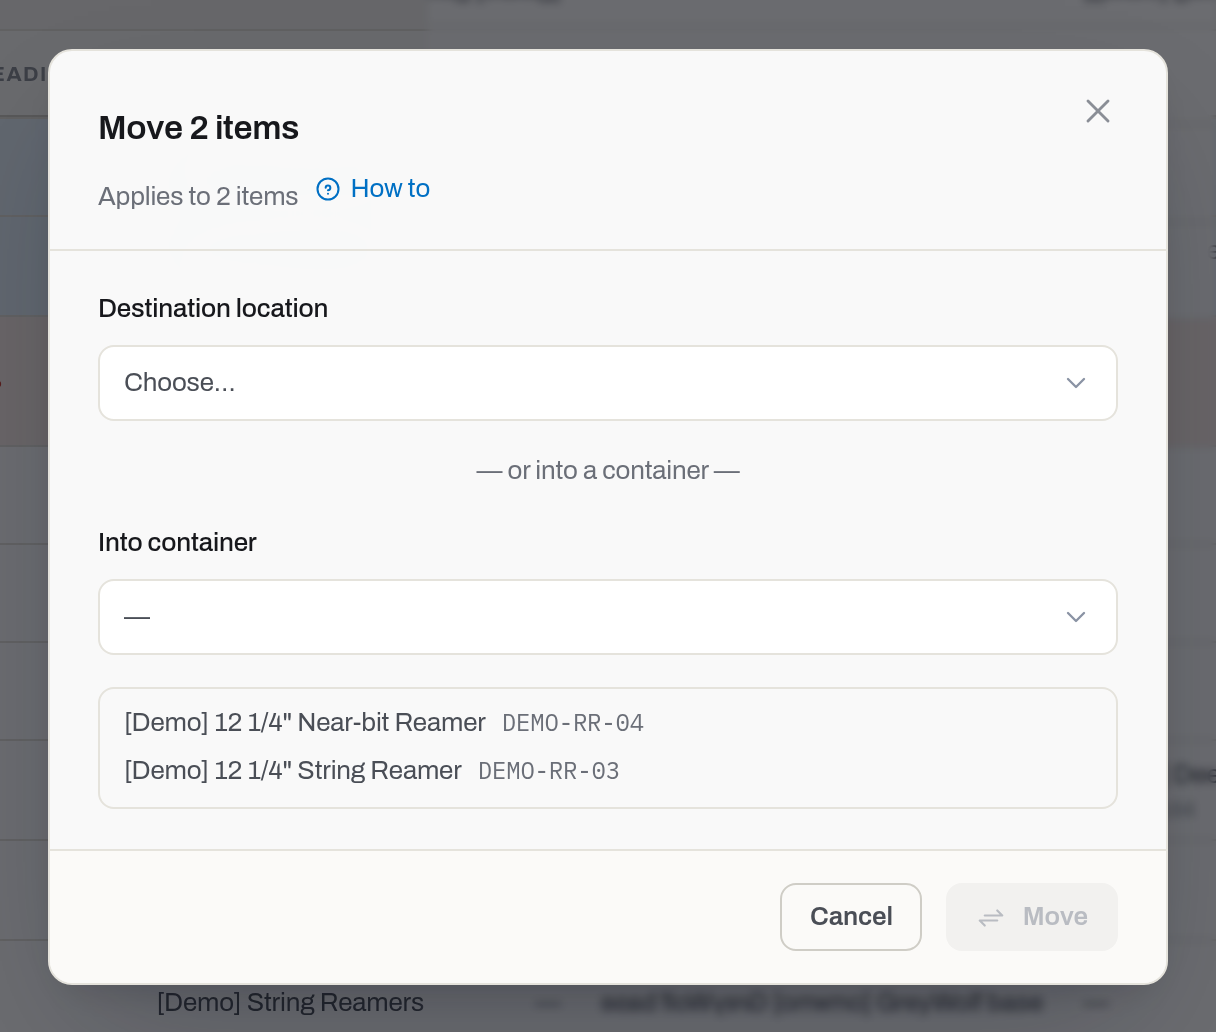
Result: the Location column shows the new place — or, for a box, Inside on the card names it — each item's timeline gets a Moved row, and a toast confirms the save. Units put into a kit box are what a check sheet counts: until they are in the box, Refresh lines on the sheet has nothing to find.
If it fails: a part that is fitted into an assembly cannot be moved on its own — the message names the assembly and links to it; take it off instead, and the same dialog puts it where you wanted it (see Take a part off an assembly). A container cannot be moved into itself or into its own contents. Moving an item that is out on a job does not bring it back from the job — use Return first, otherwise the dispatch board still shows it out.
Note
A box already inside another box is named by its owner in the list — Black Box · Kit-53 — because departments run more than one kit with the same compartment names. The boxes you ticked are not offered as a destination: nothing goes inside itself. See Item card for moving a single unit.
Install a cutter set into a reamer
Who: Operator and above.
- Open the assembly's card — the reamer body, the motor — and find the Components card.
- Click Install. The list opens already filled with the parts that fit; type a serial, or the start of a name, to narrow it. The list only offers parts of the assembly's own size — a 6 3/4" motor does not offer 4 3/4" rotors. Parts whose size nobody has filled in yet stay on the list: an empty size means "we do not know", not "it does not fit". Tick Show all sizes to see the rest of the fleet, with each part's size next to its name.
- Check the Slot if the type declares seats. A reamer has one, Cutters, and it is already filled in. Where the type says which part goes into which seat — a motor does — Hafrix picks the seat from the part's category, a stator to the power section, a rotor to the rotor seat, and says in a line if you pick a different one by hand. The picker shows how full each seat is; a full seat is not swapped for the next one, the dialog says it is full and waits for you to take the old part out. Parts that already stand in another assembly stay on the list greyed out, with the assembly's name — take the part out of that assembly first, and it comes back.
- Click Install.
Result: the part moves inside the assembly, its card starts saying Installed in, and the row appears in the Components card with today's date. From now on every run logged on the assembly wears this part too.
Taking it off: you do not have to be on the assembly's card to do it — see Take a part off an assembly. From here, the arrows button on the row asks two things — why it came off (worn, damaged, redress, moved to another assembly, sold, lost) and where it goes. Leave the location empty and it stays where the assembly is standing. The row does not disappear: it turns into history with the hours and KREV the part earned in that assembly.
On the phone: the field app does the same with the camera — open the assembly, tap Install part and scan the part's label; on a part that is fitted, tap Remove part and pick a reason. Both queue up and go out when there is signal — see Field app.
Building something other than a reamer? The steps are the same, the seats are not: an MWD tool is a stack of modules — see Build an MWD probe stack; a mud motor is built for the job in front of you — see Build a mud motor.
If it fails:
| Message | What it means |
|---|---|
| Assemblies take components through the install action | You tried to Move a part into an assembly. Use Install — a plain move would leave the history blank |
| The item is installed in |
You tried to move a fitted part somewhere else. The message names the assembly and links to it — see Take a part off an assembly |
| Component size does not match the assembly | The two sizes are known and different — you got here through Show all sizes. A manager can tick Install anyway |
| Position is full | Every seat of that slot is taken. Free one first |
Build an MWD probe stack
Who: Operator and above.
An MWD tool is a stack: a pulser, a directional module, a gamma module, a TVD probe and one or two batteries, all riding in one carrier. The carrier is the card you open; the modules are cards of their own, because each one keeps its own hours and its own paper.
- Open the carrier's card and find the Components card. Downhole tools declare five seats — Pulser, Directional module, Gamma module, TVD and Battery, the last one taking two.
- Click Install, pick the module by its serial, choose the seat, and click Install. A battery from the Batteries group lands in the Battery seat by itself. The list is narrowed to the carrier's size; Show all sizes lifts that. Repeat for the rest of the stack.
- Log the run on the carrier, once — hours, runs, the well.
Result: every module standing in the carrier gets its own usage row for that run, so "how many hours has this pulser done" is a question the pulser's card answers. A module you took out before the run keeps its old total: the hours follow the period it stood, not the card it sits on today.
Swapping a battery mid-well: take the spent one off with the arrows button, give the reason Worn out, then install the fresh one into the same seat. The spent battery's row stays as history with the hours it earned in that carrier.
After the run the tool asks for an inspection by itself. Downhole tools carry an After job inspection trigger, so a carrier or module that logged hours since its last inspection turns Need inspection with no one pressing anything — see Status and readiness. A brand new tool that has never worked is not overdue: it waits for its first run, and its first inspection is the one after that run. Surface and lab equipment do not work this way — their calibration runs on the calendar, so they turn Need inspection only when the paper expires.
If it fails: the messages are the same as for any assembly — see the table in Install a cutter set. The one worth knowing here: Position is full on the battery seat means both batteries are in; free one before fitting a third.
Build a mud motor for the job
Who: Operator and above.
A motor is not a fixed set of parts. The same stator sits in one housing today and another one tomorrow, because the shop builds the motor for the job in front of it. So the motor's card does not say "this motor's stator" — it says which stator stood in it, and for how long.
- Open the motor's card and find the Components card. A motor declares eight seats: Power section, Rotor, Transmission, Bearing assembly, Mandrel (two), Housing (two), Stabilizer sleeve and Other part for the rest of the string.
- Click Install and pick the part by its serial — the seat is filled in from the part's category (a stator goes to Power section, a rotor to Rotor), and you can still change it by hand. Click Install. Only parts of the motor's size are offered; Show all sizes lifts that if you are building something the shop signed off on. Repeat for the rest of the build.
- Log the run on the motor, once — hours, runs, the well.
Result: the hours land on the parts that were in the motor for that run. "How many hours has this elastomer done" is a question the stator's card answers, and it answers it for the stator itself — not for the housing it happens to be in.
Stripping the motor down: take each part off with the arrows button and give the reason — Worn out for an elastomer that is gone, Redress for one going to the shop, Moved to another assembly for a part going straight into the next build. Every row stays as history with the hours that part earned in this motor.
A part whose role nobody named — a flow diverter, an adjustable ring — goes into Other part, which takes four. The seat is deliberately dull: the system will not invent a role for a part, and it will not drop the part either.
If it fails: the messages are the same as for any assembly — see the table in Install a cutter set.
Take a part off an assembly
Who: Operator and above.
A part that is fitted into a motor, a reamer or a probe stack has no location of its own — it stands wherever the assembly stands. That is why Move refuses it: moving the part on its own would leave the assembly's history open on a part that is no longer in it. Take it off first, and the same dialog puts it where you want it. One action, not two.
There are three ways in, and they end in the same dialog:
- From the part's own card — the Installed in line names the assembly; Remove from assembly sits next to it.
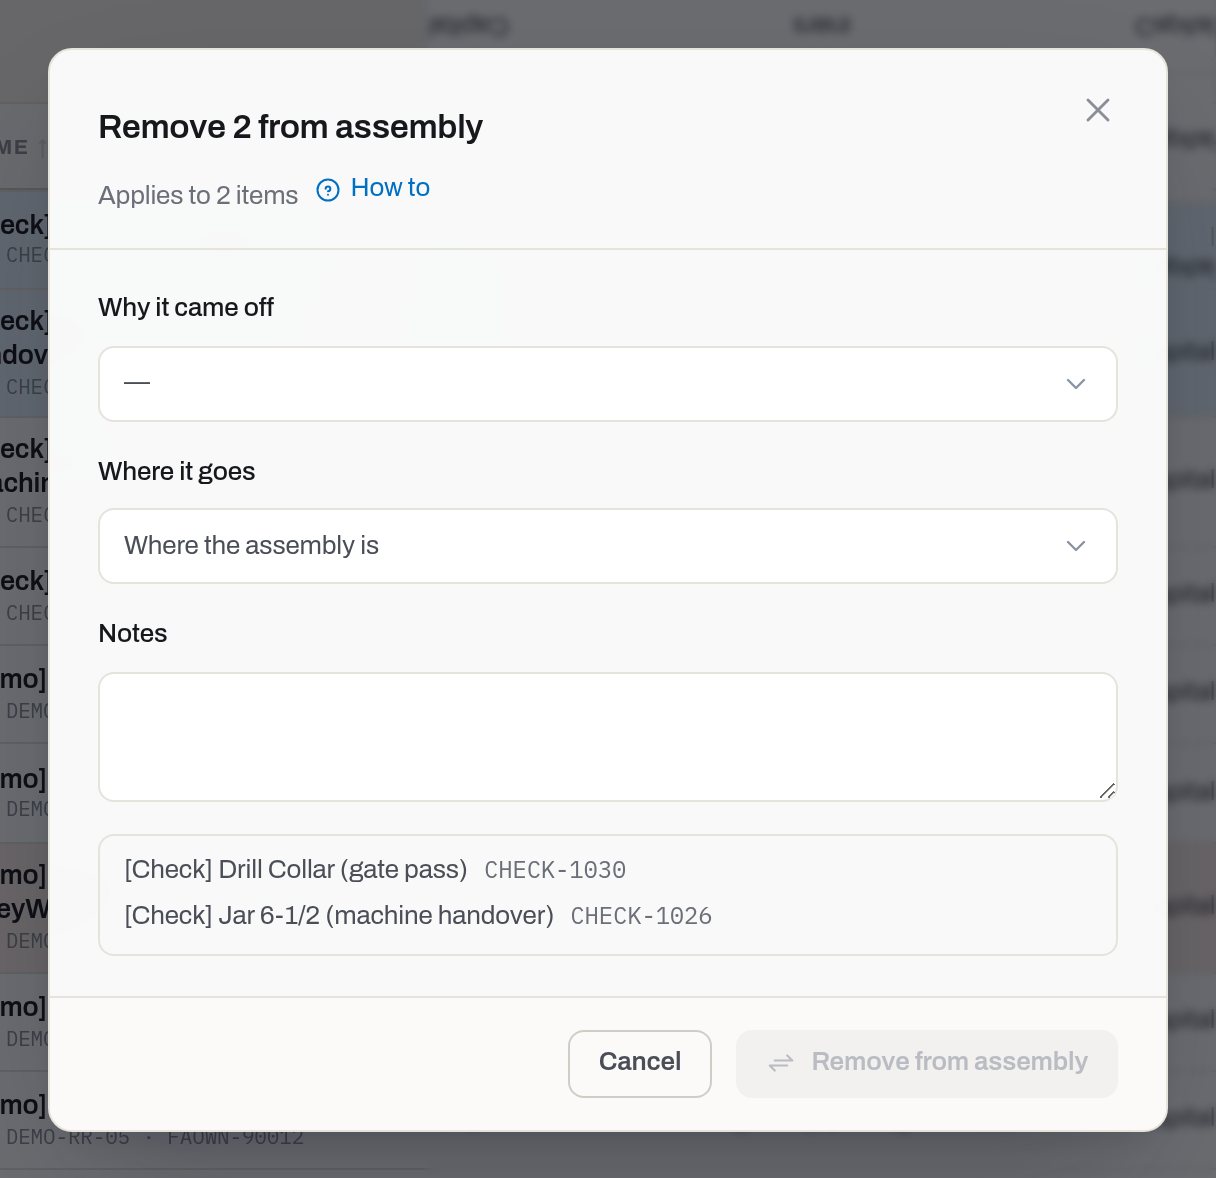
- From the list — select the parts and click Remove from assembly in the selection bar. They may sit in different assemblies; each one comes off its own.
- From the assembly's card — the arrows button on the row of the Components card.
Coming from the list, anything in the selection that is not fitted anywhere is greyed out with Not installed anywhere — there is nothing to take off it. The rest of the selection comes off as usual.
- Pick Why it came off: Worn out, Damaged, Redress, Moved to another assembly, Sold, Lost, Assembly scrapped or Other. The reason lives on that period, not on the part — one cutter set collects nine of them over its life.
- Pick Where it goes. Leave it empty and the part stays where the assembly is standing.
- Click Remove.
Result: the part comes off, its Installed in line clears, it is at the location you chose, and its timeline gets a Moved row. The row on the assembly does not disappear — it turns into history, carrying the hours and KREV the part earned in that assembly.
If you tried Move first: the refusal names the assembly and links straight to it, so you do not have to hunt for which motor a part is in.
On the phone: the field app does the same with the camera — open the assembly, tap Remove part and pick a reason. See Field app.
Take the whole assembly apart
Who: Operator and above.
Stripping a motor down for a full teardown does not call for taking each part off by hand. Disassemble all removes every part currently fitted at once — one reason, one destination, one click — instead of walking the Components card row by row.
There are two ways in:
- From the assembly's own card — the Disassemble all button sits next to Install on the Components card. It only shows while something is fitted.
- From the workshop board — a Dirty or Attached row that sits inside an assembly gets a second button, Disassemble with the assembly's name, next to Disassembled. It opens the same dialog for the whole assembly that row belongs to, not just that one part.
- Check the list — every part about to come off, with its serial number and slot.
- Pick Why it came off: the same reasons as a single part — Worn out, Damaged, Redress, Moved to another assembly, Sold, Lost, Assembly scrapped or Other. One reason covers the whole batch.
- Pick Where it goes — it defaults to where the assembly itself is standing; change it if the parts are heading somewhere else.
- Click Disassemble all.
Result: every part comes off in one event, each with its own history row on the assembly and its own Moved entry on its own timeline — exactly as if it had been removed one at a time. The Components card shows nothing fitted, and the assembly's timeline sums the whole batch up: how many parts came off, the reason, and where they went.
If nothing is fitted, there is nothing to disassemble — the button does not show.
Assign items to a client
Who: Operator and above. Ad-hoc needs the Clients section as well (the client is picked from it); On a job needs Jobs and Dispatch. With neither open, there is no Assign button on the list.
- Select the items and click Assign.
- If both are open, choose the mode: Ad-hoc (client + rig) or On a job. With only one open, the dialog opens straight in that mode.
- For ad-hoc, pick the Client and, if you know them, Rig (optional) and Assigned from (optional). For a job, pick the Job — the items are reserved on it and mobilized right away.
- Click Assign.
Result: the Client column fills in, the items count as out of the yard in Utilization, and each timeline gets an Assigned row.
If it fails: items already on a rig are greyed out with Already assigned before you send anything — untick them or return them first. No client companies yet — add one on the Clients page means the client is not registered: create it in Clients.
Log usage on a string
Who: Operator and above.
- Select the items that ran together and click Log usage.
- Enter Hours, Runs, Well, Rig — the same numbers go to every selected item, which is how a run is logged for a whole string. Job (optional) below them links the run to an open job.
- If every selected asset tracks the same counter — amp-hours on a battery, flow hours on a pulser — a field for it shows up below Job (optional), under the other fields. Fill it in to log that counter for the whole set the same way; leave it blank to skip it. A mixed selection with no counter in common shows a note instead of fields: there is nothing every item in it tracks, so nothing to log for all of them at once.
- Click Log.
Result: the Hrs column grows and each timeline gets a Usage row. Two things follow from it: a unit whose category has an After job trigger turns Need inspection on the spot, and a unit that crosses its life budget raises an alert that night. A life budget does not change readiness by itself — it warns.
If the item is an assembly, every part standing in it at that moment gets its own Usage row with the same hours and KREV — see Components.
RPM and "Hours from" are not here: the bulk dialog logs raw hours and runs only. Set the RPM measurement and the hours' source — entered by hand, a client report or a well report — one unit at a time, in Log usage on that unit's own card. RPM there is what turns hours into KREV; marking the source keeps a client report and a field ticket from covering the same day twice.
If it fails: nothing is refused for being small or negative — a negative number is how a mis-typed run is taken back, because the timeline is never edited, only added to. The real risk is the opposite one: check that you selected the string and not the whole page.
Log an inspection for many items
Who: Operator and above.
- Select the items, open Add a record → Inspection.
- Enter one date and one result for the whole set, then confirm.
Result: each item gets a certificate record and its readiness is recomputed — units that were waiting for an inspection turn Ready.
If it fails: the scan of the certificate is attached later from the item card — a certificate belongs to one item, so the bulk dialog does not take a file.
Print labels and reports
Who: Operator and above — both live behind the selection bar, and the report is refused to a viewer by the server as well.
- Select the items, open Print in the selection bar.
- Print labels produces 50 × 25 mm labels with a QR code that opens the item; Print reports produces the one-page PDF report per item.
- The browser print dialog opens — print or save to PDF.
Result: nothing changes in the data; printing leaves no trace in the timeline.
If it fails: both are hidden while Select all matching is on — printing needs a named list, not a filter.
Sell a unit to a client, or take a client's tool onto the books
Selling a serialized unit is a change of owner, not a status. The tool goes on living: it comes back for redress, it logs hours, its timeline continues. Only the balance sheet loses it.
- Open the item card and press Change owner. Manager and above; an operator does not see the button.
- Pick the New ownership:
- Client-owned — you sold it, or you are taking a customer's tool onto your books. Choose the Owner.
- Owned — you bought it back, or you bought out a rental.
- Rented in — it turned out to be the vendor's after all.
- If you can see Finance, fill in the Sale price and the Currency. It becomes the proceeds of the disposal, and the profit or loss is worked out against the book value on the spot — a figure typed in later cannot fix a closed month.
- Put the paper in Document: the invoice, the delivery note or the transfer act.
- Change owner.
What happens in the same breath: the timeline gets an Ownership changed entry with the owner, the price and the document; everyone who can see Items gets a feed row; and, if the unit was leaving your books, the ledger gets its Disposal line right away — not at the next month close.
Note
Change owner is the only way ownership moves. The edit form shows it greyed out, and the API refuses a PATCH: an owner changing quietly, with no event and no disposal, is exactly the hole this closes.
A unit that is out on a job cannot change hands — Return it first, so the rental period has an end.
Use Sold as a status only for the other case: the thing left and you will never see it again.
Turn a serialized unit into a stock card
Who: Operator and above.
Use it when a thing turns out not to be worth counting one by one: four identical valves that came in with four serial numbers and are used up as material, a box of subs nobody tracks individually.
- Open the item card and press To stock card.
- Set the Quantity the card starts with (1 by default) and the Unit it is counted in — pcs, m, set.
- Check the Part number: stock is identified by it, one card per part number.
- Pick the Role the card should carry, and say why in Reason if it helps the next person.
- Turn into stock.
Result: the unit comes off its place and the same place — the location, or the kit box it was lying in — receives the stock. The serial number is cleared but not lost: it goes into the card's former numbers, so a search by the old number still finds it, and into the Class changed row of the timeline. If the unit had an acquisition cost, that money becomes the average cost of the stock instead of staying on the card.
If it fails: the refusal says what is in the way. Return the unit from a job or cancel its booking; close the work order; remove the components or take it out of the assembly; empty the container; unpair it; set the status to Active or Obsolete first. Two refusals cannot be argued with here: a client-owned tool stays serialized because its owner counts units, and a unit that already carries book value — depreciation has been posted, or a repair was capitalized — has to be disposed of properly first, then received as stock.
Turn a stock card back into a serialized unit
Who: Operator and above.
Use it the other way round: the client finally says the eight housings do have serial numbers, or a card was created for something that deserves its own history.
- Open the card and press To serialized unit.
- Type the Serial number — it has to be free in the fleet.
- Leave the place as Where the stock lies now, or pick another Location.
- Turn into a unit.
Result: the shelf goes to zero with an adjustment in the stock journal, the unit takes its place, and the timeline gets a Class changed row. The average cost of the stock becomes the acquisition cost if the card had none.
If it fails: the card holds N on hand — a serialized unit is one piece, so consume or transfer the rest first; each of several pieces becomes its own card, one conversion at a time. A card named in a kit standard is refused too: a standard counts cards, not units.
Export the list
Who: Viewer and above.
- Set up the filters and columns you want.
- Click the download icon in the header (or in the selection bar for a selection) and pick a format from the Export menu: Excel, CSV or PDF.
Result:
- Excel (
items.xlsx) — a spreadsheet meant for reading and sharing: readable column titles, values spelled out in words (status, class, custody), a bold frozen header row and filters turned on. It carries the whole filtered set, not just the page you can see. - CSV (
items.csv) — unchanged: raw keys and codes, the same format an import expects back. - PDF (
items.pdf) — a landscape A4 printout with a title, your company and the date, up to 3,000 rows. Past that, narrow your filters or use Excel instead.
If it fails: nothing downloads if the filtered list is empty — clear the filters and try again. A PDF request over 3,000 rows is refused with a message asking you to narrow the filters or export to Excel.
Fields
| Field | Meaning | Required | Who edits |
|---|---|---|---|
| Counted as | Serialized units (a card per unit) or Quantity (a card per part number) | yes | Operator+, at creation only; afterwards only by the convert actions |
| Category | Where it sits in the catalogue; decides the attribute schema and the depreciation policy | yes | Operator+ |
| Role | Capital equipment · Spare & tooling · Consumed material · Goods for sale (not bookable onto a job) | no | Operator+ |
| Name | What people call it | yes | Operator+ |
| Serial no. | Your yard serial; unique in the fleet | no | Operator+ |
| The serial number is provisional | The number was made up because the real one clashed — see A serial number we issued ourselves. Clears itself when you type a different number | no | Operator+ |
| Part no. | Manufacturer's part number | no | Operator+ |
| Asset ID | Number in the fixed-asset register (e.g. FAOWN-00271) | no | Operator+ |
| Manufacturer's number | Number stamped by the maker — not your yard serial | no | Operator+ |
| Former numbers | Numbers the unit used to carry before it was renumbered; searched like the current one | no | Operator+ |
| Manufacturer / Model | Who made it and what model | no | Operator+ |
| Code | Your catalog code, e.g. from RigER; unique in your company regardless of case — tr-12 and TR-12 count as the same code, and it is kept as you typed it |
no | Operator+ |
| Unit | How the card is counted: pcs, m, L, set. Pick one already on your cards, or type a new one and press Enter; a new consumable starts at pcs, an asset starts empty | no | Operator+ |
| Location | Where the unit physically is | yes, for assets | Operator+ |
| Ownership | Owned, Rented in or Client-owned. Changed afterwards only through Change owner | no | Operator+, at creation only |
| Owner | The company a client-owned tool belongs to | when client-owned | Manager+, through Change owner |
| Vendor / Rental rate | Who it is rented from and at what rate, per day or per month | when rented in | Operator+ |
| Acquisition cost / Currency | What it cost; the currency applies to the cost and to the rental rate. For a consumable it is also the currency of its stock, so it cannot change while any stock line holds stock (see Stock) | no | Operator+ |
| Acquired at / PO no. | When it arrived and on which purchase order | no | Operator+ |
| This is a container (kit box, basket) | Lets other items live inside this one. On a category whose composition is Assembly it is on by default — an assembly is what takes components | no | Operator+ |
| Attributes — {category} | The specification schema of the category: sizes, threads, lengths | no | Operator+ |
| Description | What the item is, in a sentence or two — the description column of a CSV import lands here. Shown in Details on the card |
no | Operator+ |
| Notes | Free text for whatever the fields do not hold | no | Operator+ |
What the system tells you
| When | Feed row | Who gets it | |
|---|---|---|---|
| A certificate expires within 30 days | Certificate expiring | in the daily fleet digest (07:30 workspace time) | everyone who can see Alerts |
| A certificate has expired | Certificate expired (bold) | in the same digest | everyone who can see Alerts |
| An event of the work cycle owes an inspection | Inspection due | in the same digest | everyone who can see Alerts |
| Hours, runs or KREV cross a life budget | Life budget warning / Life budget exceeded | in the same digest | everyone who can see Alerts |
| Nothing happens to a unit for a long time | Idle asset | — | everyone who can see Alerts |
| A unit changes hands | … changed hands | — | managers who can see Items |
| A valid certificate is voided | — | A certificate was voided on {item} | every manager and admin in the workspace |
| The month closes and a unit is sold, written off or fully depreciated | Sold / Written off / Fully depreciated | — | managers and admins who can see Finance |
Alerts are evaluated once a night (07:00 workspace time), so a certificate you fix today stops shouting tomorrow morning — or right away if you press Check now in Alerts.
Related
- Item card — one unit: actions, certificates, documents, components, money and timeline.
- Overview — the home board; the Overview view of this section works the same way.
- Stock — quantities of consumables: receive, consume, transfer, adjust.
- Locations — the tree of yards, rigs and workshops the Location field points at.
- Compliance — the fleet-wide view of certificates and what is expiring.
- Maintenance — work orders opened for items that need repair.
- Roles & access — why a button or a whole section may be missing.
FAQ
Why do I not see the checkboxes? — Selecting rows is for operators and above; the actions behind the selection all write to the fleet.
Why is there no Delete? — An item is never deleted, by anyone. Its timeline is the yard's memory and the register's evidence. Take it out of service with Change status — Scrap, Sold, Lost — and it leaves the working lists but keeps its history.
Why is an Active item not Ready? — Because readiness is computed, not declared: an expired certificate, an inspection owed by the work cycle, a failed inspection or a stay in the shop will hold it back. A life budget will not — it raises an alert instead. When the cycle is what holds the unit back, the badge on its card names the event — After job, After reassemble, After idle or Before job — and the rule itself lives on the category, see Set the inspection triggers.
The list shows an old value after I edited the item. — The list caches its page for a few seconds; reload if it lingers. If the value is wrong on the card too, check that you edited the unit you meant — two units of the same model differ only by serial.
Where are the quantities? — On the Consumables tab an item is a card, not a pile: how much lies where is the business of Stock.
Updated 2026-09-27
New to Hafrix?
See this workflow in your operation
Explore how Hafrix connects equipment records, locations and readiness across your fleet. Bring your inventory workflow to a demo.