Field app
The shift ticket, the tool in your hand and the client representative's signature — on a phone at the rig, with no signal, sent by itself once there is one.
Where: open https://dash.hafrix.com/m in the phone browser and add it to the Home Screen. The field app is not in the navigation capsule: it is a separate app on a separate address, built for a thumb in a glove. An operator's invitation email points straight at it.
Who can do what
| Role | In the field app |
|---|---|
| Viewer | Open the app, read own tickets, find a tool and read its card |
| Operator | + New ticket, lines, photos, signature, Submit, Reopen for editing, Log usage, Report damage, Mark returned; Mark received where the Dispatch section is granted; Send to repair where the Maintenance section is granted; Receive a customer tool where the Maintenance, Items, Clients and Locations sections are all granted; Ask for a part where the Procurement section is granted |
| Manager | + nothing on the phone — a shift is approved in the office, see Tickets |
| Admin | + nothing here |
A person only ever sees the sections their group was granted; the phone downloads nothing else. If the Tickets section is not granted, My tickets stays empty and there is no New ticket button — see Roles & access.
At a glance
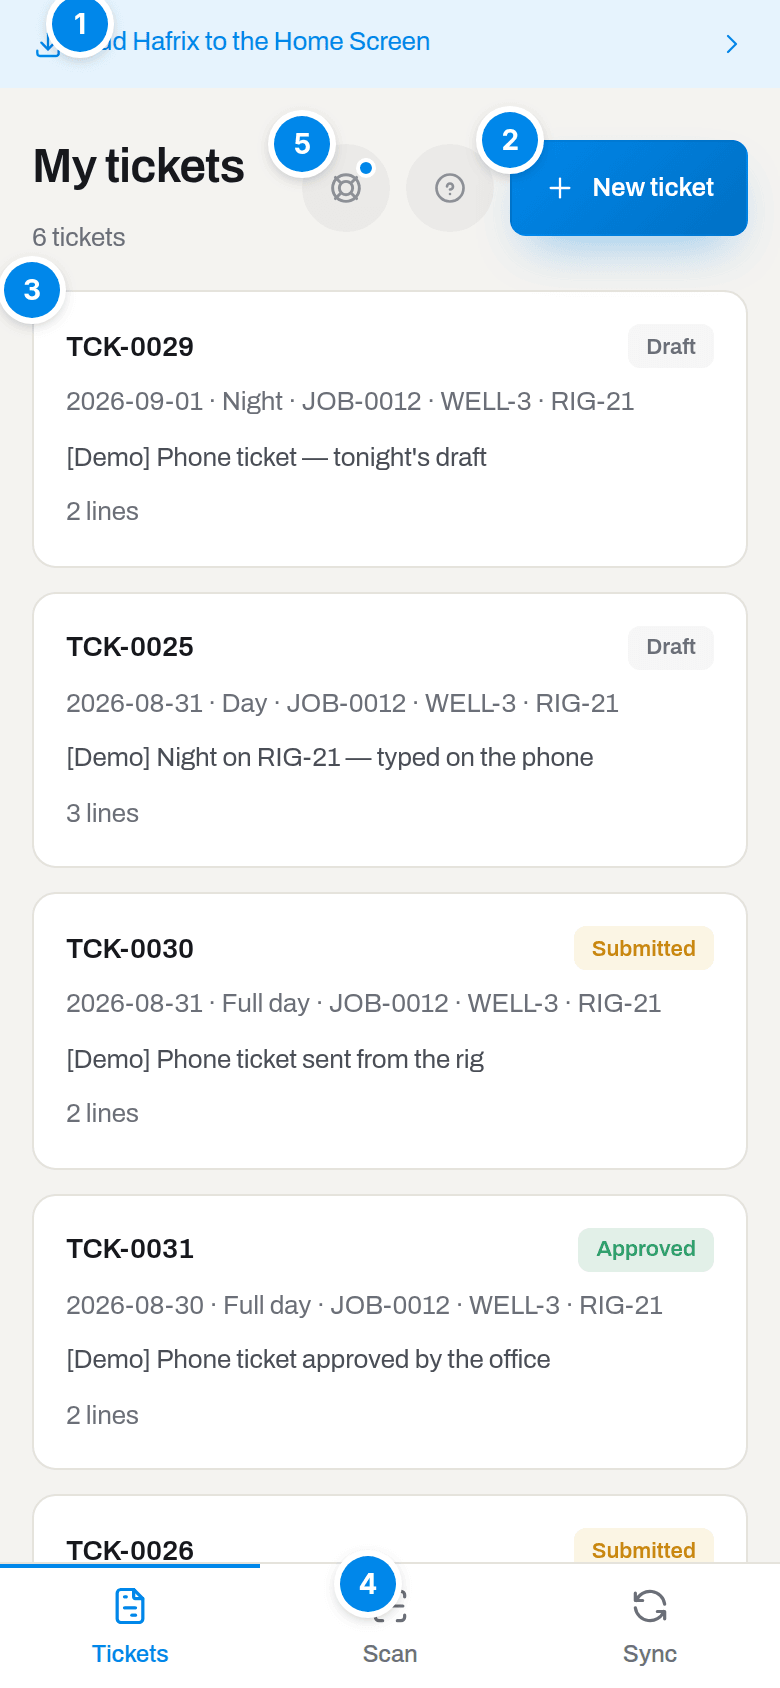
My tickets is where the app opens. The marker on the strip covers its first word.
- Status strip — one line about the phone, and only when there is something to say. In order of precedence: the red Not sent for N days: N tickets first of all, then No signal — showing what is on this phone, then Sync failed — details on the Sync screen, Syncing…, and last Add Hafrix to the Home Screen.
- New ticket — starts a shift (Operator and above).
- A ticket row — the number on the left, a badge on the right, then day, shift, job, well and rig, the summary and the line count. The two are different things: the number is the office's (a document it has never seen has none, so the row reads Draft on the left), and while the document is still in the queue the badge slot carries its delivery state — Not sent, Send failed, Needs a decision — not its status.
- The three buttons — Tickets, Scan, Sync. There is no fourth: everything else opens out of these. The number on Tickets counts shifts still sitting on the phone.
- The life ring and ? — support and this book. Both sit in the header of every screen, because there is no capsule on a phone and no fourth button below. A dot on the life ring means support has written back.
Key concepts
The phone answers, not the network
Every screen here reads the phone's own copy of the catalogues — jobs, shift types, trades, locations, equipment with its readiness and papers, and your own tickets. Typing a shift, scanning a label, reading a tool card and sending it all off are four different things, and only the last one needs a signal.
What comes down is a delta: the phone remembers where it stopped (Sync cursor) and asks only for what changed. If it has been out of touch so long that the office no longer keeps the list of deletions, the whole set is rebuilt in one go and the app says so: This device was too far behind, so its data was rebuilt from scratch. Nothing you typed was lost.
Warning
Offline means the next time you open it. The phone can serve the app from its own cache only after it has loaded the app at least once from its own address. Open /m, let the Sync screen say Works offline · Yes — the app shell is cached, and only then walk out of coverage.
The queue, and what its badges mean
Saving is not sending. Save ticket, Submit and every action on a tool put the document in a queue on the phone, and the queue empties itself: the moment the phone sees a network, every time the app is opened, and once a minute while it is open. Send N tickets on the Sync screen and Try again on a failed document only ask it to go now.
A document travels as a chain — the ticket, then its photos and its signature, then the submission — and each step waits for the previous one to be confirmed. That guarantees the order, not all-or-nothing: the ticket itself lands as a draft first, so a photo or a submission that fails afterwards leaves the office holding a shift that has not been handed in. The badge is what tells you that happened.
| Badge on the row | What it means | What to do |
|---|---|---|
| Not sent | Queued, waiting for a signal | Nothing. It goes on its own. |
| Send failed | The server refused a step of this document | Open it, read the red note, then Try again, or Edit ticket and fix what the note names |
| Needs a decision | Another ticket already covers this job, day and shift | Open TCK-… to see it, or — for a manager — Send anyway if a second crew really worked that shift. An operator sees the reason and is told to ask a manager |
The red note carries a fourth button: Discard throws the queued document away on this phone. Nothing is deleted in the office — but everything typed on that screen is lost, so it is the last resort for a shift whose delivery is refused for good.
Sending twice never makes two documents: each attempt carries the same key, and a server answer that arrives too late is read as delivered, not as an error.
Readiness travels with the tool
Readiness is computed in the office and carried down with the tool, so the scanner can answer is this thing fit to go down the hole with no signal: Ready, Need inspection, Need repair. Expiry dates travel as dates, so a certificate that runs out while the phone is in a pocket drops Ready to Need inspection by itself.
A tool that is not ready is never blocked in the field — you get a warning and a choice. How the verdict is decided is in Items.
One ticket per job, day and shift
The office keeps one ticket per job, per day, per shift. Try to send a second and the phone shows Needs a decision rather than quietly making a duplicate.
Only your own work is on the phone
Your tickets, the repairs you opened and the kit sheets where you are named as the field side — not the crew's; the catalogues of your workspace, and nothing about money — no rates, no prices, no invoices. Storage on a phone is not encrypted, so that list is deliberately short. Signing out, or revoking this device from Account → Devices in the office, erases the local copy.
A kit is counted blind
When a kit box comes to your rig, its check sheet arrives with it — and it shows the standard in full, but not the base's column. That is deliberate: a count you compare against a number already on the screen is not a count, it is agreement. Your figures and theirs meet at the base, and the difference is settled there by a person.
Once the sheet is closed, both columns show: it is history then, and knowing what the base counted is useful.
How to
Install the app on the phone
Who: anyone with an account.
- Open
https://dash.hafrix.com/mon the phone and sign in. The app takes you back to itself after the password, the two-factor code and the workspace choice. - Follow the three steps of Add to the Home Screen. The app shows the steps for the phone you are holding and only those: on iPhone the Share button in Safari → Add to Home Screen → Add; on Android the browser menu (⋮) → Install app, plus an Install button when Chrome offers one; in Samsung Internet the menu (☰, bottom right) → Add page to → Home screen.
- Open Hafrix from the new icon.
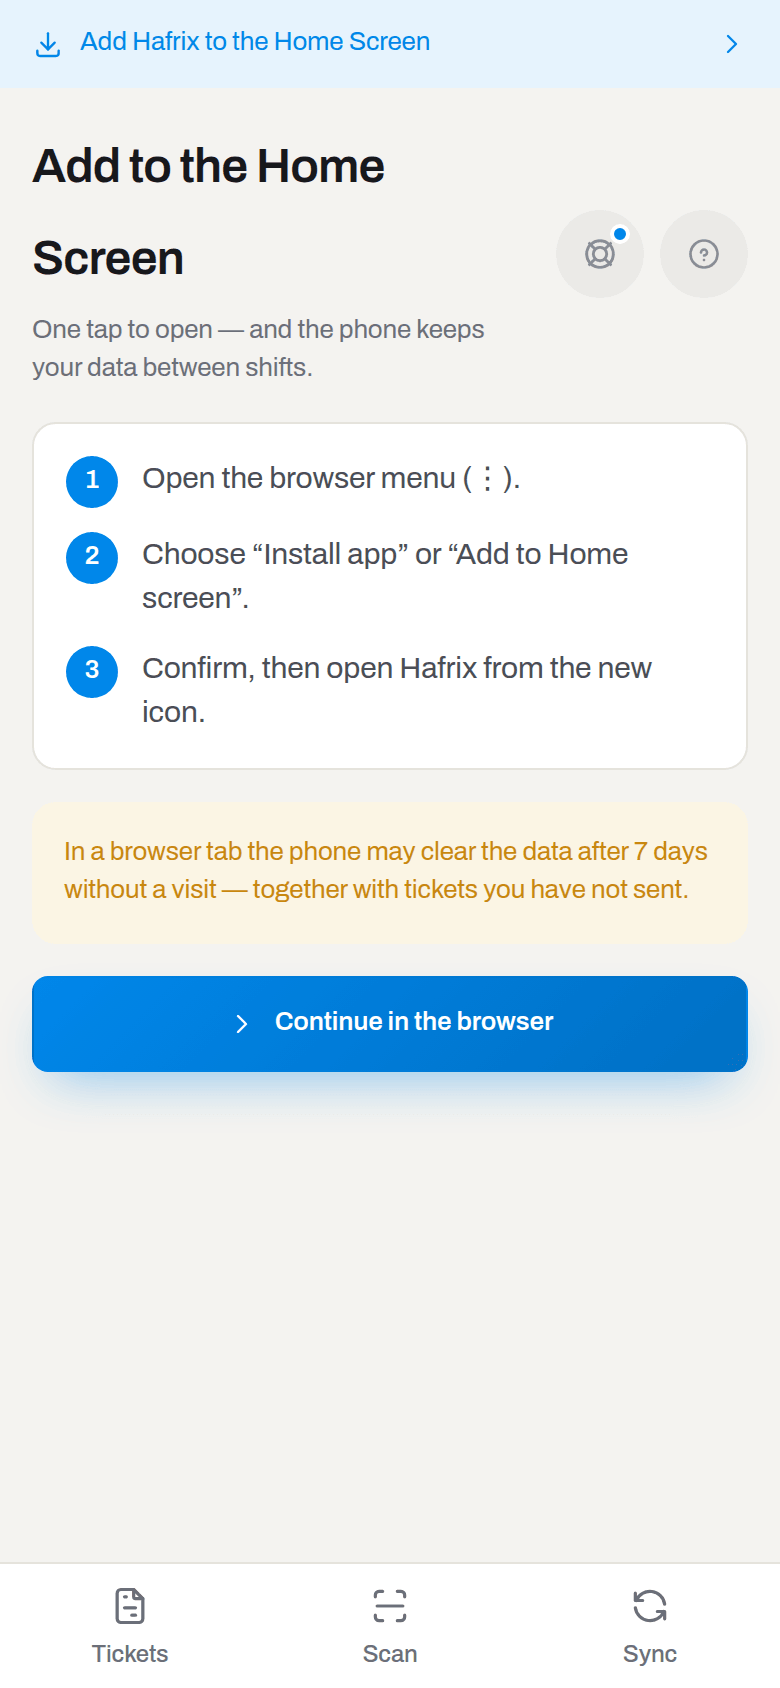
The Android wording. On an iPhone the same screen names the Share button instead.
Result: the app opens without an address bar, and the Sync screen says Installed · Yes, opened from the Home Screen.
If it fails: Continue in the browser lets you work from a tab, but read the warning first — In a browser tab the phone may clear the data after 7 days without a visit — together with tickets you have not sent. The strip at the top keeps offering the install until it is done. Where the browser offers no install of its own — Samsung Internet, and any browser that never shows the Install button — that is the ordinary way in, and the app puts the button first.
A bookmark is not the app. Some Android browsers add a plain shortcut instead of installing: the icon opens Hafrix with the address bar on top, and the Sync screen keeps saying Installed · No, running in a browser tab. Add it again from the menu; until it works, the tab is fine as long as you send your tickets the same day.
Fill in a shift ticket with no signal
Who: Operator and above.
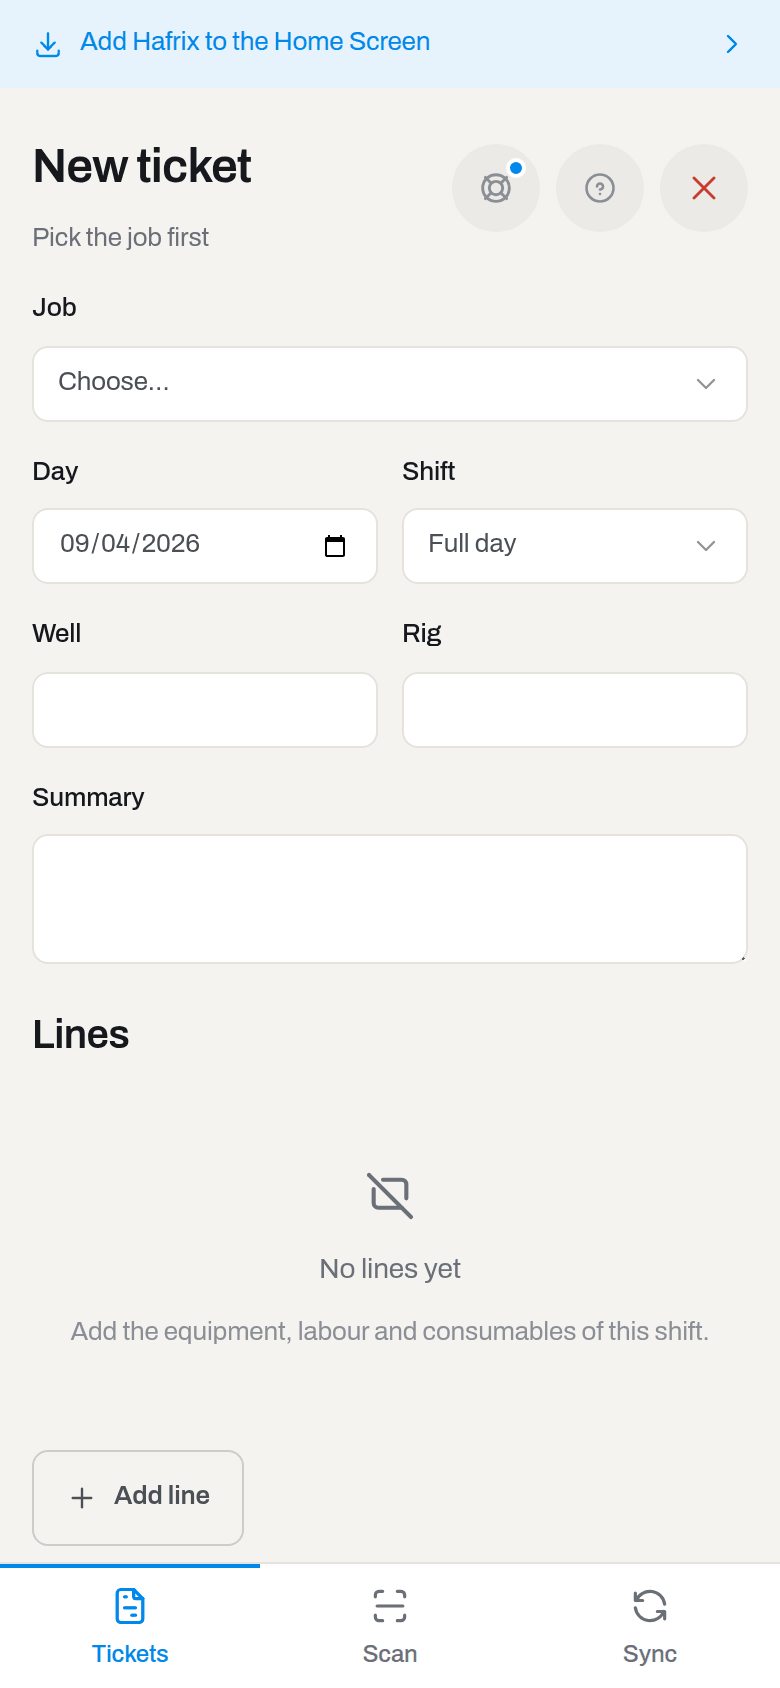
- Tap New ticket.
- Pick the Job. Day is today and Shift is the workspace default; change either if the shift you are closing is not today's.
- Well and Rig are pre-filled from the job — type over them only when the crew moved.
- Summary is one line for the office: what the shift was.
- Tap Add line for each thing that happened.
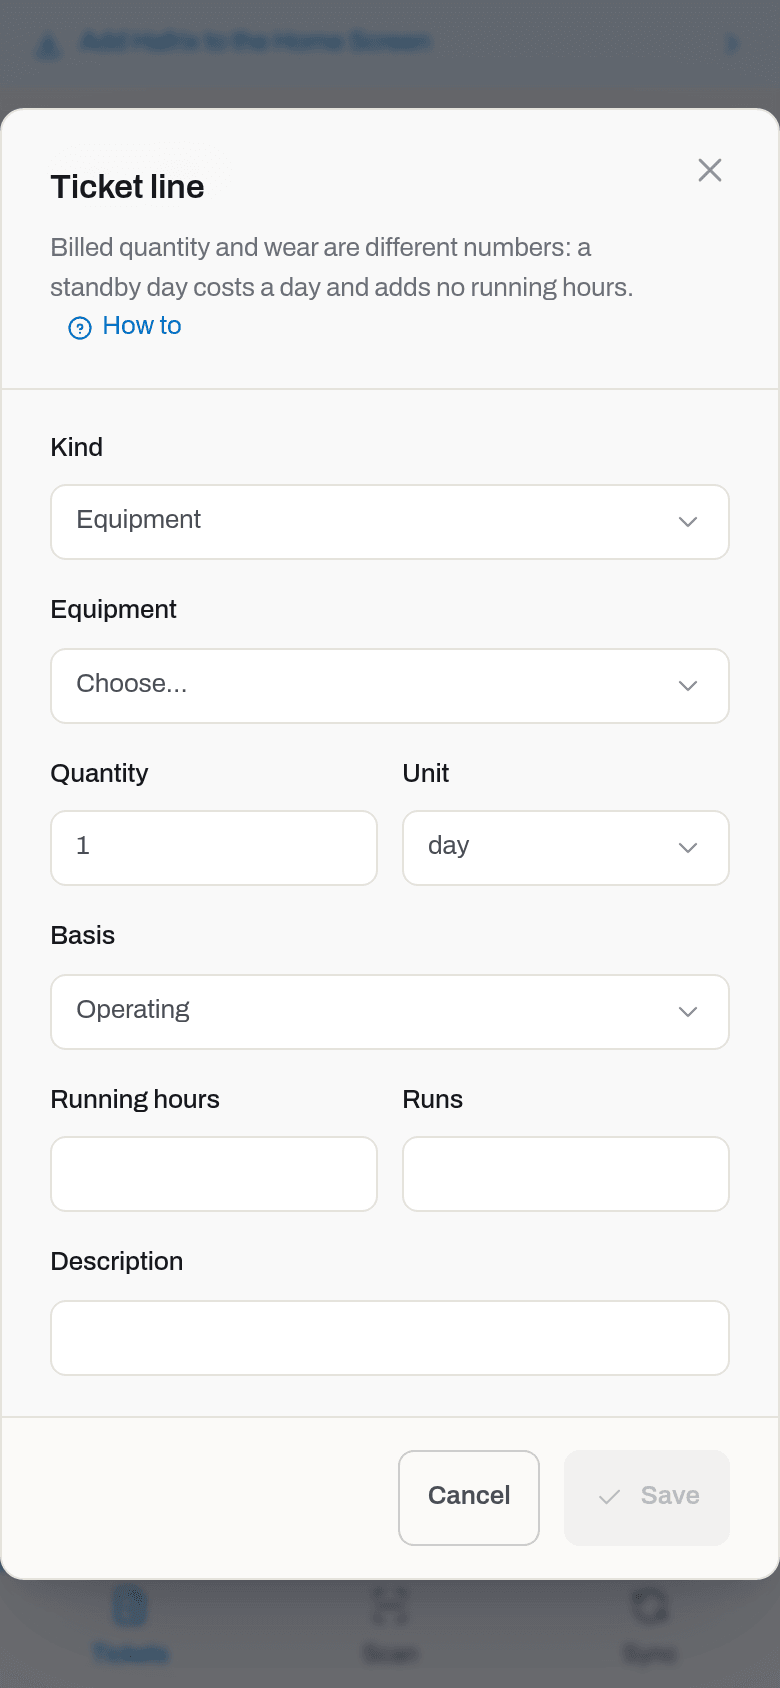
A line has a Kind and the fields that kind needs:
- Equipment — the tool, Quantity and Unit, Basis (Operating or Standby), then Running hours and Runs. Billing and wear are different numbers: a standby day is billed as a day and costs the tool nothing.
- Labor — Trade and the person's Name.
- Consumable — the item and Take from, the location it comes off.
- Service — a Service from the catalogue (its price is in the office's book) or One-off (describe below) plus a description, and the quantity.
- Sale — a serialized item you sold to the client, and optionally Sold against: the rental it went with. Quantity is fixed at one piece. When the office approves the ticket the item changes owner — it stays in the register and keeps its history, but it is the client's now.
The item list follows the kind: Equipment and Sale offer serialized tools only, Consumable offers stock items only. A line that was queued with the wrong kind of item shows Choose when you open it — pick the item again before saving.
If the phone already holds an earlier ticket for the same job, a Repeat button carrying that shift's date copies its lines into today's shift and clears the hours and runs — daily rental is the same list of lines every day, and typing it again in gloves is how shifts end up being written in the office off a paper slip. Only tickets that have come down from the office are offered: a shift still sitting in the queue cannot be repeated.
Result: Save ticket puts the shift in the queue as a draft; the row appears at the top of My tickets.
If it fails: Save ticket stays grey until a job, a day and at least one line are there. Nothing on the list means the phone has never synced — see Check what has arrived and what has not.
Add photos of the site
Who: Operator and above.
- On the ticket form, tap Add photo under Photos.
- Shoot with the camera, or pick shots taken earlier — both are offered, because at the rig you shoot as it happens and in the trailer you attach what you already have.
Result: a thumbnail appears at once and survives the app being closed. Up to 10 photos per ticket. A tick on a thumbnail means Sent to the office; a photo that has gone can no longer be removed from the phone.
Every shot is redrawn on the phone before it is stored — about 1600 px on the long side and a few hundred kilobytes — so a shift does not cost megabytes of a rig connection. The redraw hands over bare pixels: the camera's EXIF block, and with it the coordinates the phone wrote into the file, is dropped on purpose. A photo carries no position. The only place a position is recorded is the signature.
Get the client representative's signature
Who: Operator and above.
- On the ticket form, tap Sign under Signature.
- Type the Name and the Position of the person signing.
- Have them sign with a finger in the box, then Save signature. Clear wipes the box and starts again.
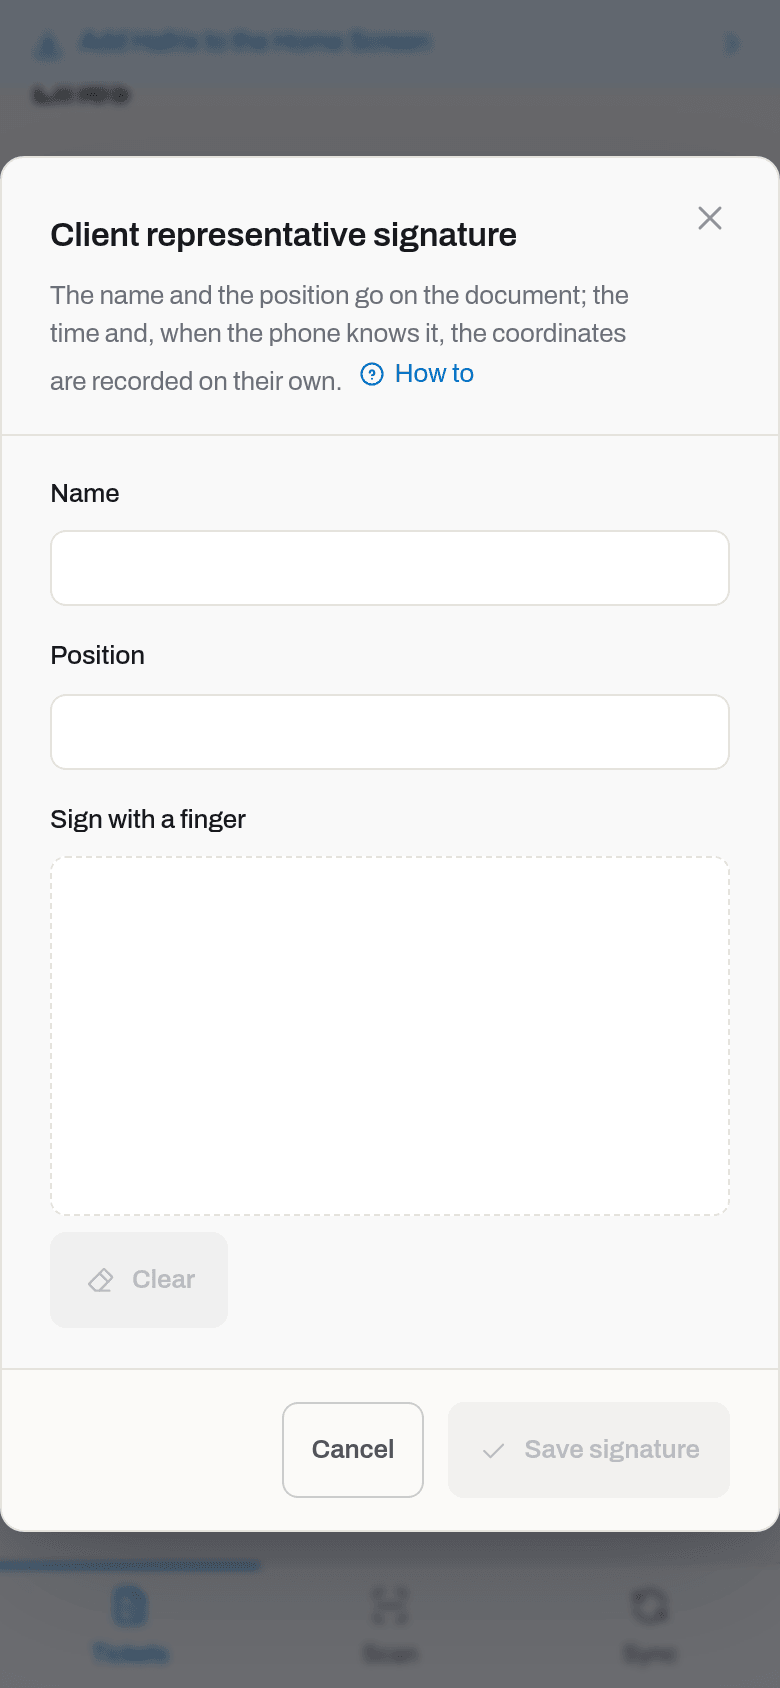
Result: the signature, the name, the position and the time are stamped on the document. Where the phone can get a fix, the coordinates go on it too and show on the card as Signed where with an accuracy in metres. After the shift is submitted none of it can be edited — that is the point of it.
If it fails: Save signature stays grey until there is both a name and a stroke in the box. If the phone gives no fix the card says No coordinates — the phone did not give a fix. That does not stop the signature. — sign anyway.
Submit the shift
Who: Operator and above.
- From the form, tap Submit — or open the draft from the list and use Submit there.
- Watch My tickets: the row shows Not sent until the phone finds a signal, then the office assigns the number and the badge becomes Submitted.
Result: the shift is with the office and frozen on the phone — it can be read, not edited. Managers get a Ticket TCK-… is waiting for approval row in their feed, and approve it in the office (see Tickets).
If it fails: where the workspace asks for a signature, Submit is not offered until the ticket is signed, and the form says so: Get the signature before submitting the shift. A ticket with no lines cannot be submitted either. On Needs a decision, either open the ticket that already covers the day or — if you are a manager — Send anyway; an operator asks a manager to do it.
Note
Submit appears on a ticket card only for a draft the office has already seen. While the shift is still in the queue the card shows its delivery note and Edit ticket instead — there is nothing to submit until the document itself has arrived, and the app is already carrying that request for you.
Reopen a ticket the office sent back
Who: Operator and above, on your own ticket.
- Open the row badged Rejected. The reason is at the top: Returned to the field: …
- Tap Reopen for editing at the bottom of the card.
- Correct what the reason asks for and Submit again.
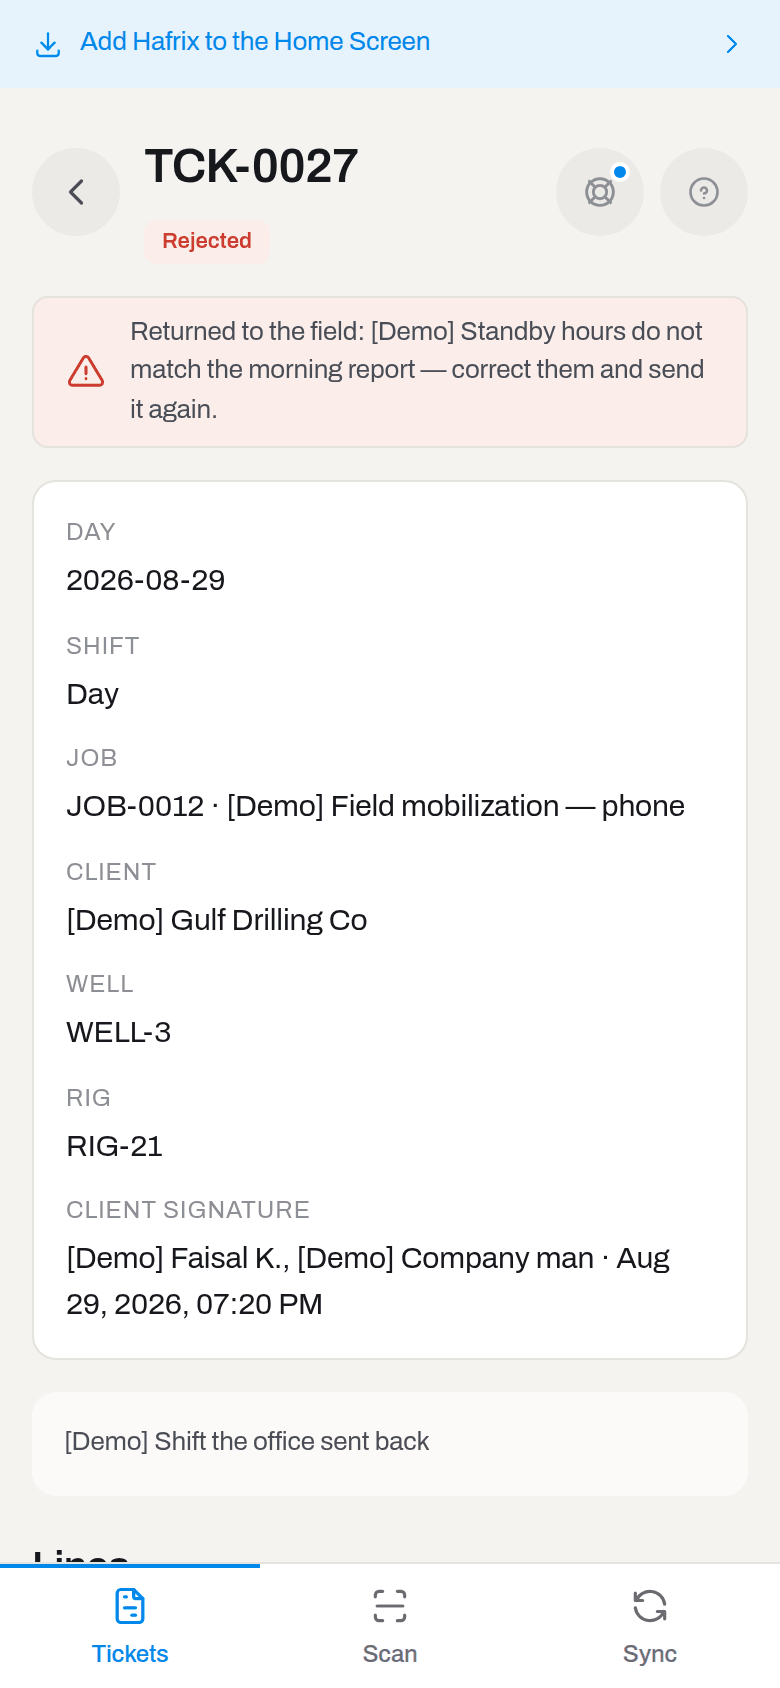
Result: the same document goes back to draft — not a new one, because a correction that is detached from the signature settles nothing with the client. Until the office confirms the request, the card keeps saying Waiting for a signal to reopen it. Until the office answers, the ticket stays as it is.
If it fails: the button appears only on Rejected, and only once — a second tap would ask twice for the same thing.
Scan a label to find a tool
Who: anyone with the app.
- Tap Scan, then Turn on the camera.
- Hold the QR code from the tool's printed label in the frame. The camera stops the moment it reads one, and the card opens.
- If the label is worn away, type the serial, the part number or the tool's name in the box under the camera instead — the search is always there, not only when the camera fails.
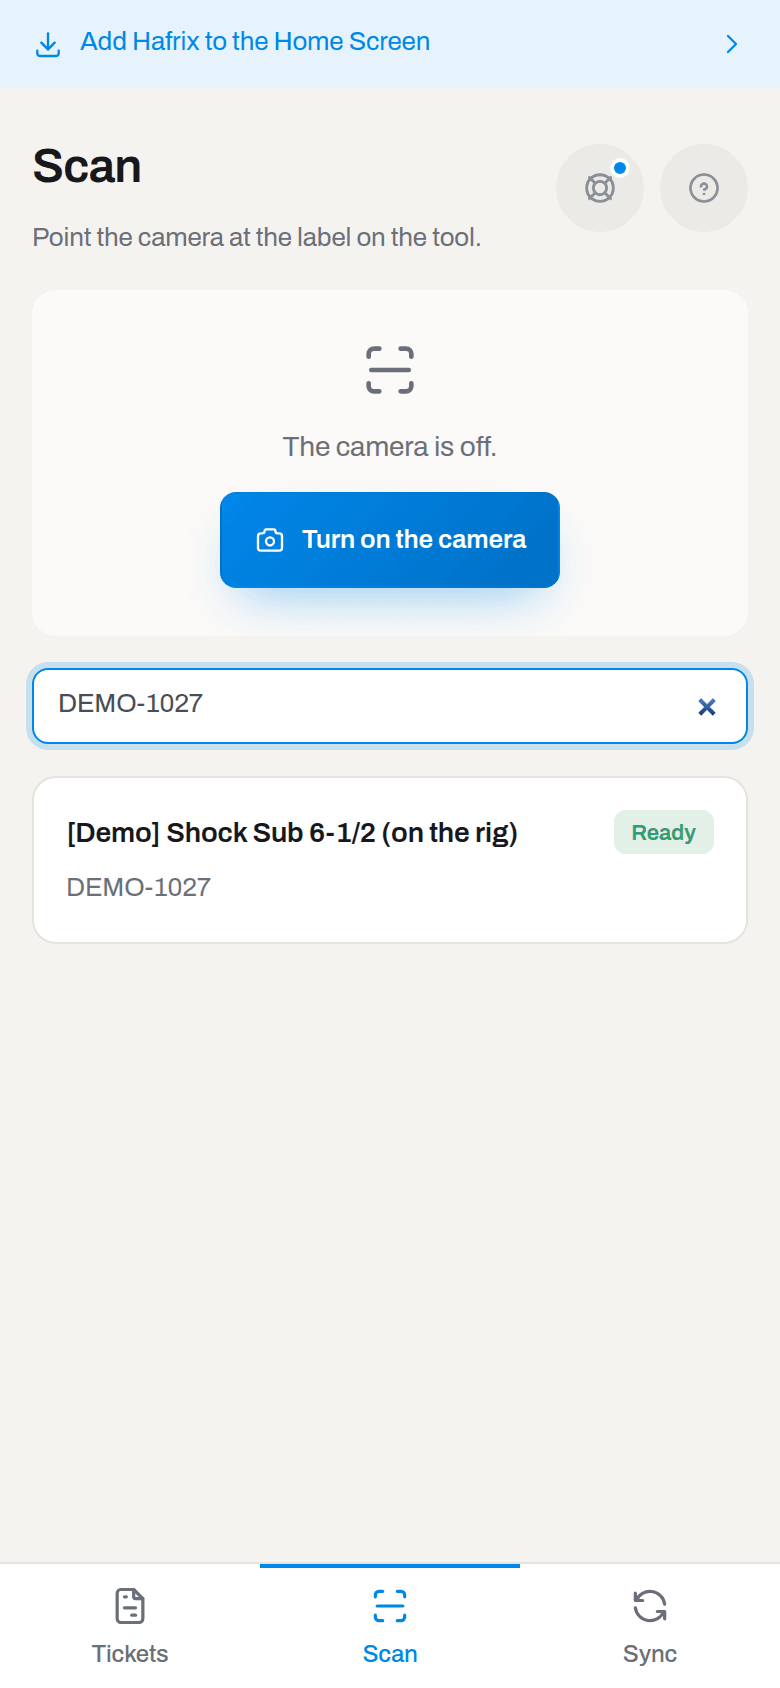
Result: the tool's card opens straight from the phone's own copy — no request goes out.
If it fails: This code is not a Hafrix label — the QR belongs to something else. The label points at a tool that is not on this phone — sync while you have a signal. The camera is not allowed on this phone — allow it in the phone settings, or use the search box.
Scan a shelf and put a tool on it
Who: anyone with the app reads the shelf; Operator and above puts a tool on it.
Shelves and racks carry the same kind of label as a tool, and the same scanner reads both — the app tells them apart on its own.
- Tap Scan, then Turn on the camera, and hold the shelf's label in the frame.
- The shelf's own screen opens: its name, its full address (yard, rack and shelf, from the top), and what this phone's last sync says should be standing on it.
- To put a tool here, tap Put it here, then either scan the tool's own label or find it by serial, part number or name in the list — the same search as on the Scan screen.
- Confirm. The move is queued like any other action in the field: it needs no signal right now, and it goes on its own as soon as there is one.
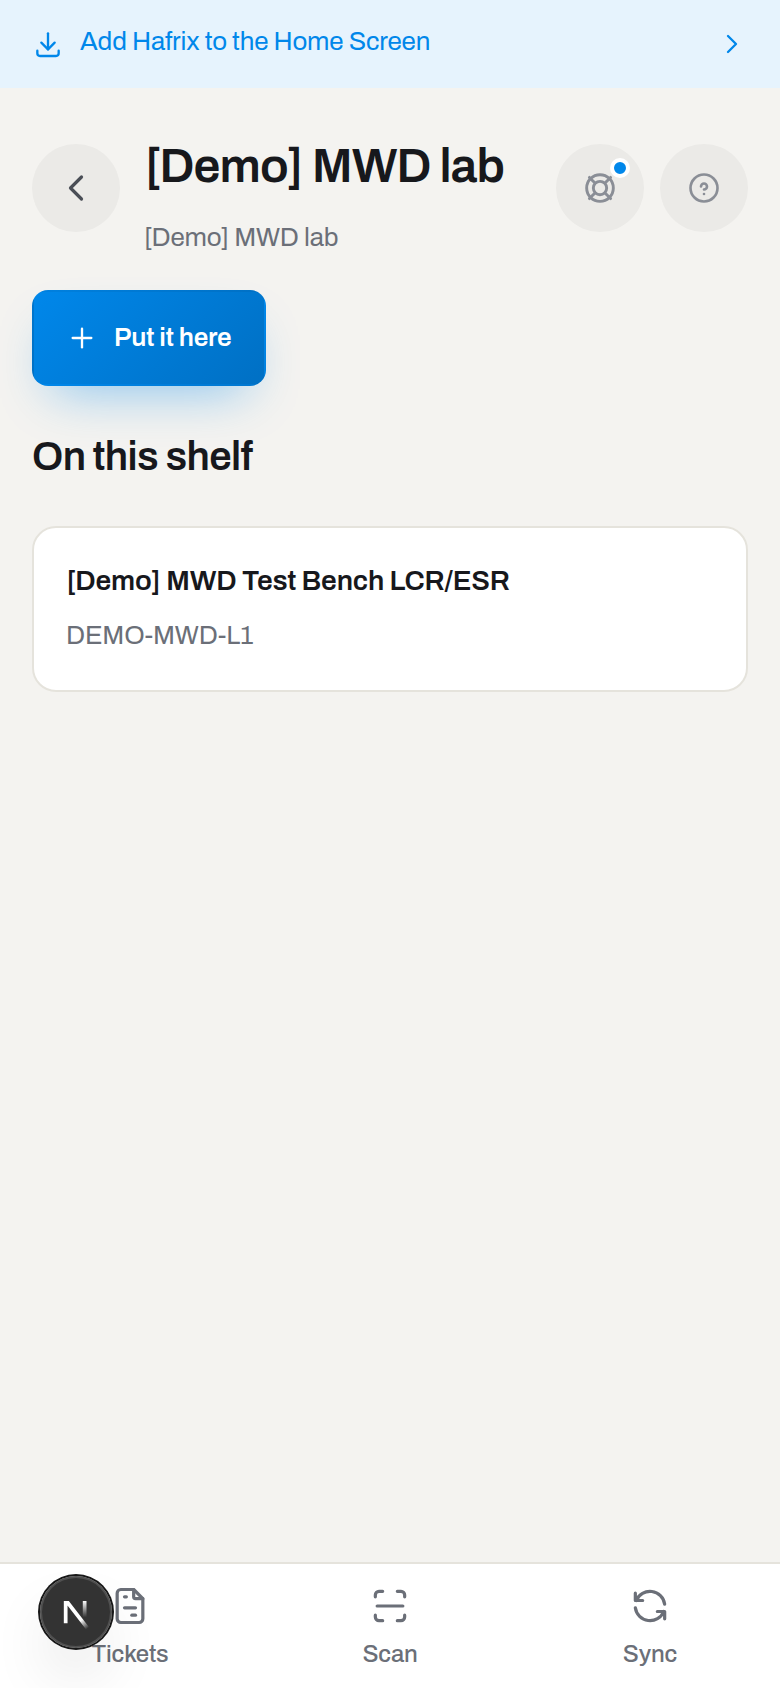
Result: the tool does not jump to the new shelf on the screen you are looking at — the phone never rewrites its own catalogue on a guess. Instead the shelf shows on the way here, waiting for a signal against that tool's name, and the button does not offer to queue the same move twice: scan the same tool again and the app tells you it is already on its way, rather than starting a second one.
If it fails: This location is not on the phone — sync while you have a signal; the device carries only the locations of your workspace. The label points at a tool that is not on this phone while picking a tool to put here — the same rule as scanning it from the Scan screen.
Read the tool card
Who: anyone with the app.
The card answers the question you have while standing next to the tool, in this order: is it fit to go, what is it, where does it stand, and what do its papers say.
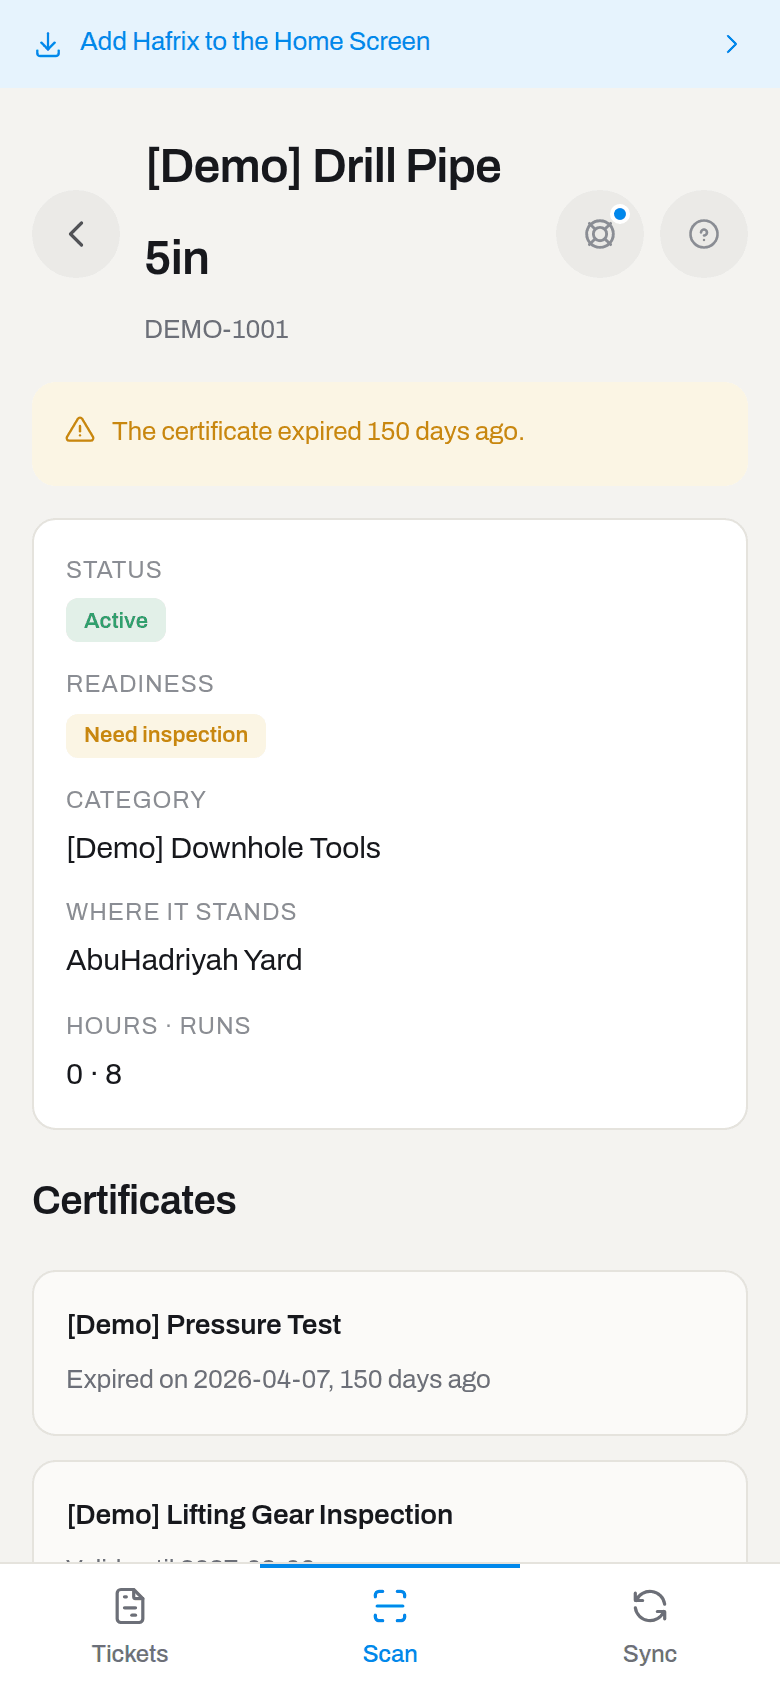
The first line is readiness in words, not a code — The certificate expired 146 days ago., Needs repair — this one does not go down the hole., Ready to run. Below it: Status, Readiness, Category, Where it stands, Hours · runs, then Certificates, one per type, each with its expiry. This is the short card; the full one, with files, history and label printing, is in the office — see Item card.
Money, rates and depreciation are not here and never travel to a phone.
Put a scanned tool on today's ticket
Who: Operator and above.
Warning
Read this before you tap it. The button behaves correctly only when there is no draft for today on the phone: it then starts a new shift with the tool already on a line. In the other two cases it does not do what it says, and the work goes nowhere:
- A draft typed on this phone and still in the queue — the button does not find it, starts a second shift for the same job and day, and the office refuses it: Needs a decision.
- A draft that came down from the office — the form opens titled Edit ticket but empty (Pick the job first, none of your lines), and saving it comes back Send failed with Not found.
Until this is fixed, use the scanner to read the tool and add the line from the draft itself: My tickets → the draft → Edit ticket → Add line → Equipment.
- On the tool card, tap Add to today's ticket.
- If the tool is not ready you get a warning, not a refusal: … is not ready to run right now. In the field the truth matters more than a lock: put it on the ticket and let the office see it. — Add anyway.
- If more than one draft is open for today the app asks Which ticket?.
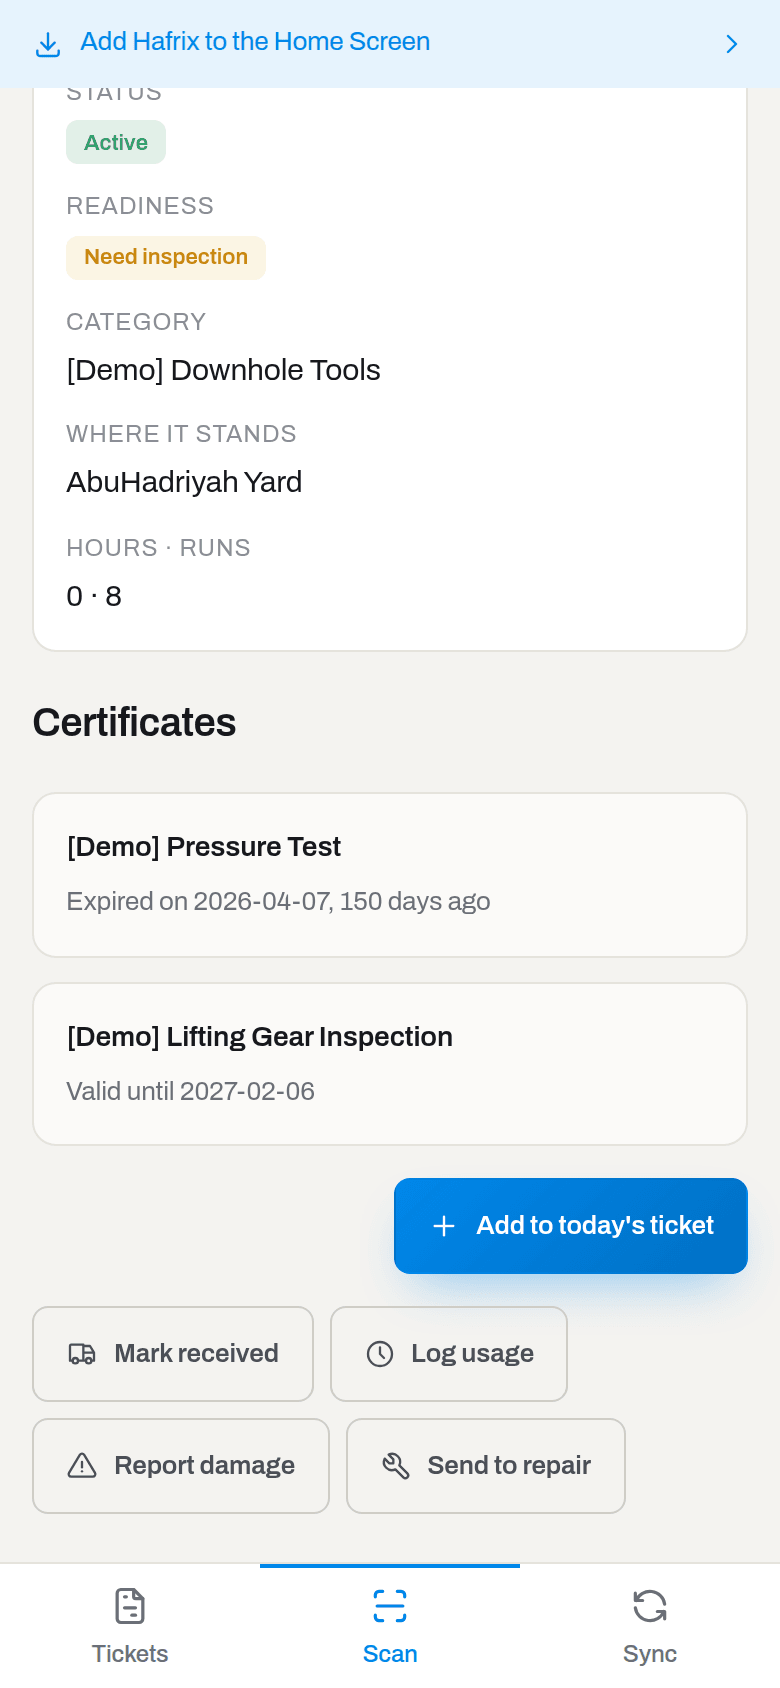
Result: the ticket form opens with an equipment line for this tool already on it — quantity, basis, hours and runs are all that is left to type. With no draft for today that form is a new shift, and everything on it is yours to keep; with a draft on the phone, see the warning above. Scanning the same tool twice does not add a second line.
Hand over and return equipment on the rig
Who: Mark received — Operator and above with the Dispatch section; Mark returned — Operator and above with the Items section.
- Tap Scan. While the search box holds fewer than two characters, the screen lists Equipment by job; start typing and the jobs give way to the search results.
- Pick the job. Each row shows the tool, its readiness and the state of its line on the job: Reserved, Active, Returned, Cancelled.
- Tap Mark received on a reserved row when the tool reaches the rig, or Mark returned on an active one when it goes back.
- In the dialog add Condition photos — up to three — and, if the representative wants it, a Signature.
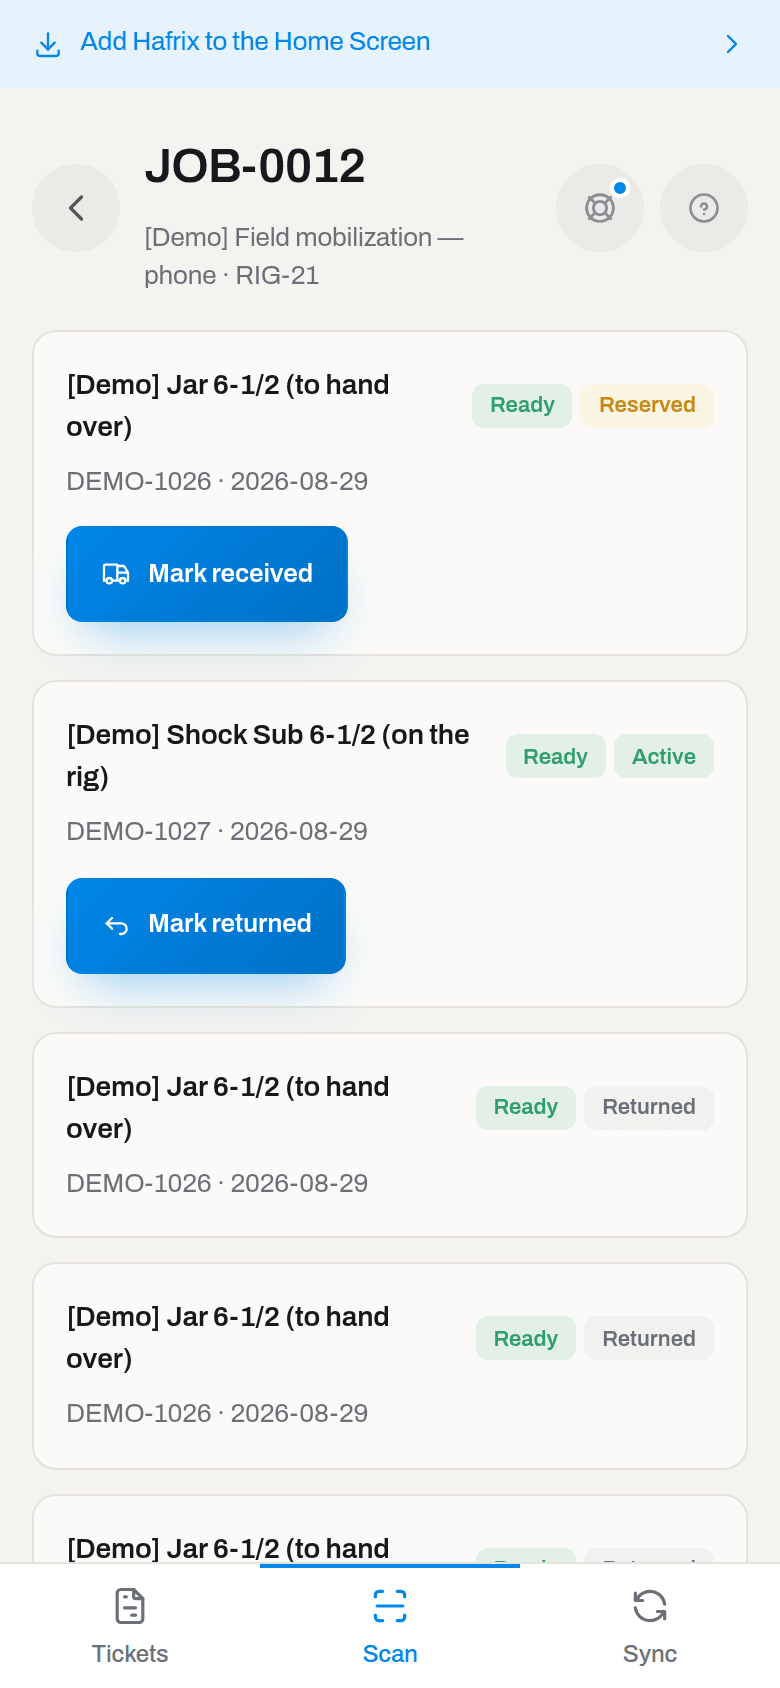
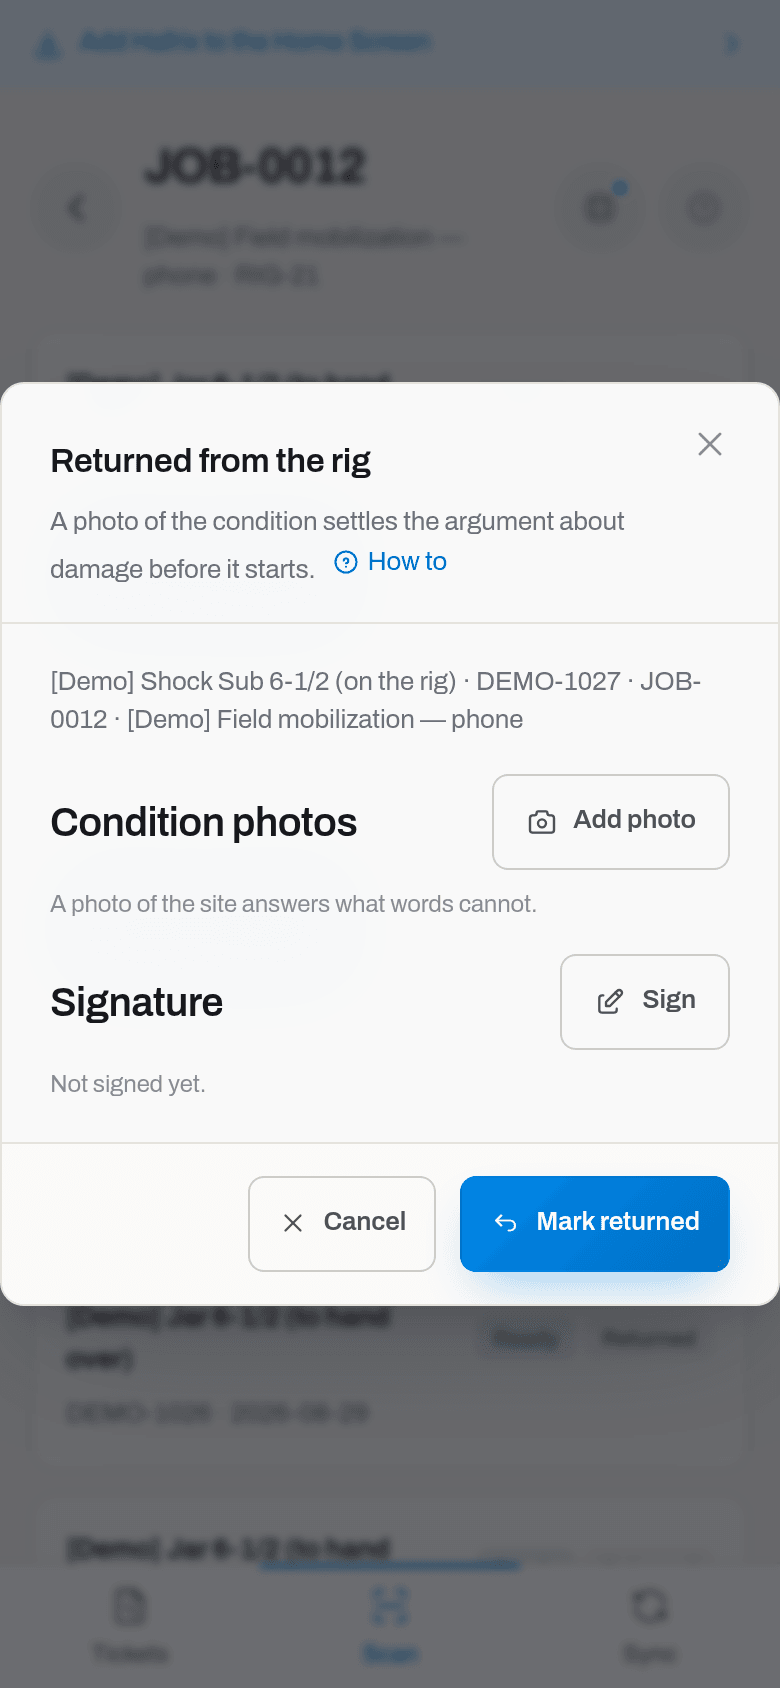
Result: the job line becomes Active on hand-over; on return the tool comes off the rig and the photos land on the tool's own files, where the office looks for them. The row keeps its place in the list with the new state rather than vanishing — but once nothing on a job is outstanding any more, the whole job drops off Equipment by job.
Every move you make here also writes a delivery note — a numbered document, DN-000n going out and RN-000n coming back, freezing what left the yard: serial numbers, hours and runs, and the parts fitted inside each unit. The phone does not ask whether to make one: handing a tool over on the rig is the moment the paper is handed over, and the signature you collect goes onto that document. Your own notes for the job are listed at the foot of the job screen under My delivery notes, and they read without signal like everything else. The office sees them on the job's Delivery notes tab and can email the PDF to the client from there.
If it fails: while the action is queued the row says Waiting to be sent and the button is not offered again — one tap is one event. If the office got there first, the phone treats the refusal as done, not as an error: the world is already in the state you asked for. If the only section you have is Dispatch, the move itself goes but its photo and signature cannot: uploading a file needs Items, Compliance, Tickets or Maintenance, and the chain stops there.
Note
A signature on a hand-over or a return is if the representative asks for it, not a condition of the move: at the rig there is not always anybody to sign. When it is taken it is a signature, not a squiggle — the Name, the Position, the time and, where the phone has a fix, the coordinates are recorded with it. The drawing itself is filed against the tool, and it goes up before the move it belongs to, so that the move can point at it. From then on it cannot be deleted from the tool's files: the office answers This file is part of a signed document — it cannot be removed.
Count a kit at the rig
Who: Operator and above with the Kits section — named on the sheet as the field side, or keeping tickets on the job the kit travels on. The sheet belongs to the rig, not to one name on it.
- Open Tickets. Sheets waiting for your count stand above the shifts, marked Your count; tap one. The return sheet is already on the phone when the kit leaves the base — the base does not have to open it for you — and each row says which way it goes: Check-out · your count, Check-in · you hand over.
- The sheet lists every position of the standard — what is required, what you have counted so far, and anything damaged.
- Tap a line and enter your figure:
- on a check-out it is Accepted — what actually arrived in the box;
- on a check-in it is Handing over — what goes back to the base. It comes prefilled with what arrived at the rig on the check-out, so you correct the figure you see instead of typing the sheet from nothing.
- If something is damaged, put the quantity in Damaged, pick the Reason, and say what happened in Details — with a photo. Damage without words is refused: that justification is what the manager approves.
- Save the line and move on. Everything is written on the phone first and sent when there is signal.
- On a check-in, anything in the box that the sheet does not list — a cable from another kit, a tool from the rig store — goes on it with Add a position: scan its label or search the phone by name or serial number, then count it like any other line, damage and photo included. What is not declared arrives at the base as iron nobody wrote down.
- When every line is counted, sign: Sign — accepted on a check-out, Sign — handed over on a check-in.
Result: the base sees your column and, where the two counts differ, settles the difference. Until then nothing is written off and no stock moves — closing the sheet is the base's step, and it is the only one that touches stock. A position you added stands on the sheet marked Not sent yet until the queue delivers it — you counted it, so you see it.
If it fails: the signature is one action per sheet, and it goes into the queue like everything else. If the base closed the sheet while you were out of signal, the phone treats the refusal as done: the world is already in the state you asked for. Add a position offers only what has already synced to this phone: a tool with no card in Hafrix has to be opened by the base first, and the same position cannot go on the sheet twice — count it on the line it is already on.
Log running hours
Who: Operator and above with the Items section.
- Open the tool card and tap Log usage.
- Enter Running hours, Runs, or both, and RPM if you know it.
- Confirm with Log usage.
Result: the hours go into the tool's life, not only into an invoice — that is what makes how much is left in it a real number. When the tool is on a job, the hours are tied to that job too. RPM turns the hours into KREV, the measure a cutter set is really worn out by — the office works it out, you only report what the string was turning at. If the tool is an assembly, every part fitted in it gets the same hours and KREV.
If it fails: the confirm button stays grey until at least one of Running hours and Runs has a number in it. Consumables have no running hours, so the action is not offered for them at all. The card does not wind its own counter forward — the new figure appears after the next sync, when the office has confirmed it.
Fit or remove a part
Who: Operator and above with the Items section.
- Open the card of the assembly — the reamer body, the motor — and tap Install part.
- Point the camera at the part's label. The tool appears by name and serial; pick a Slot if the assembly has seats.
- Confirm with Install.
To take a part off, open the part's card instead, tap Remove part and say why it came off — worn, damaged, redress, moved to another assembly, lost.
Result: the part moves into the assembly (or out of it) and the period is recorded: from when to when it stood there and how many hours and KREV it earned in it. From then on, hours logged on the assembly wear this part too.
If it fails: Install part is only offered on an assembly, and Remove part only on something that is fitted in one — a kit box takes contents by a plain move, not by installing. If the label is not in the device's list, sync and try again. The office may still refuse a part that is already fitted somewhere, a full slot or a size that does not match; the queue keeps the attempt with the reason so you can see what happened.
Report damage
Who: Operator and above with the Items section.
- Open the tool card and tap Report damage.
- Describe What happened and add up to three photos.
- Confirm with Report damage.
Result: the event lands in the tool's timeline with the photos. Nothing changes status by itself: the tool is still whatever it was and still counts as available for planning, so the office has to decide. Managers and admins get a Damage reported: … row and an email.
If it fails: the description is required — a photo without a sentence is not a report.
Report failure
Who: Operator and above with the Items section.
- Open the tool card and tap Report failure.
- Choose the Failure mode — the office's list for this fleet, not free text — and add Details if you have them.
- Confirm with Report failure.
Result: a Failed event lands in the tool's timeline with the mode and details, and a snapshot of the tool's hours and runs at that moment. Nothing changes status by itself — the tool still counts as available until the office says otherwise. Managers and admins get a notice and an email; the office reviews it from there and opens a work order if the tool needs one. There is no photo on this form yet — put photos of the tool's condition on the ticket or the item card instead.
If it fails: a Failure mode is required before you can confirm.
Send a tool for repair
Who: Operator and above with the Maintenance section.
- Open the tool card and tap Send to repair.
- Write What broke — one line, the name this repair will carry in the office queue.
- Add Details and up to three photos of the breakdown if there is anything to show.
- Confirm with Open work order.
Result: a work order is opened on that tool and the tool goes In repair, so the office stops planning it onto jobs. The photos hang on the work order itself, where the repair is decided. Managers and admins get a Repair opened at the rig: … row and an email — with no signal, both wait in the queue with the work order and go together.
The office answers on the same card: once the phone syncs, the repair appears under Repairs with the number the office gave it — WO-0042 — and its state. When the work order is closed there, the row says so, and that is how you know the tool may come back to work.
Money is not asked for here and never is: the service level, who pays and the price are the office's part of the same document — see Maintenance.
If it fails: What broke is required. Consumables are not repaired, so the action is not offered for them. If the Maintenance section is not granted to your group, the button is not there at all. Sending twice never opens two work orders: the key is made on the phone, and the second attempt is read as already delivered.
Note
Report damage and Send to repair are two different things, and both are honest. Damage records what happened on the rig and leaves the decision to the office — the tool keeps working. Repair is the decision: the tool stops working and a document is opened for it. If in doubt, report the damage.
Ask for a part
Who: Operator and above with the Procurement section.
- Tap Ask for a part — on the ticket you are working on, or on the tool card the scanner opened.
- Say What: scan the label, or find the item by serial, part number or name. The phone searches its own copy of the fleet, so this works with no signal. If the item is not on the phone at all, write it in words under Or say what you need and add a Part number — a line without a card is a perfectly good line to order.
- Fill in How many and Why. The unit comes from the item card and cannot be changed here; a line written in words has its own Unit.
- Check Deliver to. It is a base — a yard, a lab or a workshop — not the rig: the base is where a supplier delivers.
- Confirm with Ask for a part, then open the request and send it with Send for approval.
Result: the line goes onto your open request, and every part you ask for on that shift goes onto the same one — a request per part would be twenty pieces of paper a week. The request sits on the phone until there is a signal; Send for approval is a separate step for the same reason a ticket is submitted separately — you decide when the list is complete. Once it is sent, the approvers at the base get PR-… is waiting for approval, an email with your lines, and the job they are for. Their answer comes back to the phone with the next sync.
Where to see it: Part requests stands on the Tickets screen, above the shifts, and lists every request that is still live — yours and any on your job. Open one to read what was asked and what the base answered. A request that was turned down carries the reason; a closed one drops off the list.
Asking from a ticket says which job it is for, and the office sees asked for JOB-1044 next to the line — that is half the answer to "why do they need it". Asking from a tool card says which tool it is a replacement for.
If it fails: a line needs either an item or words — "something for the rig" is not an order. The quantity must be greater than zero. If the Procurement section is not granted to your group, the button is not there at all, and the requests never reach the phone. Asking twice never opens two requests: the key is made on the phone, and the second attempt is read as already delivered.
Note
Prices are not on this screen and never will be. The phone's storage is not encrypted, so what a supplier charges stays in the office — see Procurement. What travels here is what was asked, for what job, and what the base decided.
Receive a customer tool
Who: Operator and above with the Maintenance, Items, Clients and Locations sections — the work order needs Maintenance, and the owner, category and location pickers need the other three to read the phone's own copy of those lists.
- On the Scan screen, scan the tag or type the serial. GreyWolf, ARO, Seadrill and the rest carry their own barcodes, so Receive as customer tool shows up wherever the phone does not recognize the code as one of ours, or the search turns up nothing.
- Already on the phone: check the Owner, then confirm with Receive tool — the card is not duplicated.
- New to the fleet: pick the Owner, Category and Location, and add a Name if the tag does not say enough. The last category and location picked are remembered for the next tool off the same truck. Category lists only categories that are repaired. Categories the workshop never repairs are left out, because they cannot get a Redress work order.
- Add the client's PO/TO and any Notes for the workshop if you have them — both are optional.
Result: one request opens a Redress work order on the tool (billed to the owner) and prints a RC-… receipt note — the paper that proves the tool came in. The item, the work order and the note are one atomic step in the office, so a dropped connection and a retry from the queue never leave a second card behind.
If it fails: a serial that belongs to us, not a client, is refused — open the work order from that tool's own card instead. If the owner on the phone does not match the one already on record for that serial, the office says so. Receiving the same serial twice while the first attempt is still queued does nothing — the second scan reads it as already waiting. A tool already on the phone in a category that is not repaired shows This category is not repaired in place of Receive tool. Open its card and record the damage instead. On that category, damage means scrap.
Check what has arrived and what has not
Who: anyone with the app.
- Tap Sync.
- Read Not sent. Zero means the office has everything this phone typed.
- Sync now pulls the catalogues by hand; Send N tickets pushes the queue. Both need a signal, and both happen on their own anyway.
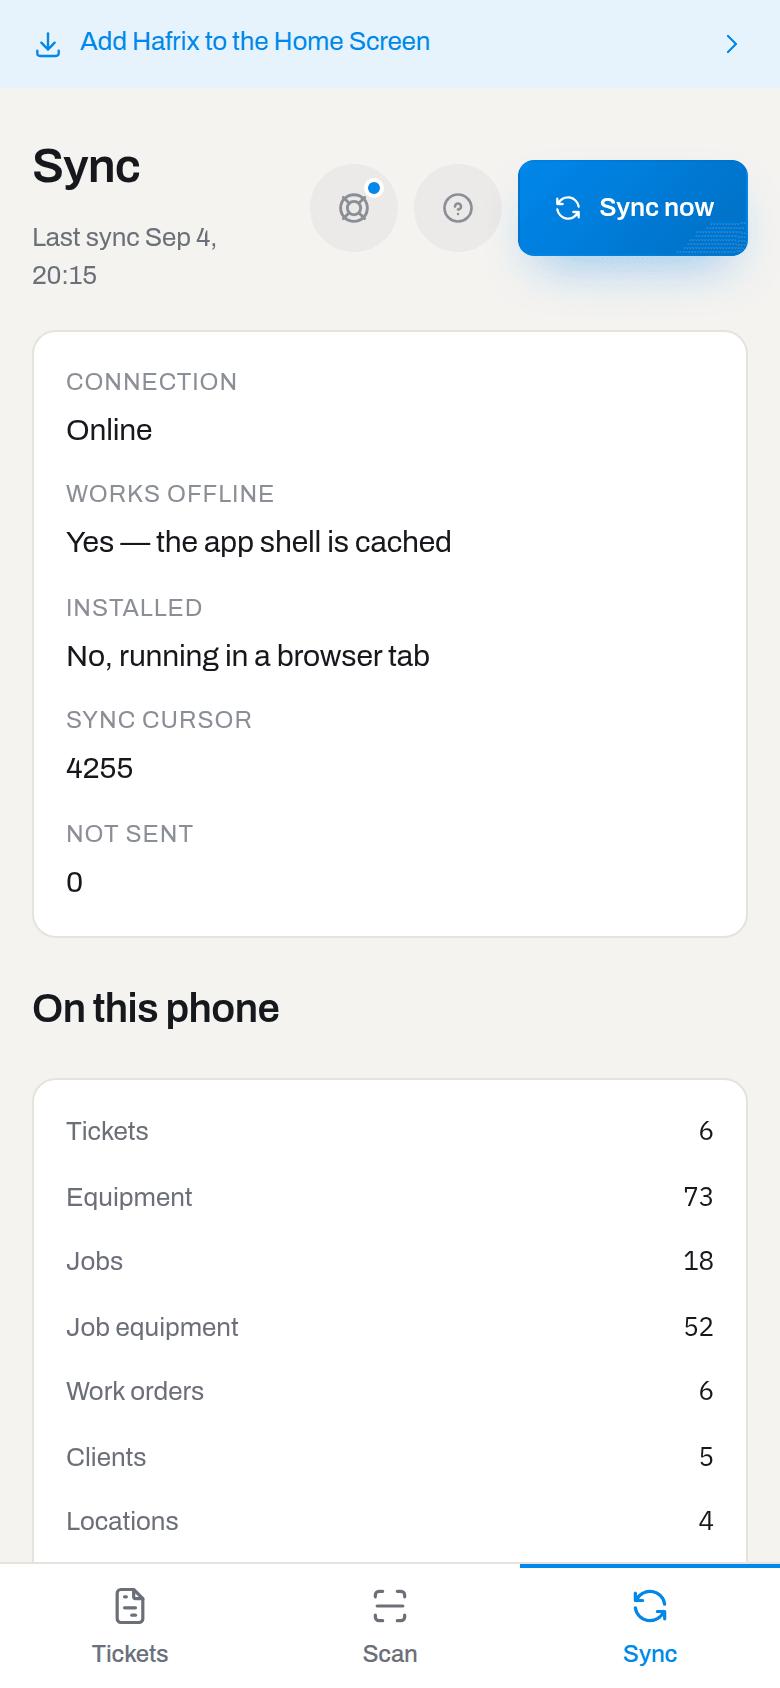
Result: the screen is the whole truth about this phone — Connection, Works offline, Installed, Sync cursor, Not sent, then how many tickets, tools, jobs and catalogue rows are stored, and which account and workspace the phone is signed in to.
Note
Not sent here and the number on the Tickets button are two different counts. The button counts documents — three means three shifts. Not sent counts steps still to send, and it includes work on tools: one shift with two photos waiting to go is 1 on the button and 4 here (the ticket, two photos, the submission). Both reach zero together.
If it fails: Sync failed — details on the Sync screen in the strip means the last pull was refused; the error is printed here. If shifts have been sitting unsent for five days, the strip turns red — Not sent for N days — and opens the list.
Sign out, or lose the phone
Who: anyone with the app; revoking a device — the person who owns the account.
- On Sync, tap Sign out. If anything is still waiting to go, the dialog says so — N documents have not been sent yet — and offers Send N tickets right there. Send them if you have a signal; the button to confirm then reads Sign out anyway.
- To kill a phone you no longer hold, open the office app on any device: Account → Devices, and revoke that session.
Result: the catalogues and the local tickets are erased from the phone. What has not been sent stays: it is work the office has never seen, and signing out does not throw it away — sign in to the same workspace again and it goes out with the first signal. Signing out wipes the rest there and then; a revoked session, or a password change, wipes the phone whole — queue included — the next time it reaches the network and the office refuses it. A phone switched off in a drawer keeps its copy until it is switched on; and if the sign-in itself ran out (a sign-in ends after 1 hour without anything you do — screens refreshing themselves do not count, and neither does reading what is already on the phone without signal, because the office never sees it — and in any case 24 hours after it began), that is not a revocation: the phone drops the catalogues but keeps the unsent queue, the sign-in form already shows your email address, and the same person signing in again sends the queue out. After that sign-in the catalogues download again in full, which takes a while on a weak rig signal. Nothing is lost in the office: submitted shifts live on the server, and signing in again syncs them back down.
Work left from another sign-in
Who: anyone whose account reaches more than one workspace, and anyone signing in on a phone a colleague used.
A phone belongs to one sign-in at a time: one workspace, one person. Sign in while work from the sign-in before yours is still waiting to go, and the app stops instead of opening — on Unsent work from another workspace, or, when it was a colleague in this same workspace, on Unsent work from another sign-in.
- Read the line: it names the workspace, or the person who typed the shifts, and how many documents the office has never seen.
- Hand the phone back to that sign-in. Sign out to send it, then sign in to that workspace — or let the colleague sign in. The queue goes out by itself with the first signal; watch Not sent reach zero on Sync.
- Sign in again afterwards. The phone is empty by then and opens normally.
- Erase and work here throws that work away instead. Confirm it only if you know it is not needed: the office never received it, so nobody can bring it back.
Result: nobody's shift is filed under somebody else's name, and nothing disappears unless a person decides to throw it away.
If it fails: the screen does not go away on its own — that is the point. It clears when the queue is delivered by the sign-in that typed it, or when it is erased here.
Open this book on the phone
Who: anyone with the app.
- Tap ? in the header of the screen you are on.
- The panel opens at the part of this page that answers that screen: the tool card at the tool card, the queue at the queue. Inside a dialog the How to link next to its hint does the same for that one job.
- Search the manual jumps anywhere else in the book.
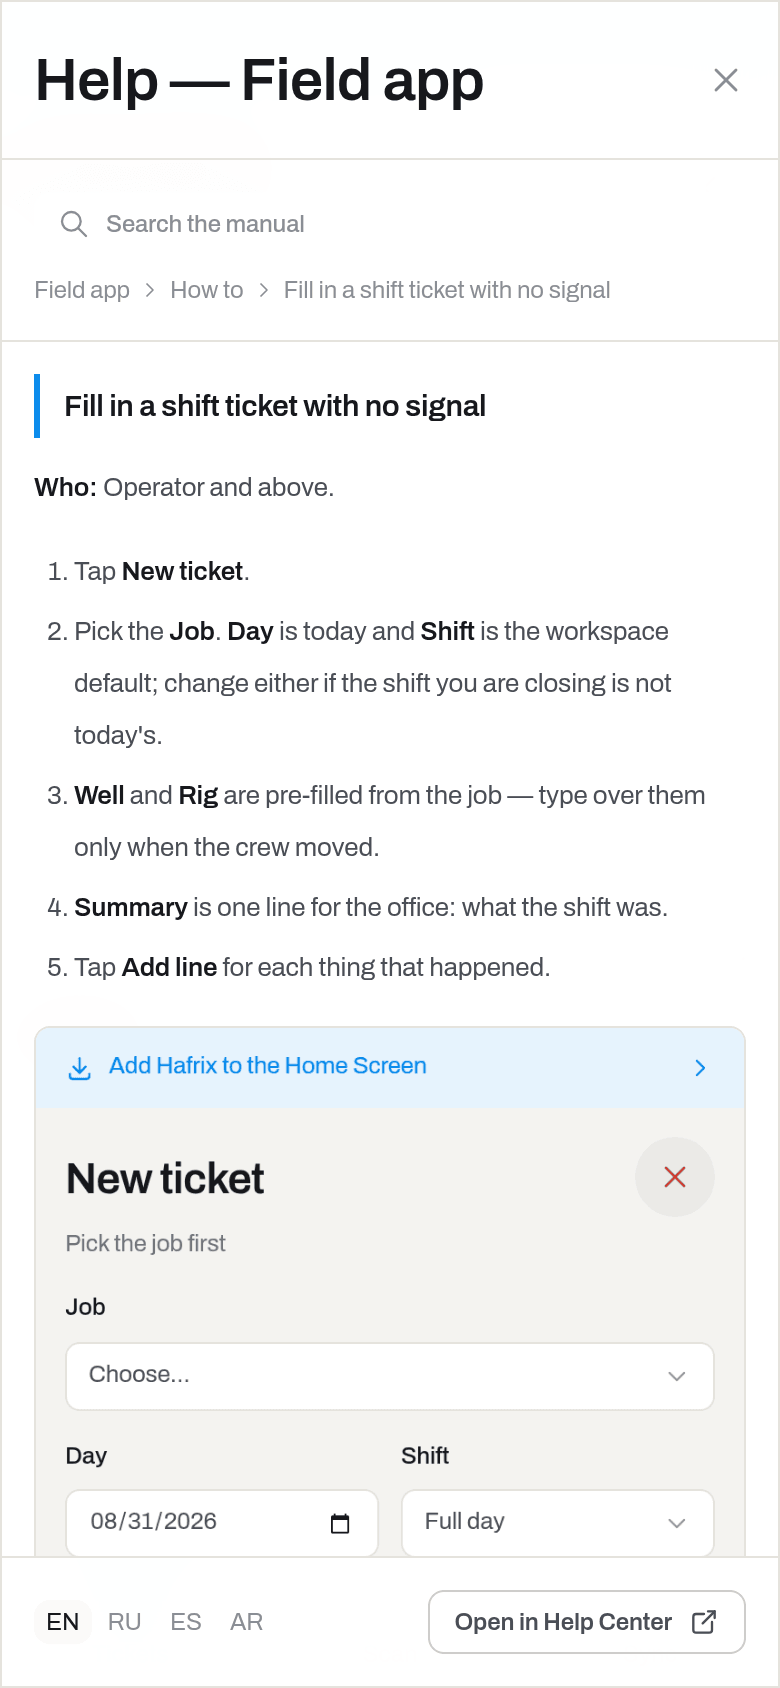
Result: the panel takes the whole screen while you read and closes back to exactly where you were — nothing typed is lost, because the screen underneath keeps its state.
If it fails: The manual needs a connection — this page has not been read on this phone yet. Open it once where there is a signal and it stays: a page you have read is kept with the rest of the app and opens at the rig without one.
Ask Hafrix for help
Who: anyone with the app.
- Tap the life ring in the header of any screen. A dot on it means support has written back and the conversation is waiting for you.
- Ask starts a conversation: a subject, then the question itself. One question per conversation — it keeps the answer to the point.
- Add photo puts the screen or the tool in the conversation — up to 4 shots on one message. Photograph what you are asking about: support reads the picture too, and one shot of the screen says what a paragraph of description cannot.
- Send puts the question — photos and all — in the same queue as a shift. With no signal it stays on the phone and goes out by itself once there is one; until then it reads Not sent.
- The answer lands in the same conversation, a few minutes later. Read it there and reply in the box at the bottom; a reply takes photos the same way.
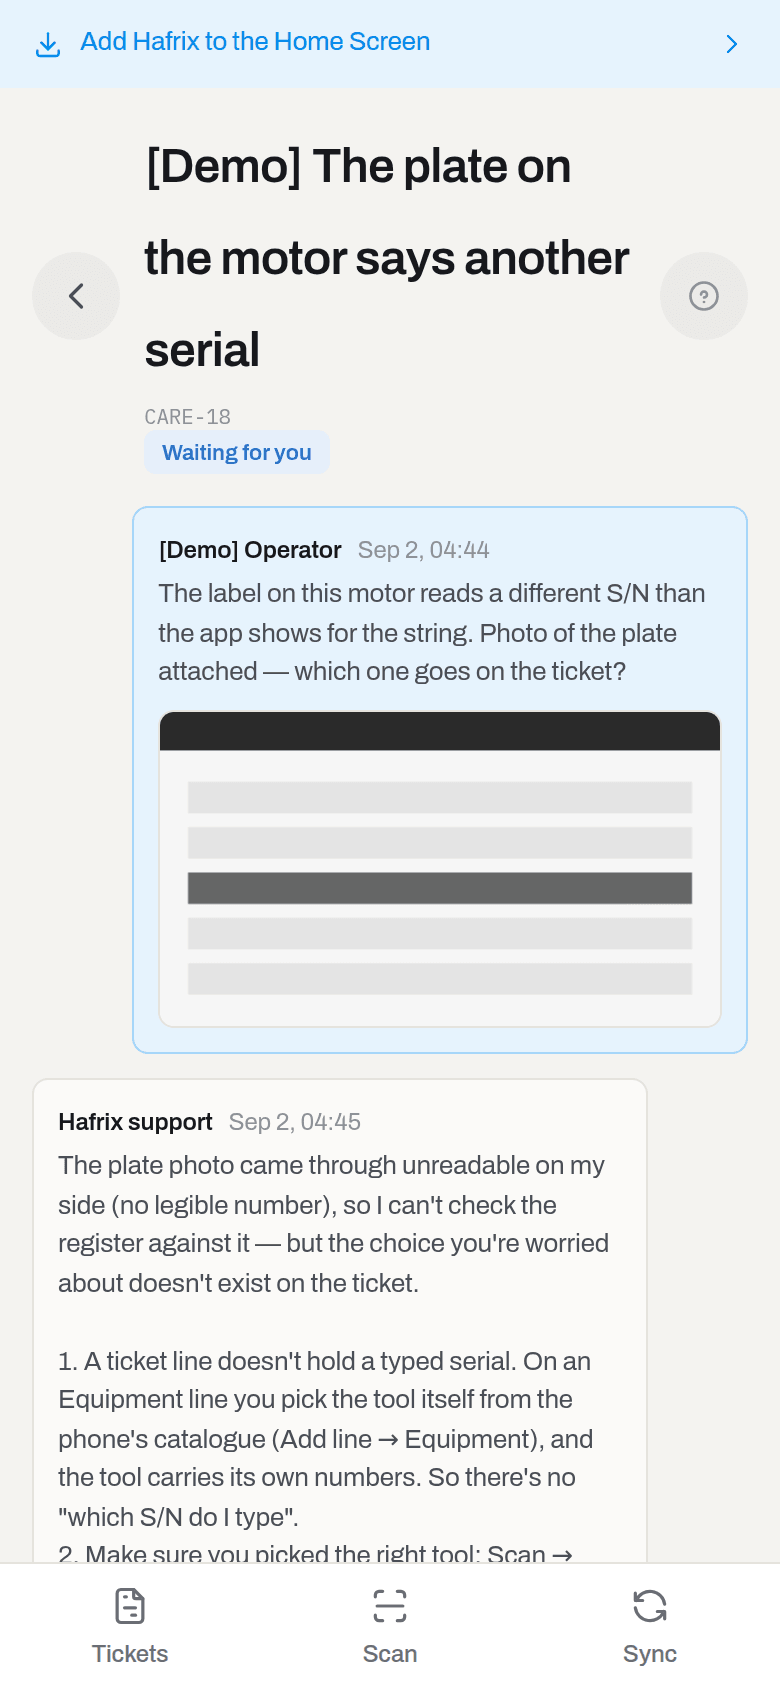
Result: the conversation is yours alone — nobody else in the workspace sees it, not even an admin. It is the same thread you would find under Support in the office app, so a question started at the rig can be finished at a desk, photos included.
If it fails: Send failed under your own message means the office refused it — Try again sends it again, Discard drops it from the phone. A question sitting at Not sent is not a failure: there is no signal, and the queue empties itself when there is one. A photo goes out before the words it belongs to, so a refusal about a file — A conversation holds at most 10 files — stops the message as well: drop a shot, or start a new conversation.
Support answers here in words, not by pointing. On a phone the chat is the whole screen, so there is nothing to point at, and it will never send you to an office screen this app does not have: where only the office can act, it says so and tells you who to ask.
Fields
The ticket
| Field | Meaning | Required | Who edits |
|---|---|---|---|
| Job | The job this shift belongs to; the client comes with it | yes | Operator+ |
| Day | The day being closed | yes | Operator+ |
| Shift | From the workspace's shift catalogue; Whole day if there is none | no | Operator+ |
| Well, Rig | Taken from the job; type over only if the crew moved | no | Operator+ |
| Summary | One line for the office | no | Operator+ |
| Photos | Up to 10, redrawn on the phone, EXIF dropped | no | Operator+ |
| Signature, Name, Position | The client representative; required where the workspace asks for it | depends | Operator+ |
A ticket line
| Field | Meaning | Required | Who edits |
|---|---|---|---|
| Kind | Equipment, Labor, Consumable, Service | yes | Operator+ |
| Equipment | The tool, for equipment and consumable lines | yes for equipment | Operator+ |
| Trade, Name | For labour lines | no | Operator+ |
| Take from | The location a consumable comes off | no | Operator+ |
| Quantity, Unit | What is billed | yes | Operator+ |
| Basis | Operating or Standby | no | Operator+ |
| Running hours, Runs | Wear, separate from what is billed | no | Operator+ |
| Description | Free text on the line | no | Operator+ |
What the system tells you
| When | Feed row | Who gets it | |
|---|---|---|---|
| A shift is submitted | Ticket TCK-… is waiting for approval | — | Managers and admins |
| The office sends a shift back | Your ticket TCK-… came back | Ticket TCK-… was sent back to you | The person who wrote it |
| Damage is reported from the rig | Damage reported: … | Damage reported on … | Managers and admins |
| A repair is opened from the rig | Repair opened at the rig: … | Repair WO-… opened from the field on … | Managers and admins |
| A part request is sent for approval | PR-… is waiting for approval | Purchase request PR-… needs your approval | The approvers of the workspace |
| A part request is approved or turned down | PR-… was approved / PR-… was turned down | Purchase request PR-… was approved / turned down | The person who asked |
| An operator is invited | — | … invited you to … on Hafrix, with the address of the field app | The person invited |
Hand-overs, returns and logged hours are quiet on purpose: they are seen by whoever opens the tool. A work order opened in the office is quiet too — the person who opened it is sitting with the people it would tell. A batch of shifts sent back in one go collapses into one row and one email per author, not one per ticket.
Related
- Tickets — the same documents in the office: the approval queue, rejection, correction.
- Item card — the full card of the tool this app scans: files, certificates, history, label printing.
- Items — the list the phone's copy of the fleet comes from, and how readiness is decided.
- Dispatch — who reserved the equipment this app hands over.
- Procurement — what happens to the part you asked for: approval, the order to a supplier, the goods arriving.
- Support — the same conversations in the office app, and what happens to a defect you report.
- Account — devices and sessions, including revoking a lost phone.
- Roles & access — why a section, and therefore a screen, is missing.
FAQ
I signed in but I got the office app, not this one. — You opened the office address. Open /m (or the icon on the Home Screen); the invitation email for an operator points there.
My tickets is empty. — Only your own tickets travel to a phone; another crew's shift stays with them. If it is empty on a phone that has never synced, the screen says so and asks you to open Sync while you have a signal.
I asked support and nothing came back. — Answers take a few minutes, and none of it moves without a signal: the question itself only leaves the phone when there is one. Open the life ring again later — a dot on it means the answer is there.
I submitted the shift and the badge still says Not sent. — There is no signal. Nothing else is needed: the queue empties itself when the phone finds one, at the latest a minute later. Watch Not sent on the Sync screen.
Can I approve a shift here? — No. Approving is done in the office, where the person doing it has a screen and a network. The phone is for the people who are not there.
The tool is not ready. Can I still put it on the ticket? — Yes. You get a warning and Add anyway. The tool is already on the rig; the office sees the warning when it approves the shift.
Where did my photos go? — They are erased from the phone as soon as the shift is submitted and that submission has come back down in the sync — not when the office approves it, and not before the photo itself has reached the bucket. A submitted document is frozen and its photos live in the office; ten photos a shift for a month would fill the storage the browser is free to wipe — along with the shifts you have not sent.
Do I need to update the app? — No. It updates itself when the phone next reaches the network; there is no store and nothing to install twice.
Should I report damage or send the tool for repair? — Report the damage when the tool is still working and somebody in the office has to decide; send it for repair when it is out of the hole for good and the workshop has to have it. The repair stops the tool being planned onto jobs, so it is a decision, not a note.
I asked for a part and nothing happened. — Asking puts the line on a request; the request still has to be sent. Open Part requests, open the one marked Not sent, and tap Send for approval. With no signal it waits there and goes by itself when the phone finds one.
Can I ask for two different parts at once? — Ask twice. Both lines land on the same request, and you send it once when the list is complete.
I sent a tool for repair and it has no number. — The number is the office's, and the phone gets it with the next sync. Until then the row under Repairs simply is not there and the queue says the repair is waiting for a signal.
Updated 2026-09-02
New to Hafrix?
See this workflow in your operation
See how field records connect to equipment and office workflows. Bring a real field scenario to a Hafrix demo.