Admin settings
The half of Settings that is about the workspace and the people in it: who has an account, what each of them may open, what the whole company is told, what everyone actually did, and how a spreadsheet of equipment becomes items in the register.
Where: capsule → profile menu → Settings (/settings). The page is a strip of tabs; the admin ones — Alerts, Workspace, Email, Announcements, Users & invites, Usage, Groups, Import CSV — are the ones described here. The tabs before them are reference data a manager keeps: see Reference data.
Who can do what
| Role | In these tabs |
|---|---|
| Viewer, Operator | Nothing — Settings is not in their profile menu at all |
| Manager | Opens Settings, but sees only the reference-data tabs |
| Admin | Everything on this page: people, invitations, groups, announcements, usage, import, logo, mail transport |
| Owner | + Make owner — passing the workspace on is the owner's alone, not every admin's |
Note
Import CSV needs one more thing besides the role: the Items section. If a group restriction has taken Items away from you, the entry is not there — the import writes items, so it lives behind the same door.
At a glance
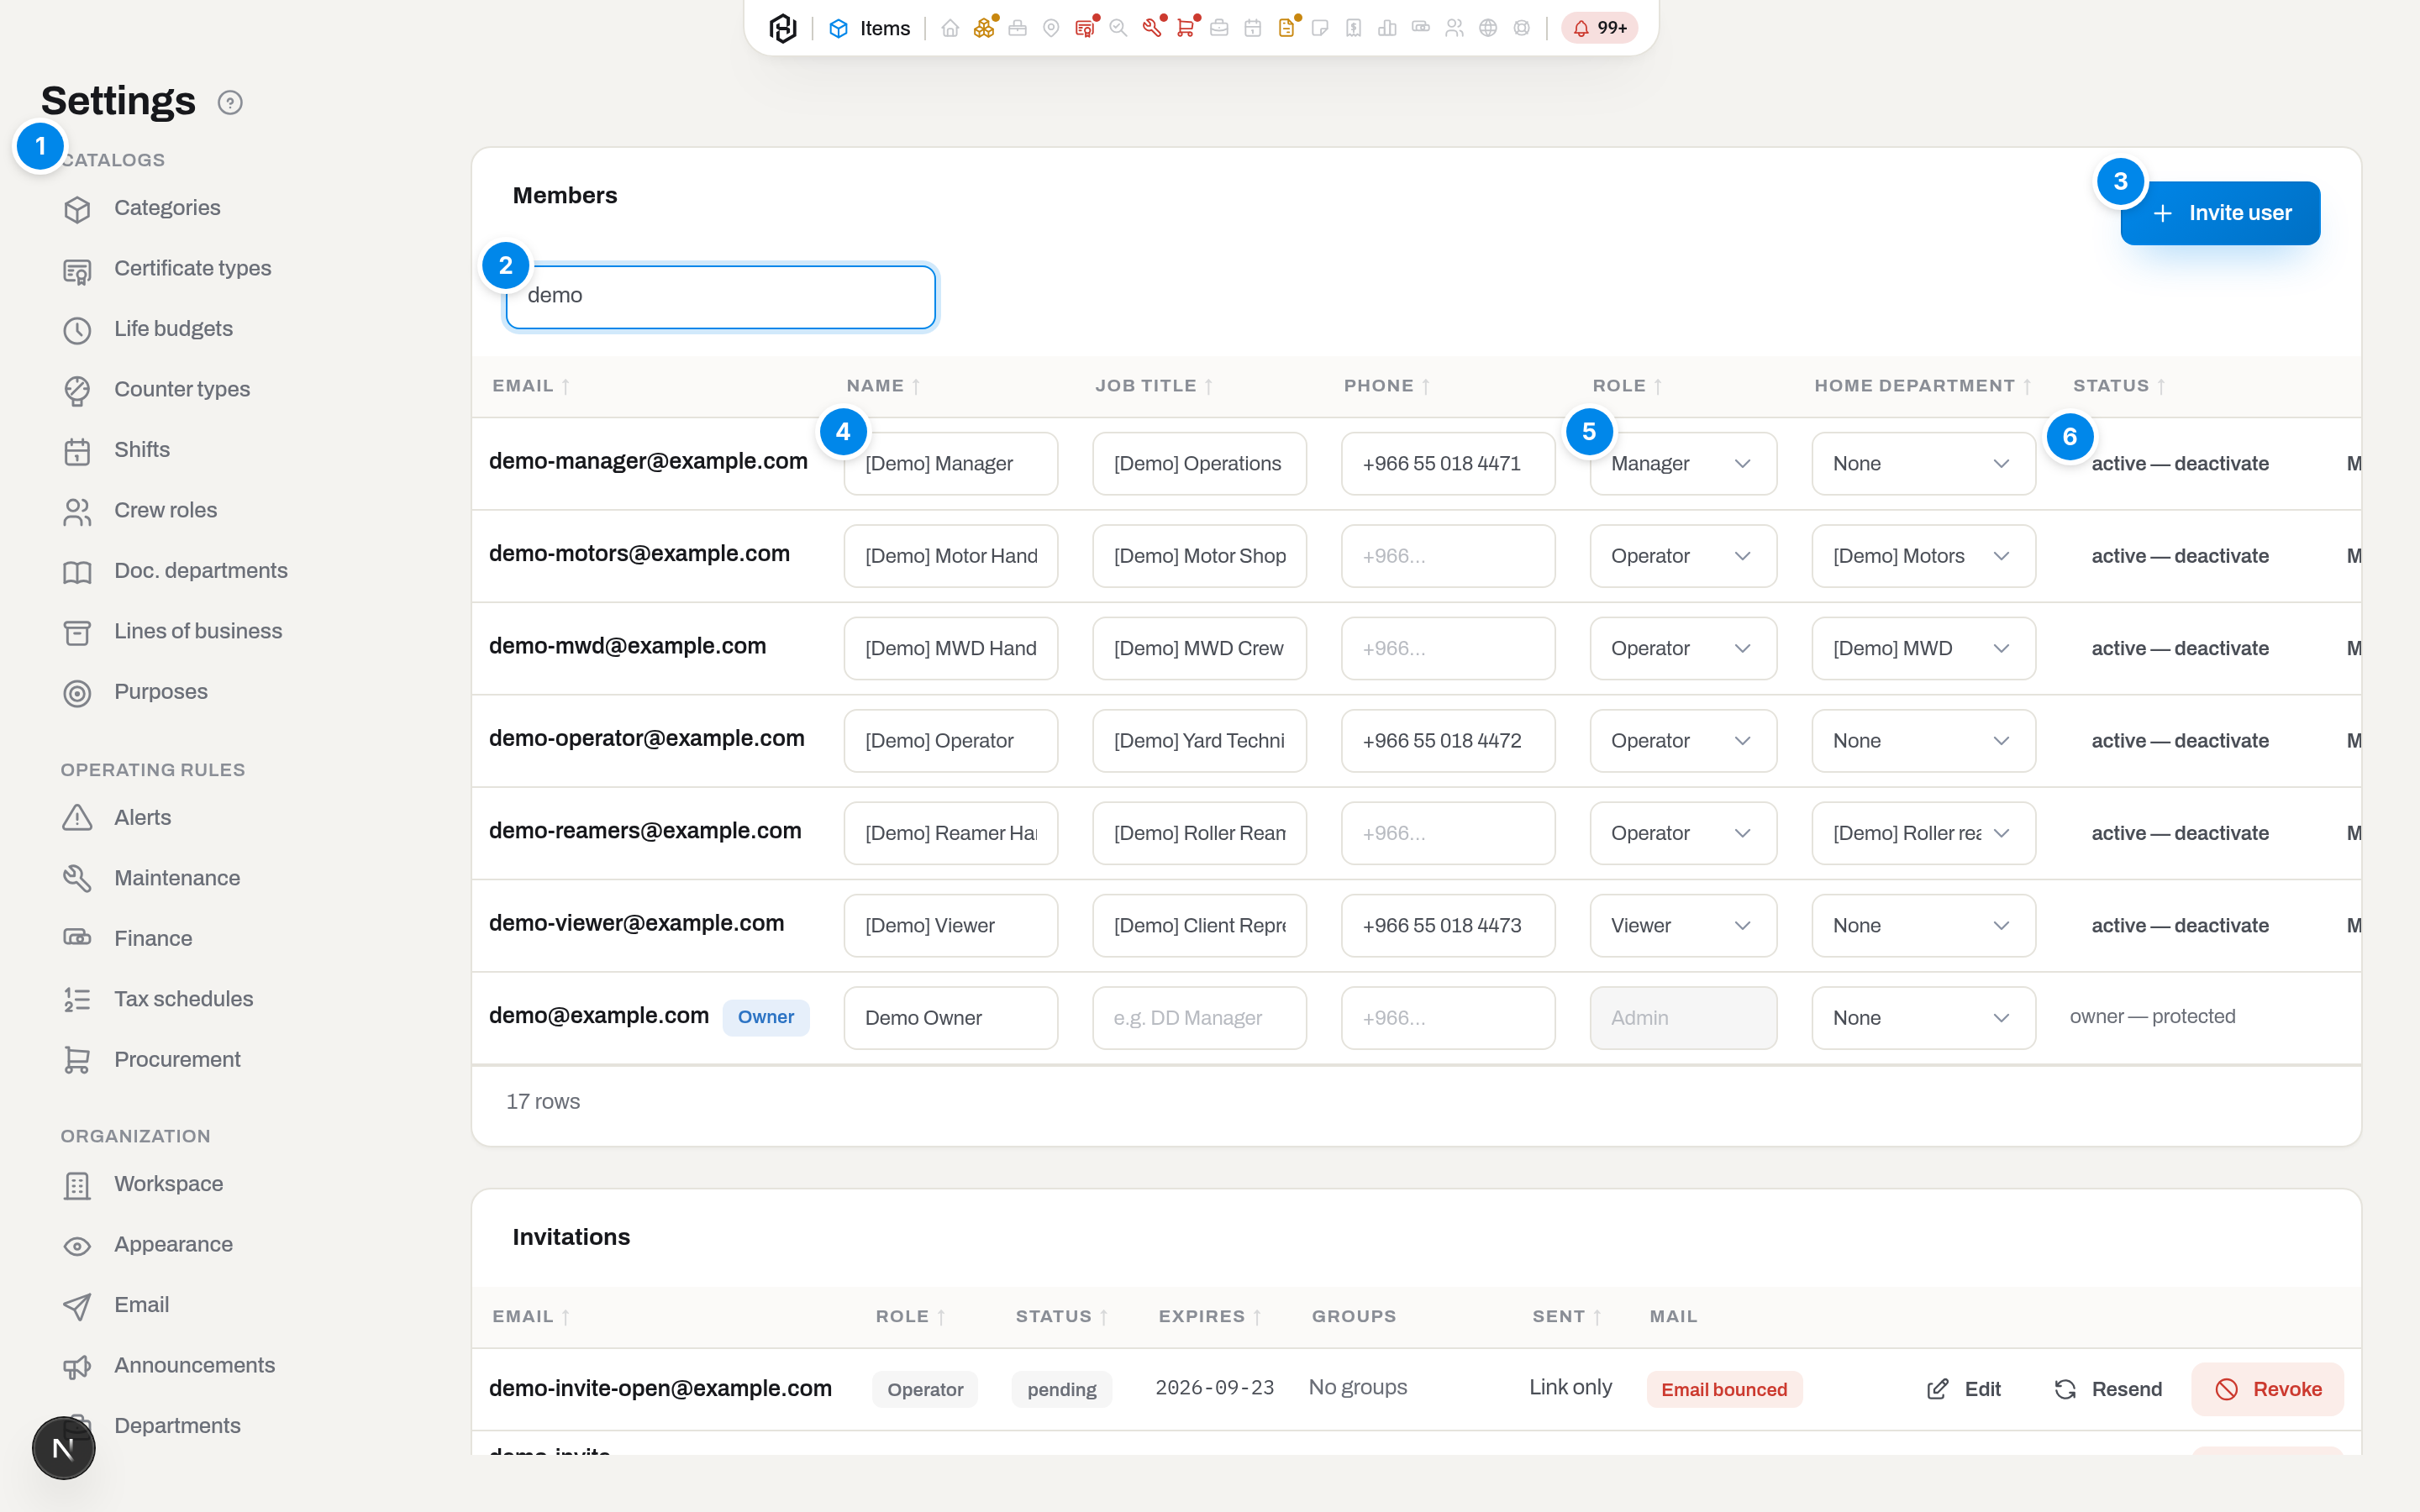
The Users & invites page. The list is filtered to the demo accounts here; without a filter it shows everyone. The footer keeps the full count all the same — it counts the members, not what the filter left on screen.
- Settings menu — the admin entries have their own groups down the left: Organization (workspace, mail, announcements, departments), People & access (this page, groups, usage) and Data (CSV import), below the manager's catalogues. The open entry is kept in the address, so a link to
/settings?tab=usageopens exactly this. On a phone the menu folds into one button above the card. - Filter rows… — narrows the list by every column of the row: Email, Name, Job title, Phone, Role and Status. It matches the value as it is stored, so Status answers to
trueandfalse, not to the words on the button. - Invite user — the only way a person gets into the workspace. There is no "create user".
- Name, Job title, Phone — plain boxes in the row. Type, click away, saved. There is no separate profile screen for a colleague.
- Role — the ladder, changed in place.
- active — deactivate — one button that both says the state and changes it.
Below Members comes Invitations — everyone who was called but has not (or has never) walked in.
Key concepts
Role and group answer two different questions
Role says how deep a person may change data — Viewer, Operator, Manager, Admin, in that order. Group says which sections they may open at all. They are independent, and both are checked on every request: a manager without the Finance section gets a locked door, not a read-only screen.
Use a role when the answer is "how much"; use a group when the answer is "who is allowed to look". Full ladder and the reasoning: Roles & access.
A department is a lens, not a permission
A department names the root categories of one part of the fleet — roller reamers, mud motors, MWD — and does three things with that: it puts a chip in the toolbar of Items, Stock, Maintenance, Alerts, Jobs and Dispatch, it becomes the view those lists open in for the people whose default it is, and it gives news about that gear an address.
It closes nothing. Everyone who could open the fleet before can still open all of it — the chip only narrows the view, and All departments steps back out. Access is still the job of Groups and section visibility, above.
Default department on a member is the same lens, made to stick: their lists open in it instead of in the whole fleet. Set it in Members next to their role, or leave it to them — everyone can choose their own in Account → Profile. Removing a department from the registry does not strand the people who had it as their default: their lists fall back to the whole fleet with a line saying why.
The group on a department answers a different question: who should hear about this gear. A life warning on a reamer cutter set goes to the reamer crew instead of everyone who has the Alerts section. Leave the group empty and everyone hears about it, as before — a department with nobody in it must not swallow the news.
An invitation link is shown once
Creating an invitation produces a link. It is displayed in the dialog that produced it and nowhere else — the workspace stores only a hash of it. That is why the Invitations list has no "copy link" button and never will; if the link is lost, Resend issues a new one and the old one dies.
An invitation lives 7 days. After that its status turns to expired, and Resend is still the fix.
The owner is one person, and protected
Exactly one member carries the Owner badge. Admins may edit each other, but not the owner: their role select is locked, their status reads owner — protected, and the only way to move ownership is Make owner — which only the current owner sees. The workspace also refuses to leave itself without an admin: taking the role off the last active admin fails with This is the last admin of the workspace.
An announcement has three volumes
| Level | What it does to the reader |
|---|---|
| Info | A line in the notification list — nothing interrupts the work. |
| Important | Opens in the middle of the screen until each person confirms it. |
| Critical | Opens in the middle of the screen and closes only by the button. |
A published announcement cannot be edited. It has already been read by half the company, and a paper corrected after the fact would mean people remember different things. Wrong announcement — revoke it and publish a new one.
Mail is more likely to arrive from your own address
Everything this workspace sends — invitations, alerts, digests, invoices to your customers — goes out from noreply@hafrix.com by default, and for most companies that is the end of the story.
For a company on Microsoft 365 or Google Workspace it sometimes is not. The letter passes every check there is (we sign ours, and the checks pass), your mail server accepts it — and then the filter quietly holds it back, because the letter comes from a domain nobody in your company has ever written to and carries a link to a site nobody has ever opened. Nothing bounces. The person simply never gets the invitation, and you find out a week later.
There is nothing to fix on our side: change the relay and the sender changes, but the link stays ours. What does fix it is the letter leaving your mail — then, for your own filters, it is internal mail from a known address with a known signature. That is what the Email tab is for.
Usage counts requests, not clicks
Every successful call the app makes to the server is counted once, for the person who made it. A read bumps the Views counter; a change bumps Actions and leaves a row in that person's Activity log with the object and the names of the fields that changed. Background polling (the bell, the summaries) is not counted, and a request that failed leaves no trace at all — the report is a record of what worked, not of what was attempted.
From tells you where the request came in: Web, Mobile app, or API / script.
How to
Invite a colleague
Who: Admin only.
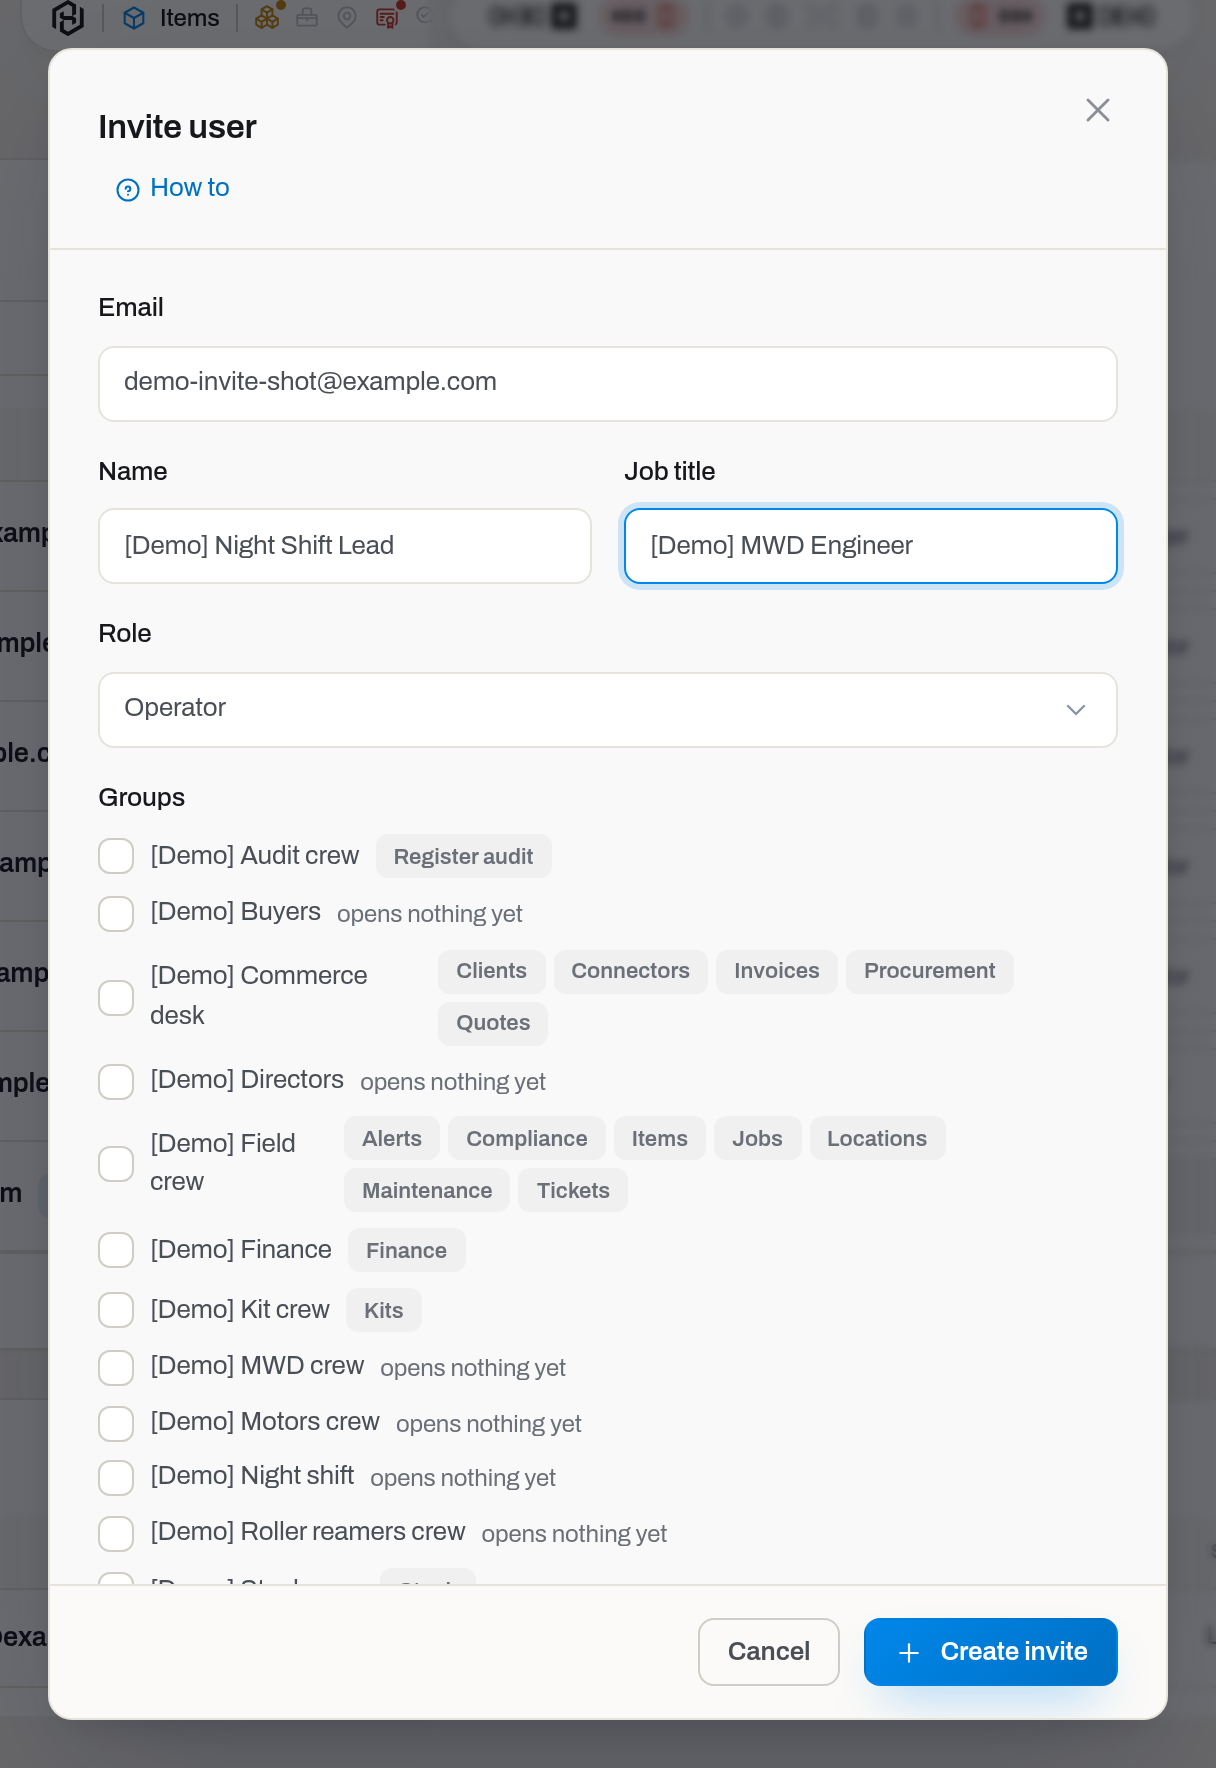
- Open Settings → Users & invites and click Invite user.
- Fill in Email (the only required field). Name and Job title are a courtesy: they are shown on the invitation page and become the person's card on arrival.
- Pick a Role — Operator unless you change it.
- Tick the Groups they should be in. Doing it now means they arrive with the right sections already open; the block is only there if the workspace has groups. Each group carries the sections it opens, so Finance and a group that has been created but never granted anything are told apart at a glance — the latter reads opens nothing yet. If the workspace has restricted sections that none of the ticked groups opens, the dialog says so in a highlighted line: Without a group this person will not see: …. That line is a warning, not a block — you can still send the invitation.
- Leave Send an invitation email on to have the workspace write to them, or turn it off if you would rather pass the link yourself.
- Click Create invite.
The dialog then turns into the link, with the warning Shown once — only a hash of it is stored.
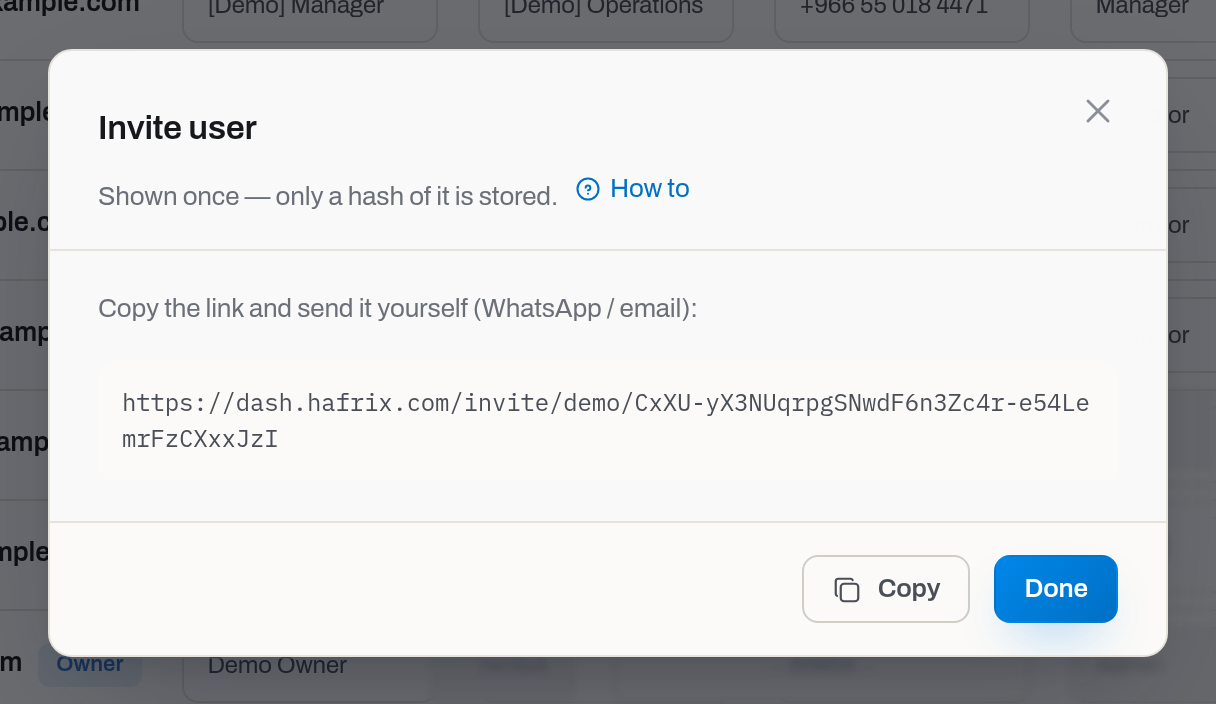
- Copy it if you are sending it yourself, then Done.
Result: a row appears in Invitations with status pending and an Expires date seven days out. If the email was sent, Sent carries the date; if not, it says Link only. When the person accepts, the status becomes accepted, they show up in Members, and whoever invited them gets the email {name} joined {workspace} on Hafrix.
If it fails: This person is already a member of the workspace. — they have an account already; change their role instead. An invitation for this address is already pending — resend it instead. — two live links in one inbox is exactly what the workspace refuses to create.
Edit a pending invitation
Who: Admin only.
An invitation carries what the person will get on arrival — role, name, job title and groups. Until they accept it, all four are still yours to change, and changing them does not touch the link: the one already sitting in their inbox keeps working.
- In Invitations, find the pending (or expired) row and click Edit.
- Change Role, Name, Job title or the ticked Groups. The address is not editable and is shown under the dialog title instead — the email has already gone to it, and a different address is a different invitation.
- Click Save.
Result: the row updates, including the Groups column, and the person arrives with exactly what the row now says. Expires and the send count stay as they were, and nothing is emailed. The edit is recorded in the access journal with what it changed.
If it fails: This invitation has already been accepted — change the membership instead. — they are already in, so their role and groups are changed on their Members row. This invitation was revoked — create a new one. — a revocation was a decision, not a typo.
Resend or revoke an invitation
Who: Admin only.
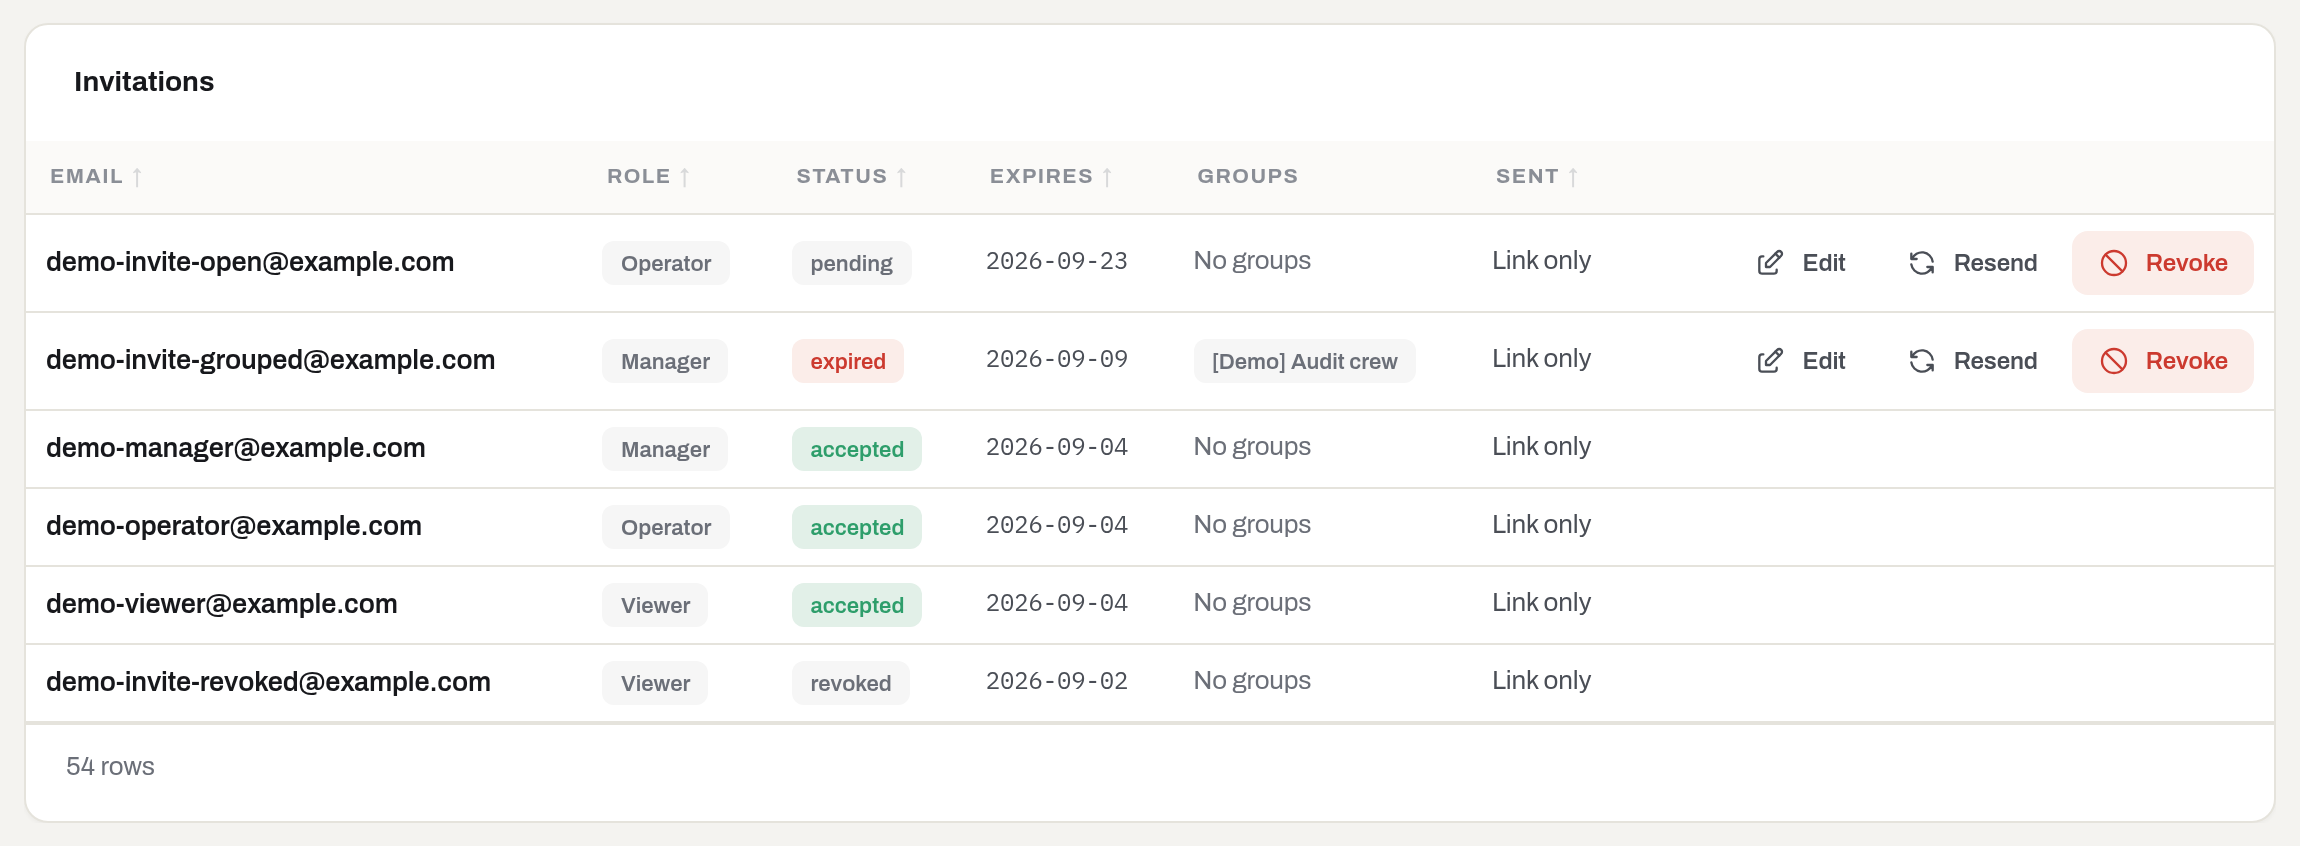
Edit, Resend and Revoke are offered on pending and expired rows only. The Groups column shows what each invitation carries, so a missing group is visible without opening anything.
- Resend issues a new link and shows it in the dialog again, and it always writes to the person — even to an invitation you created with Send an invitation email off, which is why a Link only row stops being link-only the moment you resend it. The previous link stops working; Sent takes the new date, with the number of sends in brackets after it (
2×,3×). - Revoke kills the link. The row stays, with status revoked: who was invited and what became of it is part of the access record, so nothing is deleted here.
Result: the row's status and Expires update; a revoked link answers nothing to whoever clicks it.
If it fails: This invitation has already been accepted. from Resend, Invite is already accepted — deactivate the membership instead. from Revoke — the person is already in, so the membership, not the invitation, is what you change. This invitation was revoked — create a new one. — a revocation was a decision, not a typo, so it is not undone.
Change someone's role
Who: Admin only.
- In Members, open the Role select on their row and pick the new role.
- It saves on the spot.
Result: the change takes effect on the person's next action — no re-login needed.
If it fails: This is the last admin of the workspace. — promote someone else first. Transfer ownership first — the owner keeps admin access. — the owner's role cannot be lowered at all.
Deactivate a person
Who: Admin only.
- In Members, click active — deactivate on their row.
- The button flips to inactive — reactivate, which puts them back exactly as they were.
Result: the workspace stops answering them. The next thing they do in the app fails and they are back at the sign-in screen; their history, their rows in Usage and their name on old records all stay. Members are never deleted — that is why there is no delete button; to erase the personal data of someone who has left, see Erase a former member's personal data.
If it fails: This is the last admin of the workspace. or Transfer ownership first — the owner keeps admin access. — the same two guards as for roles.
Tip
Someone leaving the company: deactivate them, do not revoke their old invitation. The invitation is history; the membership is the door.
Transfer ownership
Who: Owner only.
- In Members, click Make owner on the row of the person taking over. They must be active.
- Read the dialog: {who} becomes the owner and an admin. You keep admin access, but from then on only the new owner can pass ownership on.
- Type Your password and click Transfer ownership.
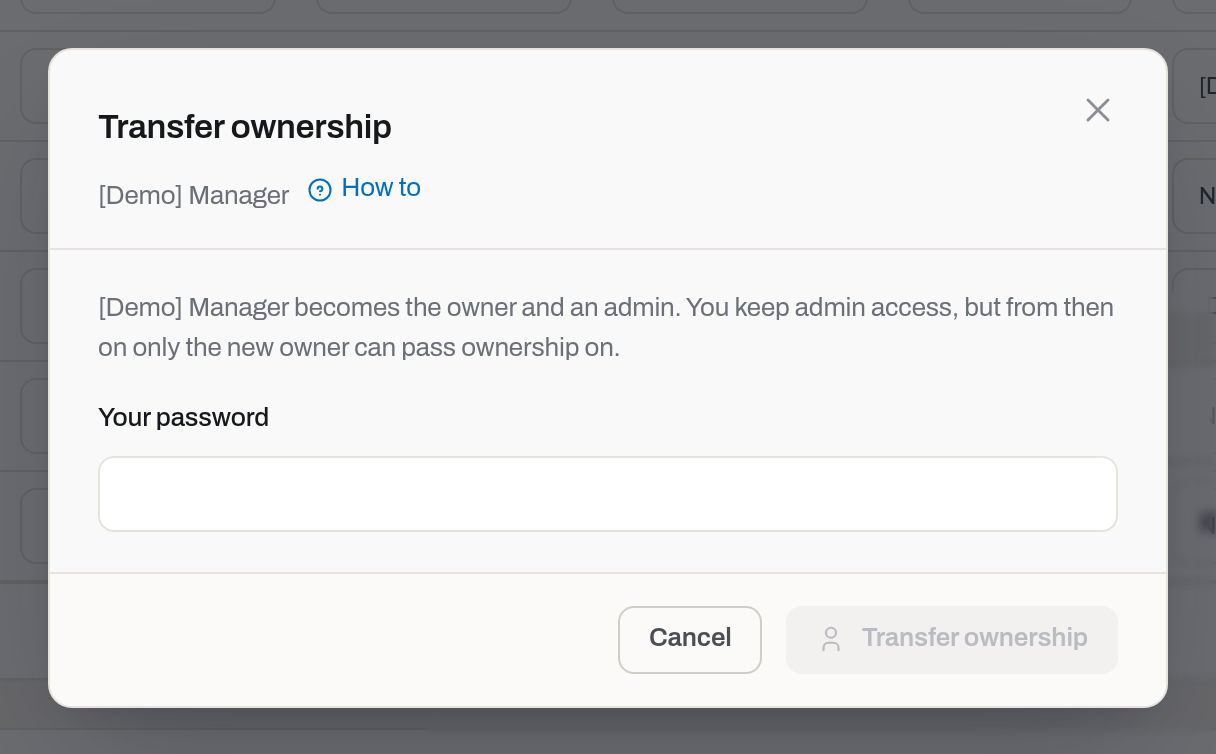
Result: the Owner badge moves; the new owner is raised to Admin if they were not one already; they get the email You are now the owner of {workspace} on Hafrix. You stay an admin — and you can no longer take it back yourself.
If it fails: a wrong password is refused. This person no longer has access to the workspace. — reactivate them first. You already own this workspace. — you clicked on yourself.
Erase a former member's personal data
When: a person who has left asks you to delete their personal data (the "right to erasure", GDPR article 17). Your company is the controller of that data, so the request comes to you and you answer it — Hafrix sends the person nothing.
Who: Admin only. Not the owner, not yourself.
- Deactivate the person first — an active member cannot be erased.
- In Members, click Erase personal data on their row.
- Read the dialog and click Erase for good.
Result: the row turns into Erased member. Their name, email, phone, photo, job title, sign-in sessions and two-factor setup are deleted, pending invitations to their address are removed, and their address is blanked in the workspace's sign-in, invitation and mail logs. Records they created or changed stay, and so does the journal entry "Member personal data erased" — both without their name. This cannot be undone: the row cannot be reactivated, and if they come back they are invited as a new person.
What stays: text people typed themselves — notes, comments, a signer's name on a ticket, a recipient's name on a delivery note — is not searched and stays as written. So do the per-request Usage rows, which cannot be rewritten.
If it fails: This person also belongs to another Hafrix workspace — their account is shared with another company, so it cannot be erased from here; their access to your workspace is already off. Deactivate this member first. — step 1. The workspace owner cannot be erased — transfer ownership first.
Restrict a section to a group
Who: Admin only.
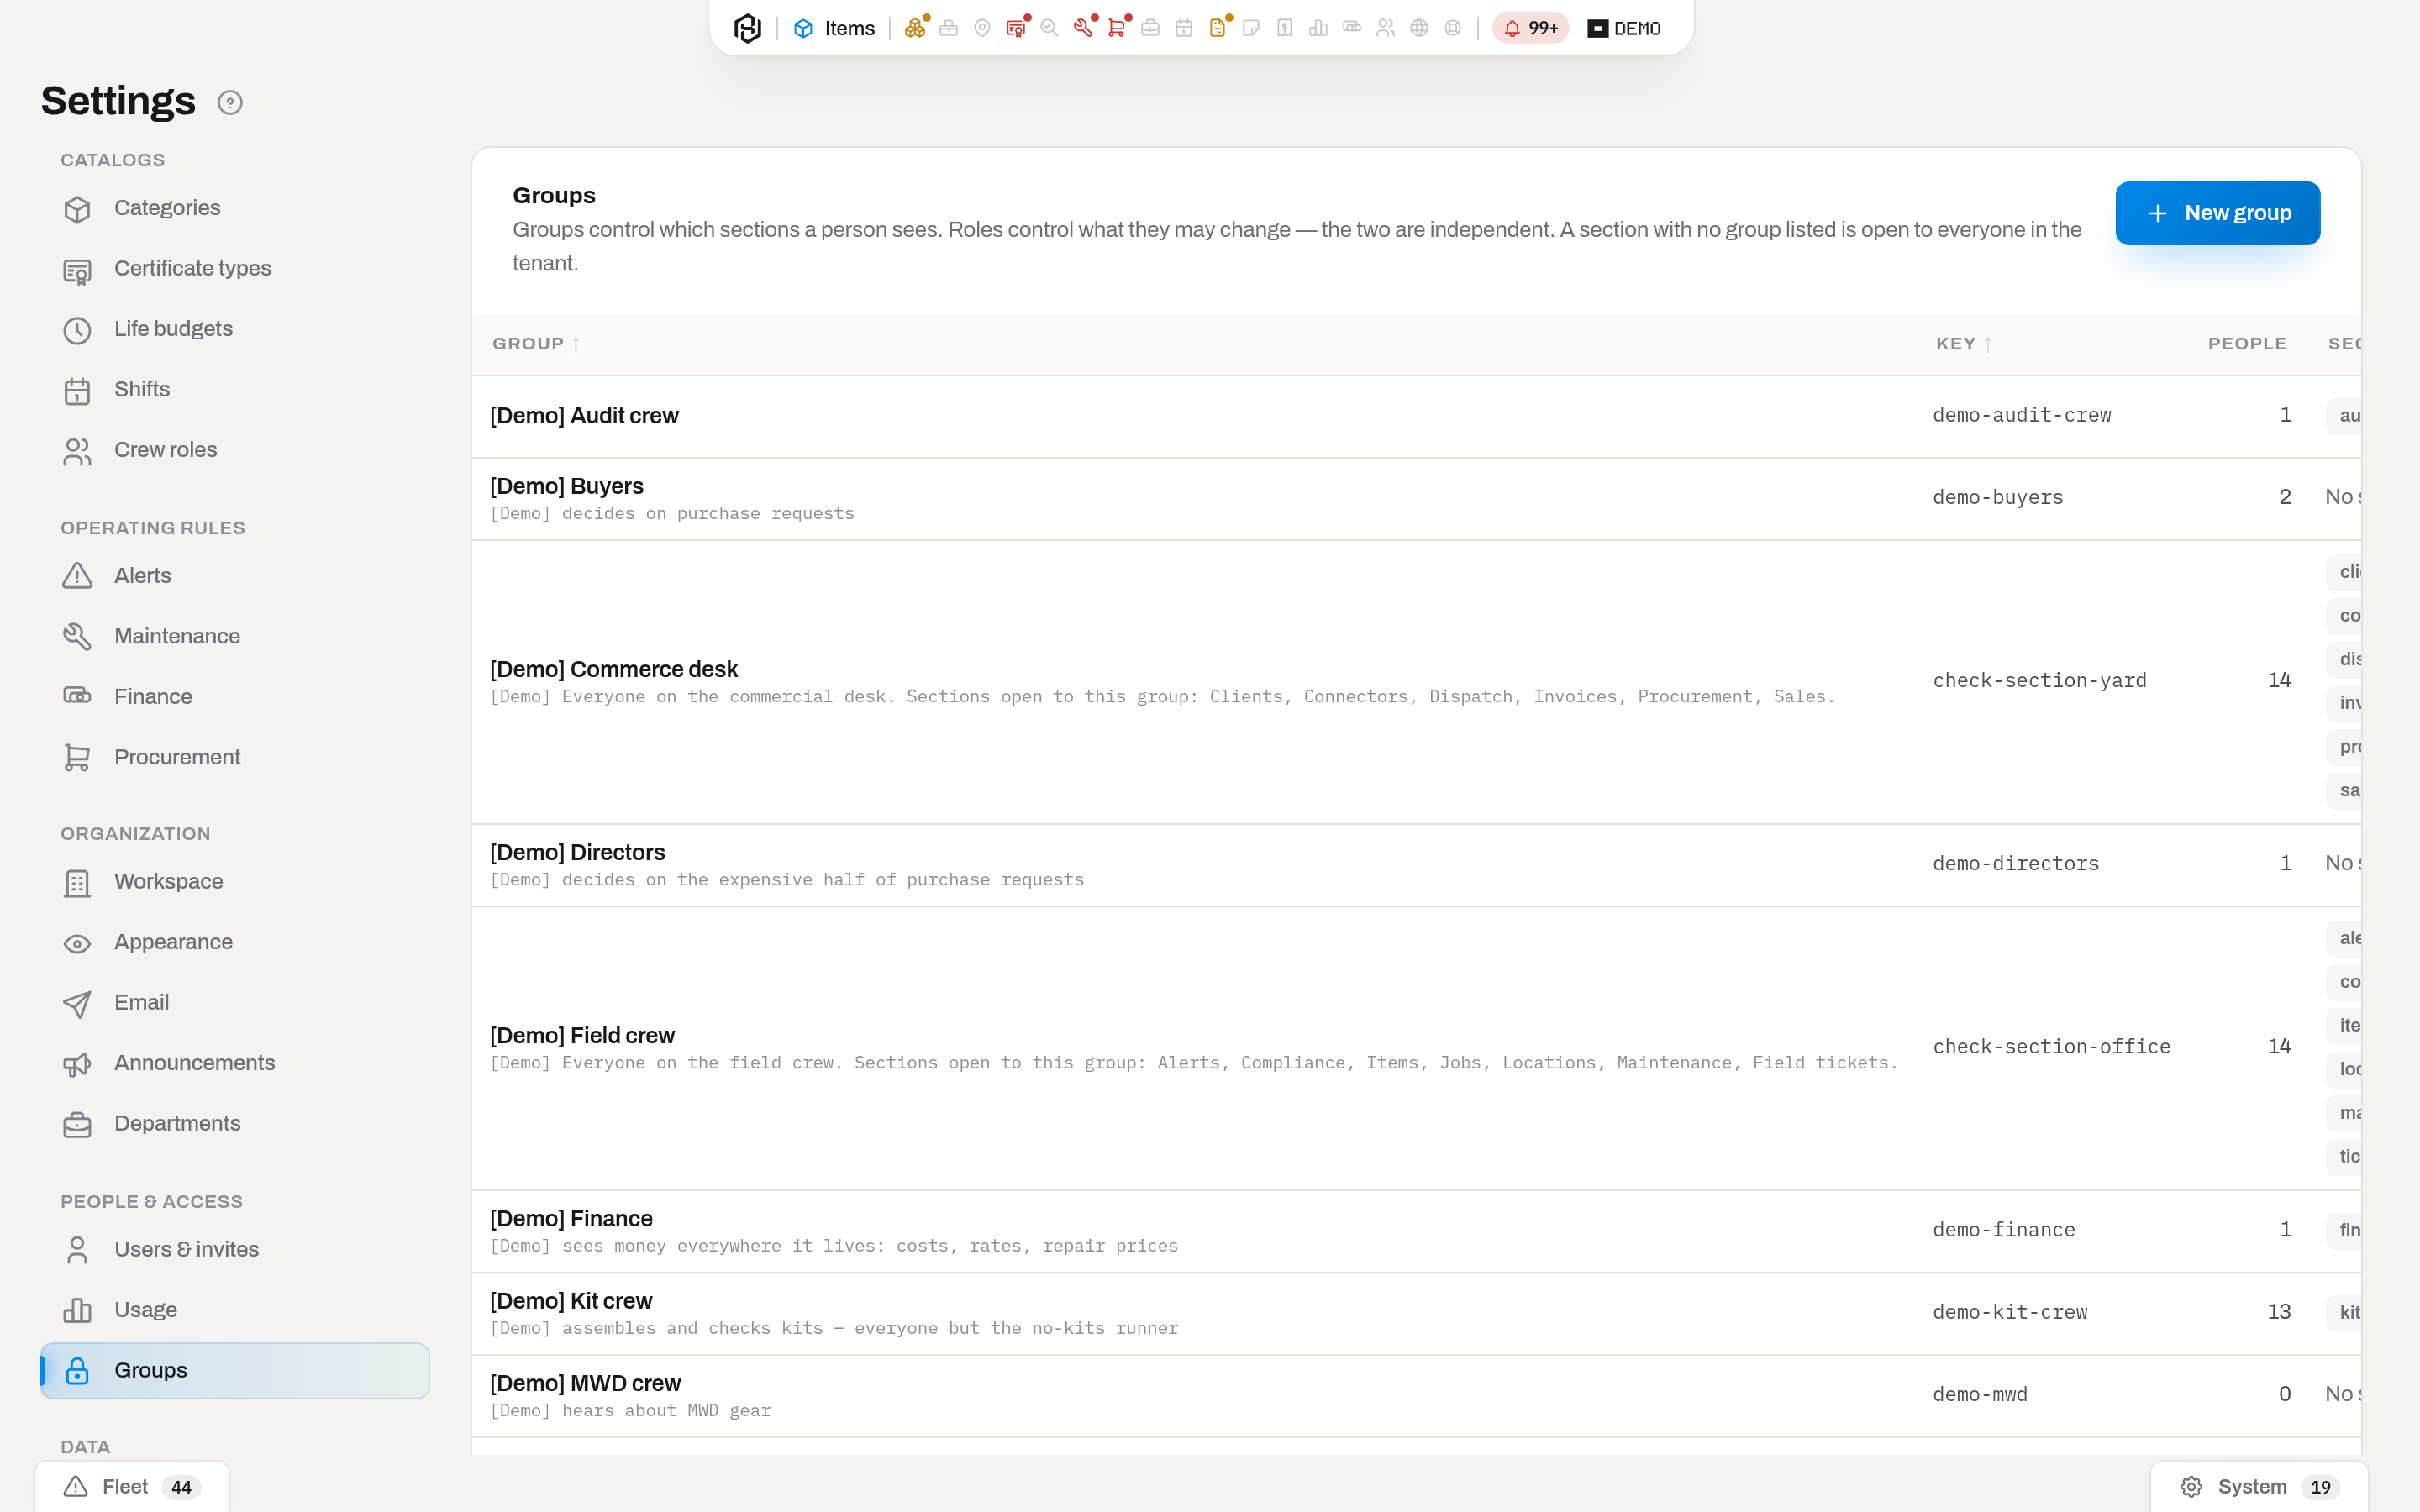
The Groups tab has two tables. The top one, above, is the groups: the Sections column says what each one unlocks, and a group that unlocks nothing reads No sections restricted. Scroll past it for the second table, Section visibility — the answer to "who can open what" for the whole workspace, read from the other end.
- Click New group. Fill in Group (the name people read) and Key (suggested from the name; it is the identifier, so it is not re-suggested later). Description is optional. Save.
- Click the group's row to highlight it, then click it again, or press Enter, to open it (Choose how a row click behaves). The dialog has two grids.
- Under Members, tick the people. Each tick saves immediately.
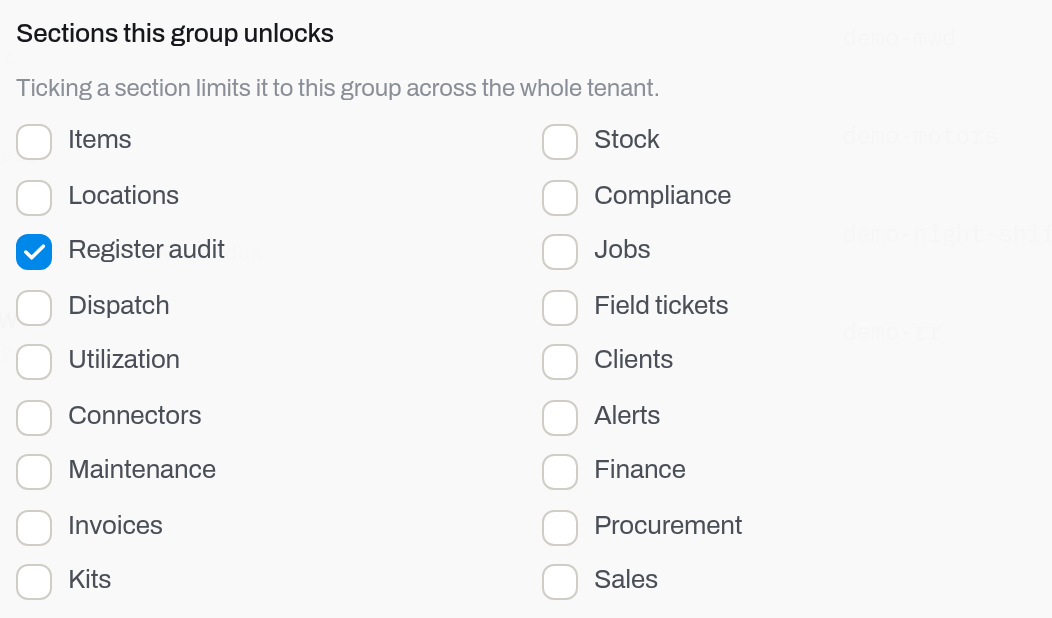
- Under Sections this group unlocks, tick the sections. Warning in the dialog and worth re-reading: Ticking a section limits it to this group across the whole tenant.
- Close.
Result: the section disappears from the capsule for everyone outside the group, and its screens answer nothing to them. Section visibility stops saying Everyone for that section and lists the group instead. Untick every group and the section is open to everyone again.
If it fails: the Save button stays off until both Group and Key are filled.
Warning
Admins do not bypass a restriction. Grant a section to a group you are not in and you lose it too. Settings itself is never grantable, so a mistake here is always repairable from the inside.
Set up departments
Who: Admin only.
- Open Settings → Departments and click New department.
- Fill in Department — the name people read on the chip. Key is suggested from it; it goes into the address (
?department=roller-reamers), so it is suggested only for a new department and never re-suggested later. - Tick the Root categories of this department. Subcategories follow on their own — tick Roller reamers and String reamers under it is included.
- Pick News go to — the group that should hear about this department's gear. Leave it at Everyone if you do not want to narrow the feed yet.
- Save. Repeat for the other departments; the order of the rows is the order of the chips.
- Open Users & invites and set each person's Home department. That is the page they land on when they sign in.
Result: the chips appear in the toolbar of Items, Stock, Maintenance, Alerts, Jobs and Dispatch for everyone in the workspace. Nothing is hidden and nobody loses a screen: the chip narrows the list, All departments brings the fleet back.
If it fails: Save stays off until the department has a name, a key and at least one root category. Unknown category means a category was deleted between opening the dialog and saving — reopen the tab and pick again.
Note
Departments do not replace groups. If a part of the fleet must be invisible to someone, that is still Groups and section visibility — see Restrict a section to a group. A department can also carry its own view of Items and Stock — see Set a view for a department.
Set a view for a department
Who: Admin only.
A department can carry its own view of Items and Stock: which toolbar buttons, filter fields, list columns and bulk-selection actions show up for the people who open the list under that department's lens. This is not access — it is tidying. Nothing is ever taken away from the product, and nobody's ability to see the fleet changes; see A department is a lens, not a permission.
- Open Settings → Departments and open the department to edit, or New department to set a view while creating one.
- Open the View block. It lists everything the Items and Stock screens can show, one screen after the other, grouped the way it appears on screen: toolbar, filters, columns, bulk actions. Stock has no filters group — its search, location and container chips sit in the toolbar, so that is where you switch them. Below the lists, Overview lists the Widgets of the home board. Under Widgets, a Board layout editor also lets you set the order and sizes this department's board opens with: drag a widget by its header to move it, and change its size through the header menu (⋮). Everyone in the department can still rearrange their own board and use Reset to department layout to come back to it; Use product order drops the department's layout and goes back to the board as the product ships it.
- Untick anything this department does not need to see there. The element stays in the product for every other department — only this department's copy of the screen changes.
- Tick Lock next to an item to fix its state for this department: a locked, hidden item does not come back through anyone's personal column or filter picker, and a locked, visible item cannot be turned off that way either.
- Save.
Result: everyone who opens Items or Stock under this department's lens sees the trimmed screen and, on Items → Overview, the board layout you set; switching to All departments, or to any other department, shows that screen's own view — the factory one, unless it too was edited. The home page's Overview has no department switch of its own, so its widgets and layout follow each person's home department: untick Billable for Motors, or reorder its board, and everyone whose home department is Motors sees the change. Items → Overview instead follows the department chip of the Items toolbar, so its widgets and layout switch with it, independent of anyone's home department. Unticking a filter field, or a toolbar chip on Stock, also drops its condition from the list address: a field that is not on screen can no longer be filtering the list behind someone's back.
Some departments arrive with a view already set by their equipment preset — see Start from an equipment preset: motors hide the K-rev and remaining-life columns, MWD hides K-rev. That is a starting point for convenience, not a rule — change it here the same way as any other department's view.
If it fails: the list never offers what would leave the screen with nowhere to go, so those elements are not in it to untick. The column that opens an item's card is one — hide it and the list would have nowhere to click through. The department switch, the Filters button and Reset are the others — hide them and a department's own lens would have no way out: nothing to reopen the filter rail with, or to step back to All departments.
Note
If a button, filter field or column you expect on Items is missing, it may not be broken — your admin may have set a view for your department. Check Settings → Departments (or ask an admin to), and switch to All departments to confirm: that lens always shows the full, factory screen.
Publish an announcement
Who: Admin only.
- Open Settings → Announcements and click New announcement.
- Write a Title and a Message. The message box has Bold, Italic, Bullet list and Link.
- Choose a Level; the line under the select spells out what that level does to the reader.
- Tick Send by email as well if the notification list is not enough.
- Click Publish.
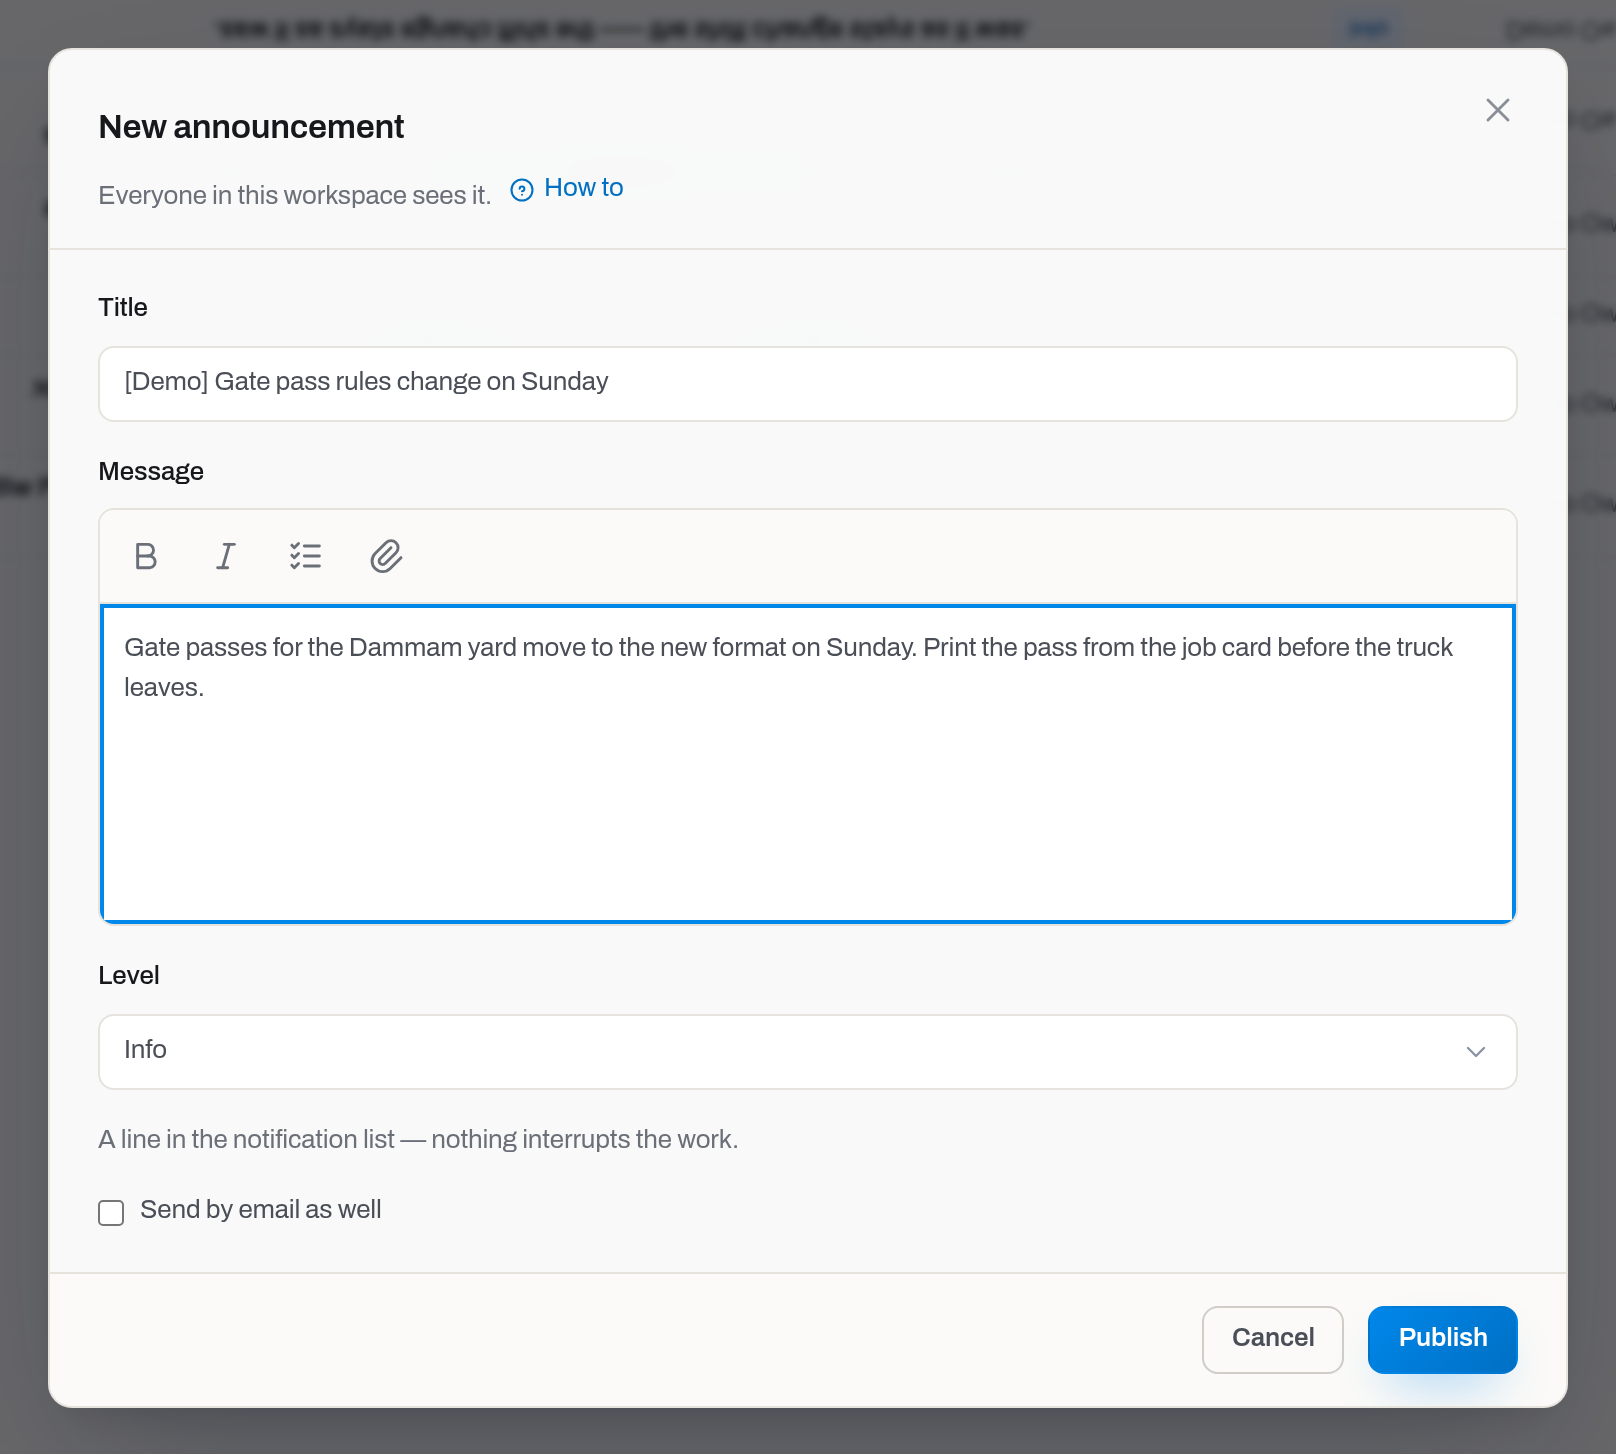
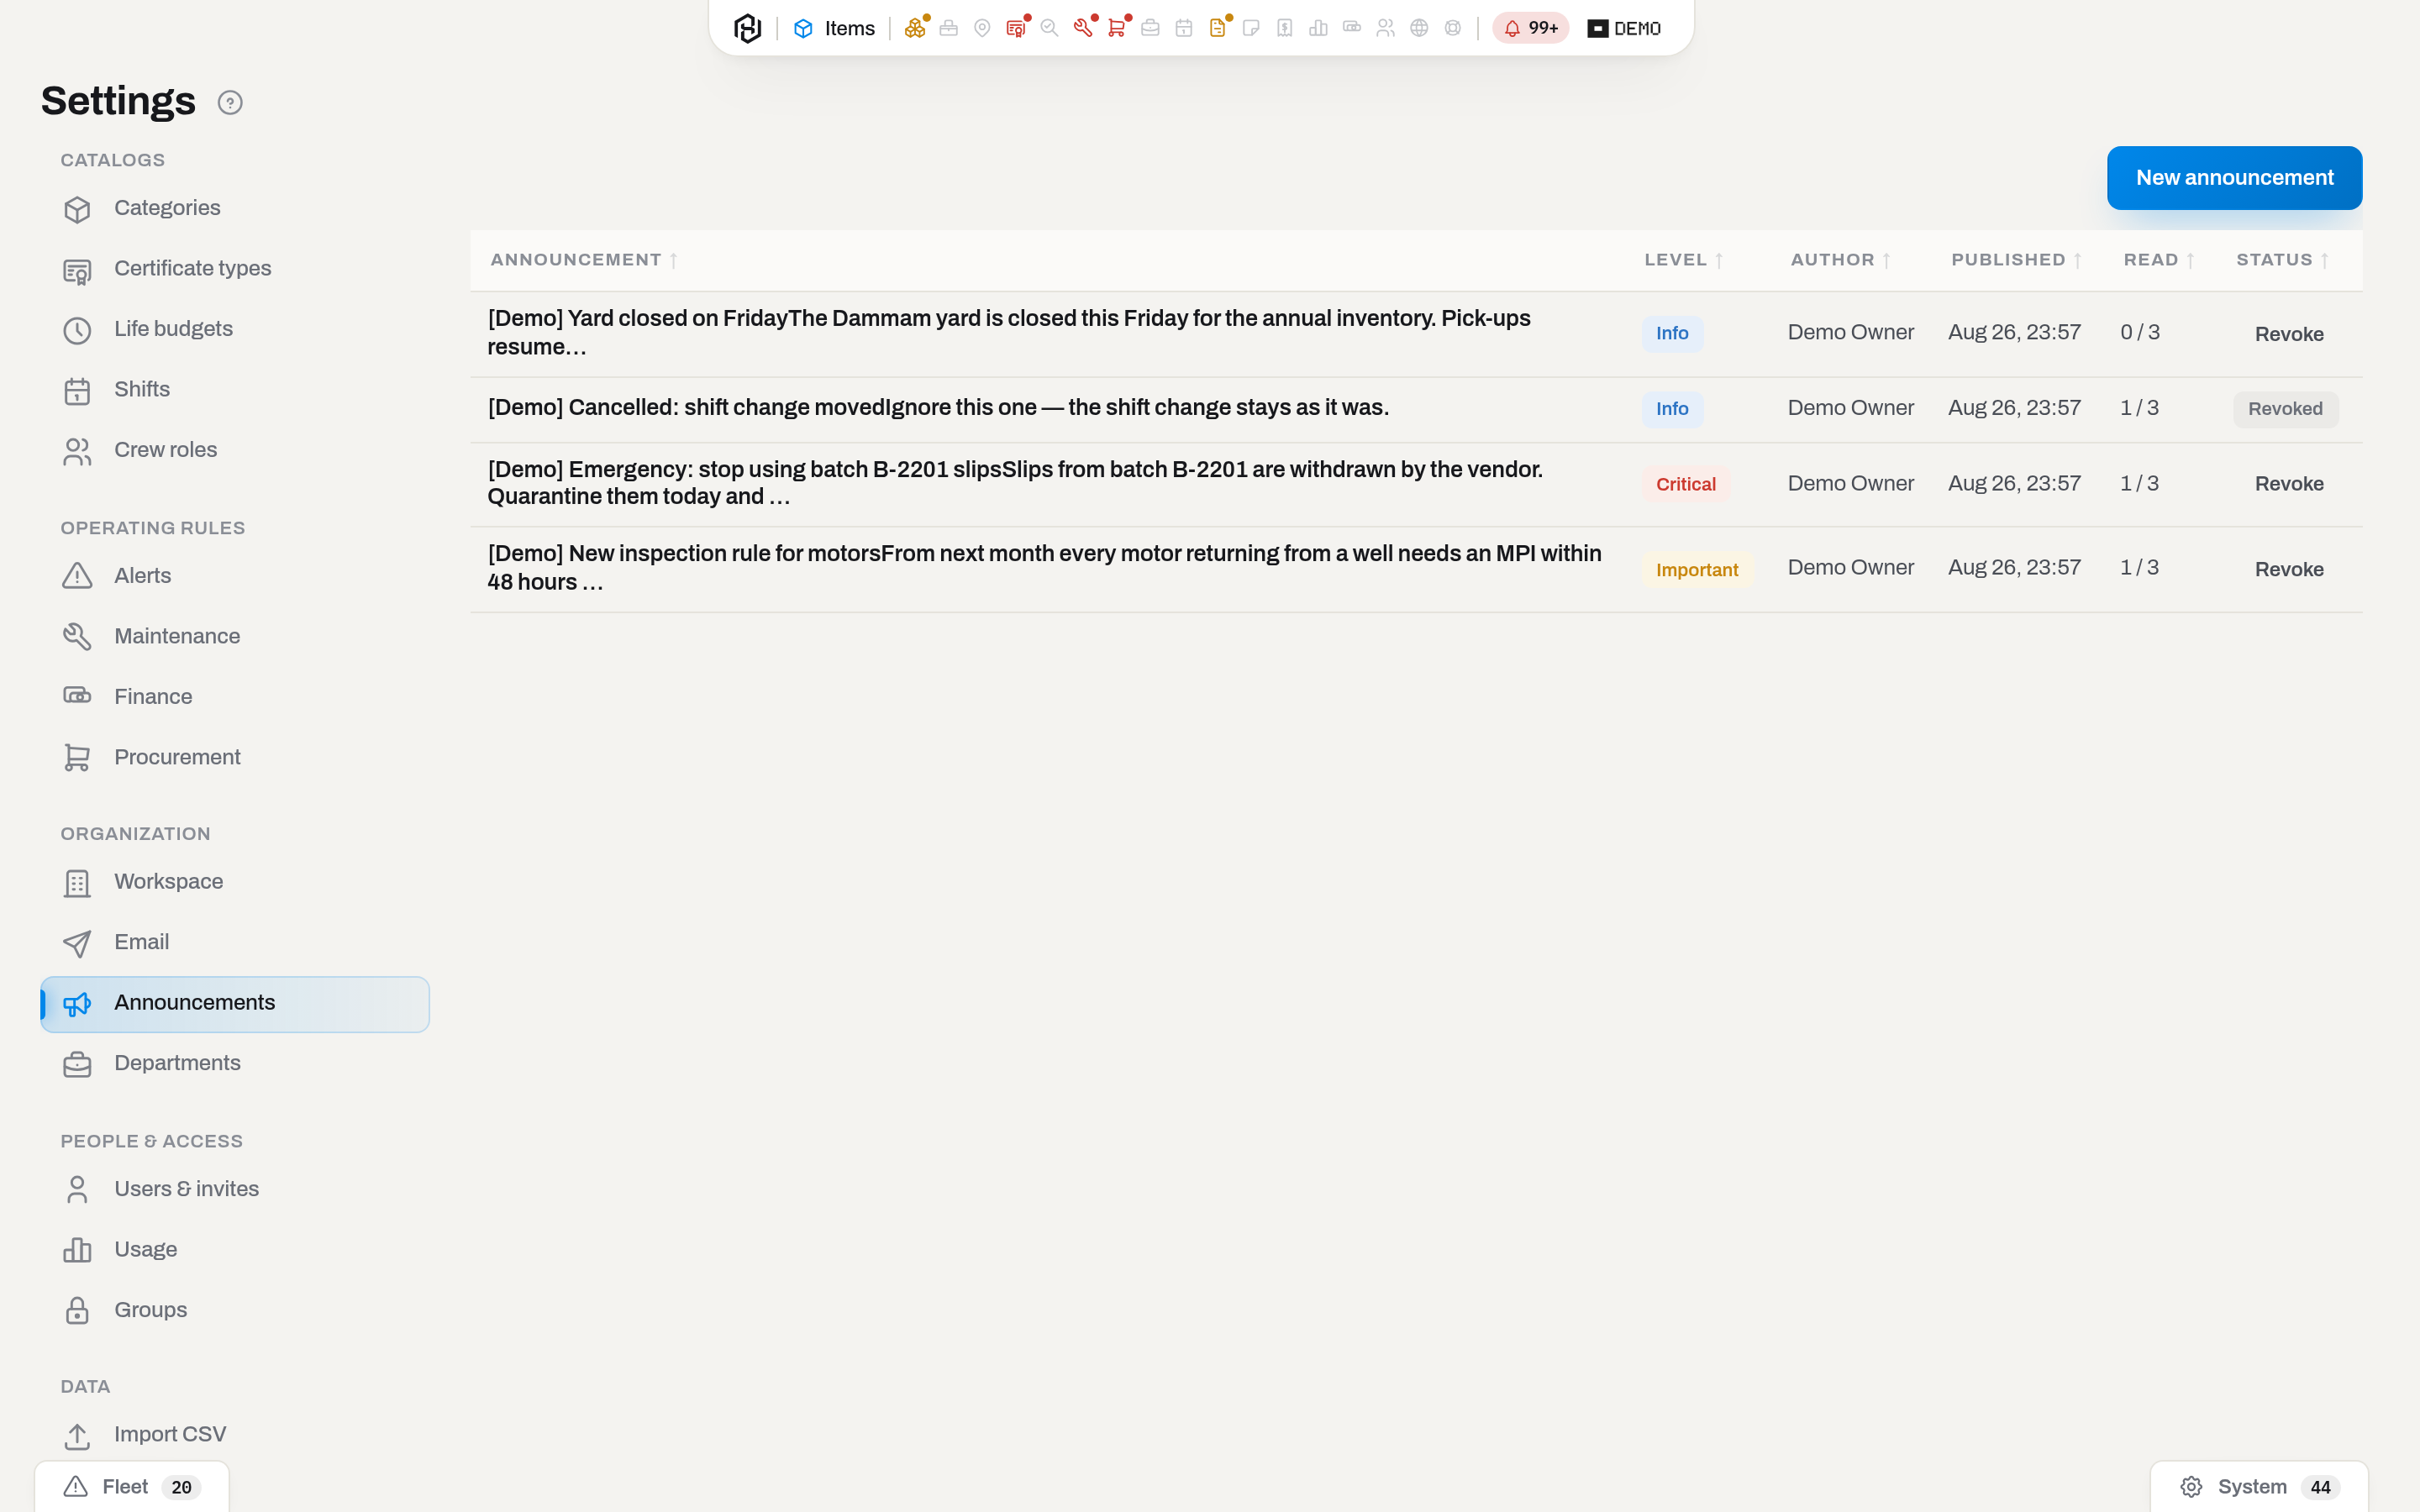
Result: a toast confirms it, and every active member gets a line in their notification list — plus a window in the middle of their screen if the level was Important or Critical. The row in the table names the Level, the Author — an announcement is signed by whoever published it — and the date it was Published, and shows Read as read / recipients, counted against the people who were active when you published.
If it fails: Publish stays off while either the title or the message is empty. There is no draft and no edit: the next screen the message reaches is everyone's.
Revoke an announcement
Who: Admin only.
- Click Revoke in the row's Status column.
- Confirm: It leaves everyone's list and stops popping up. What people have already read stays read.
Result: the row is badged Revoked and loses its button; the line disappears from everyone's notification list and the window stops opening. Read counts are not rewound.
Read the usage report
Who: Admin only.
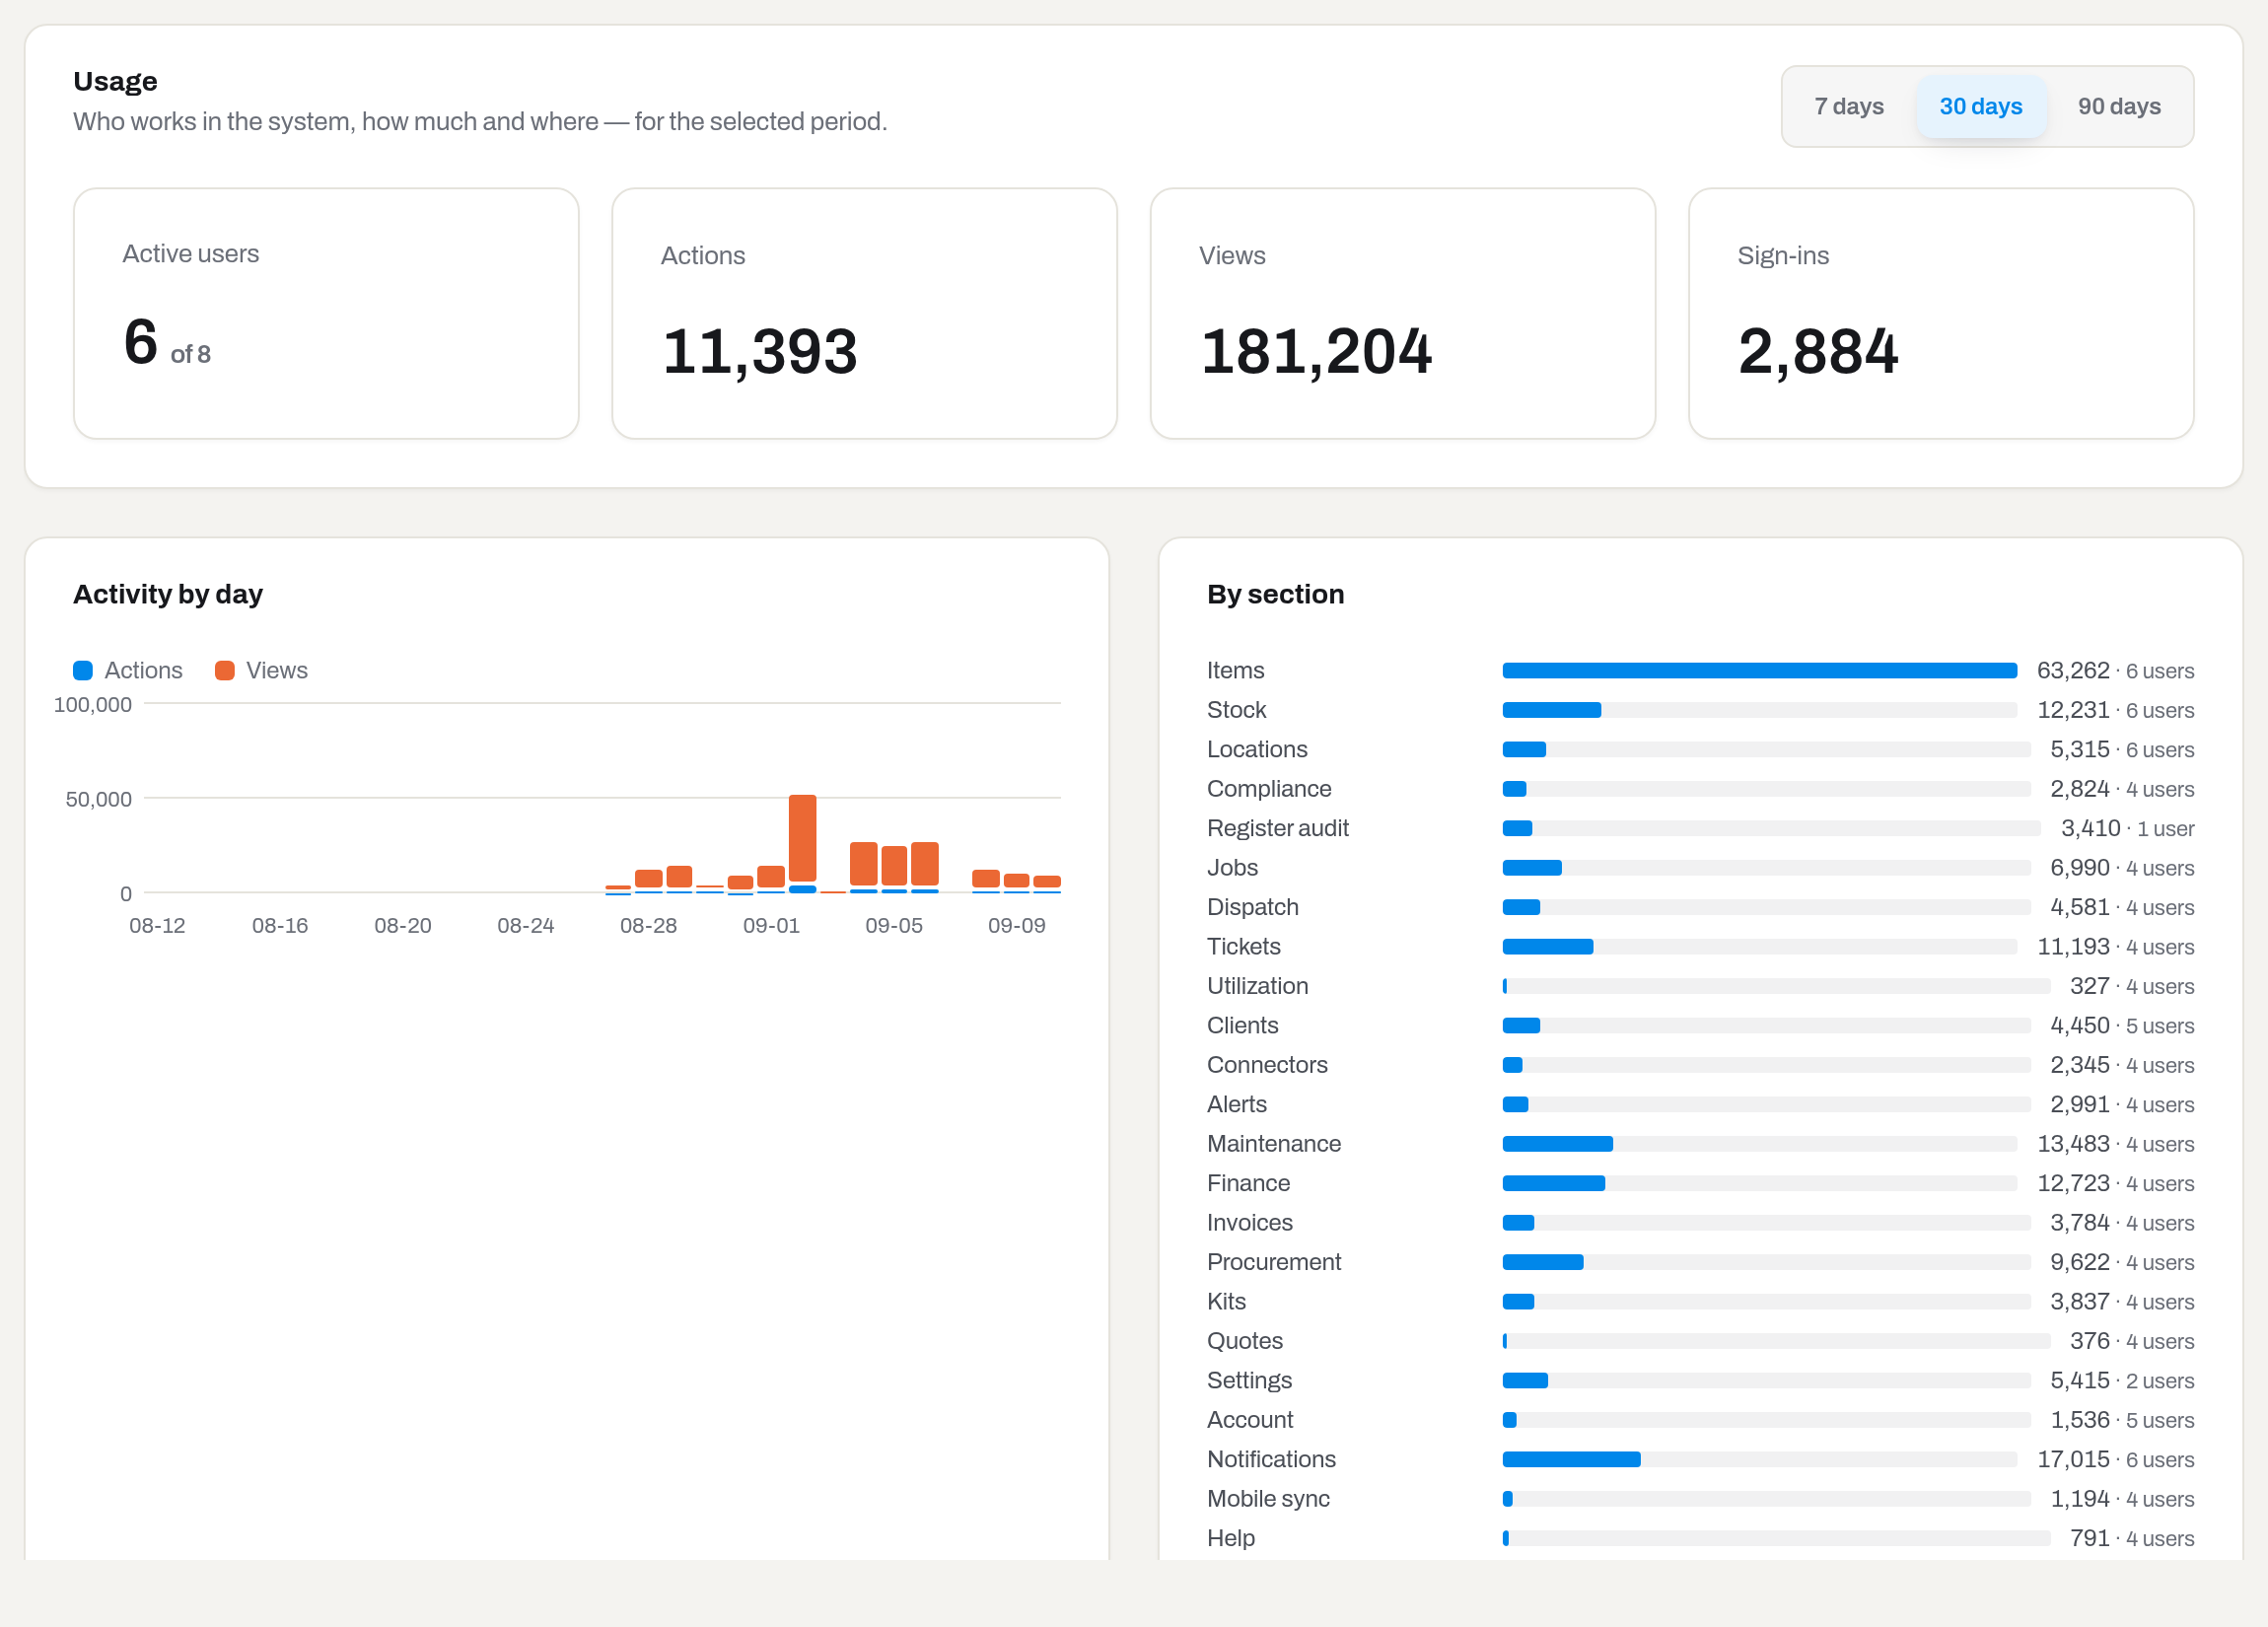
- Open Settings → Usage and pick a Period — 7 days, 30 days or 90 days. It goes into the address, so the view is linkable.
- Read the row of numbers: Active users (of the whole workspace), Actions, Views, Sign-ins.
- Activity by day puts actions and views side by side; By section ranks the sections and says how many people worked in each.
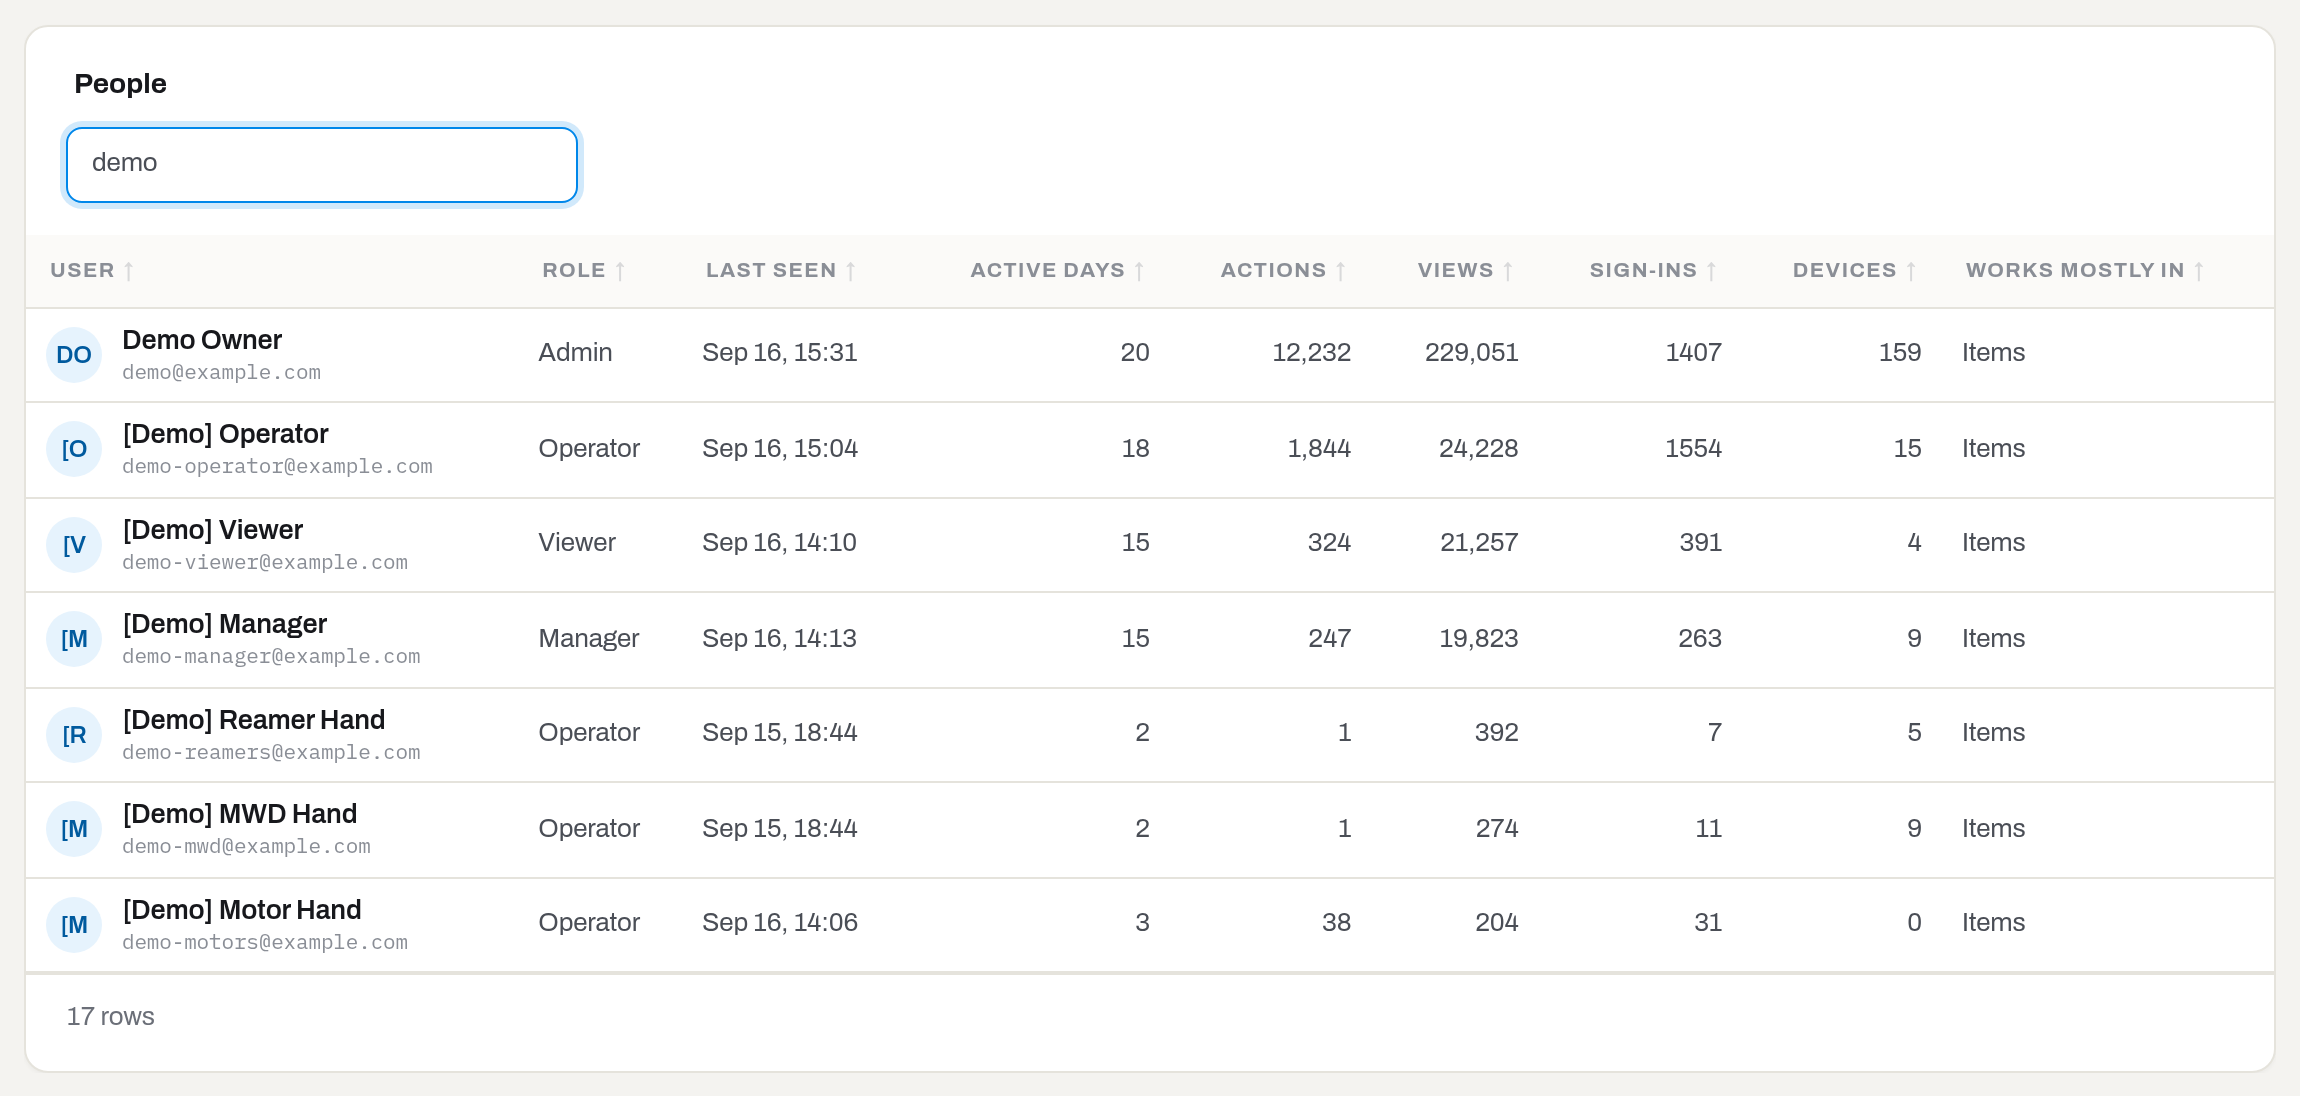
- Scroll to People and sort by whichever column you came for. Works mostly in is often the fastest answer to "what does this person actually do here". The filter box narrows the rows; the count in the footer, as everywhere, stays the count of everybody.
- Click that person's name to open their page.
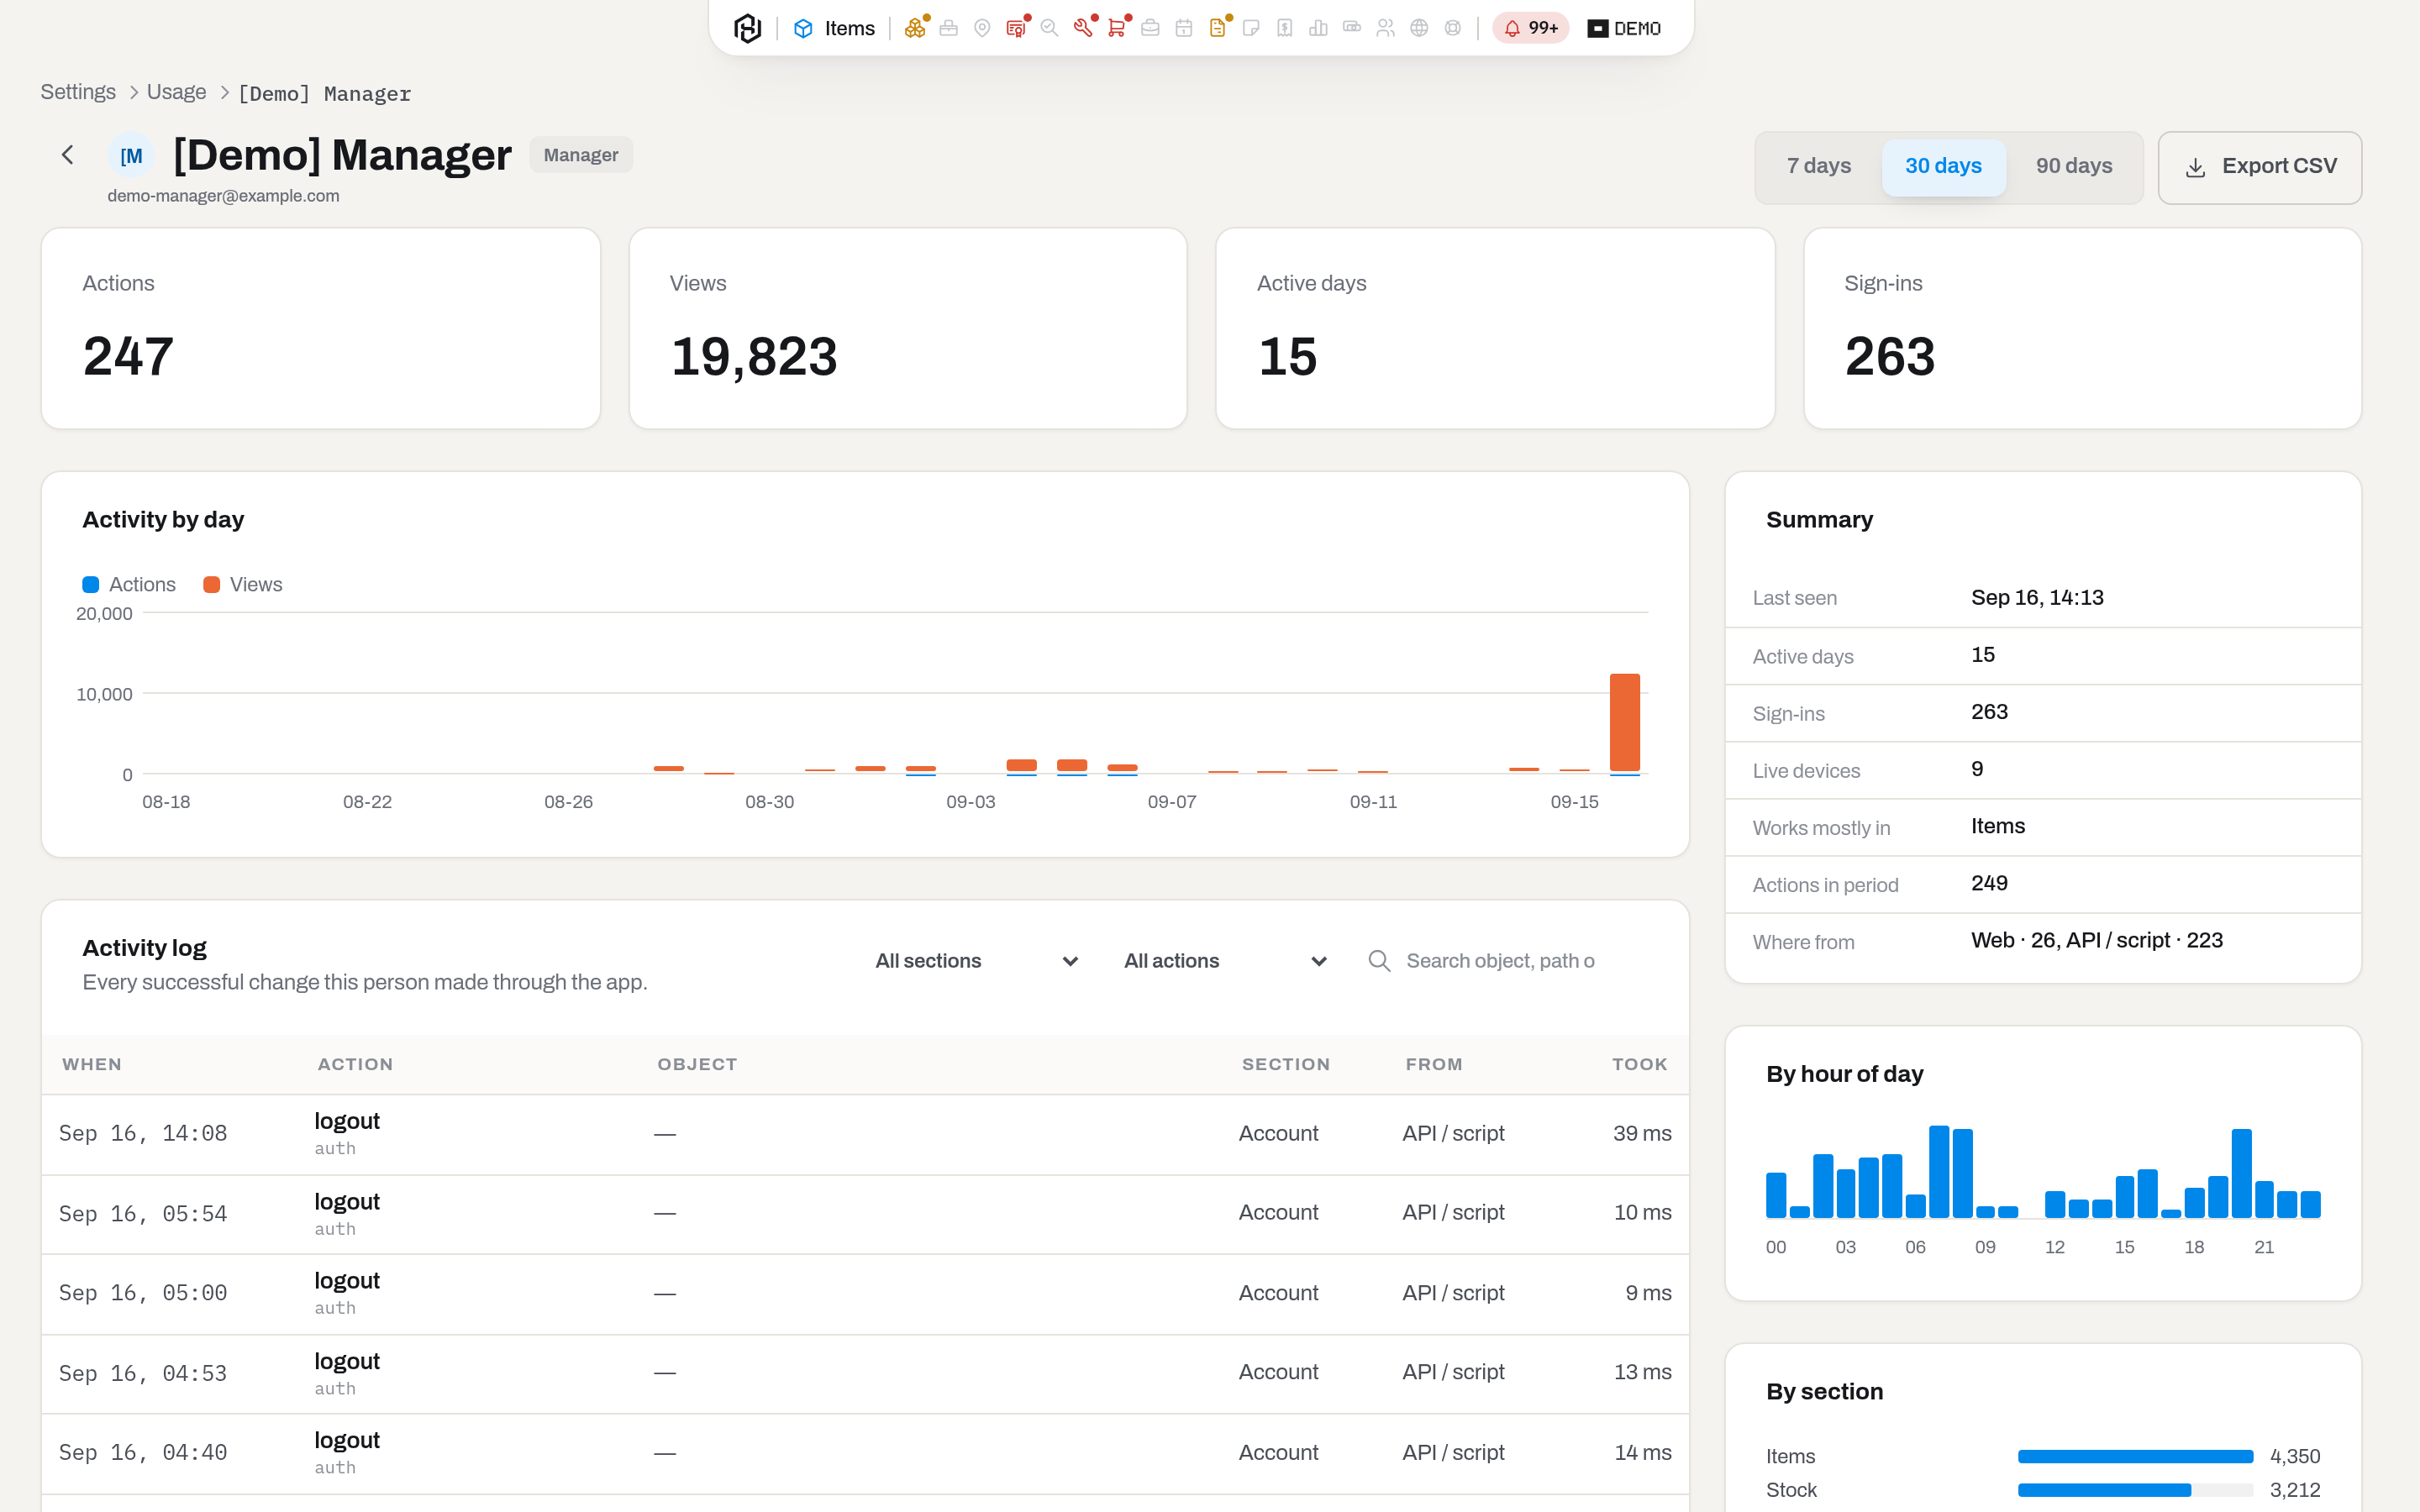
The person's page carries the same Period switch plus Export, which saves the Activity log exactly as filtered, in Excel, CSV or PDF. The log itself filters by section, by action, by resource (the part of the app the call went to, such as tickets or stock — the list offers the resources behind this person's most frequent actions in the period), by where the call came from (Web, Mobile app or API / script) and by free text; its columns are When, Action, Object, Section, From and Took, and every row names the object that was touched — hover it to see which fields changed. IP is a column of the log as well, but it comes switched off and this table has no columns button, so the address reaches you through Export, which carries it. On the right: Summary, By hour of day, By section, Most frequent actions and Devices — the sign-ins of this person in this workspace, each with its IP under the device name and the live ones badged Live.
Result: nothing changes — the whole tab is read-only.
If it fails: Nobody has used the system in this period. is not a failure, it is a short period. Widen it to 90 days.
Import items from a CSV file
Who: Admin only, and only with the Items section.
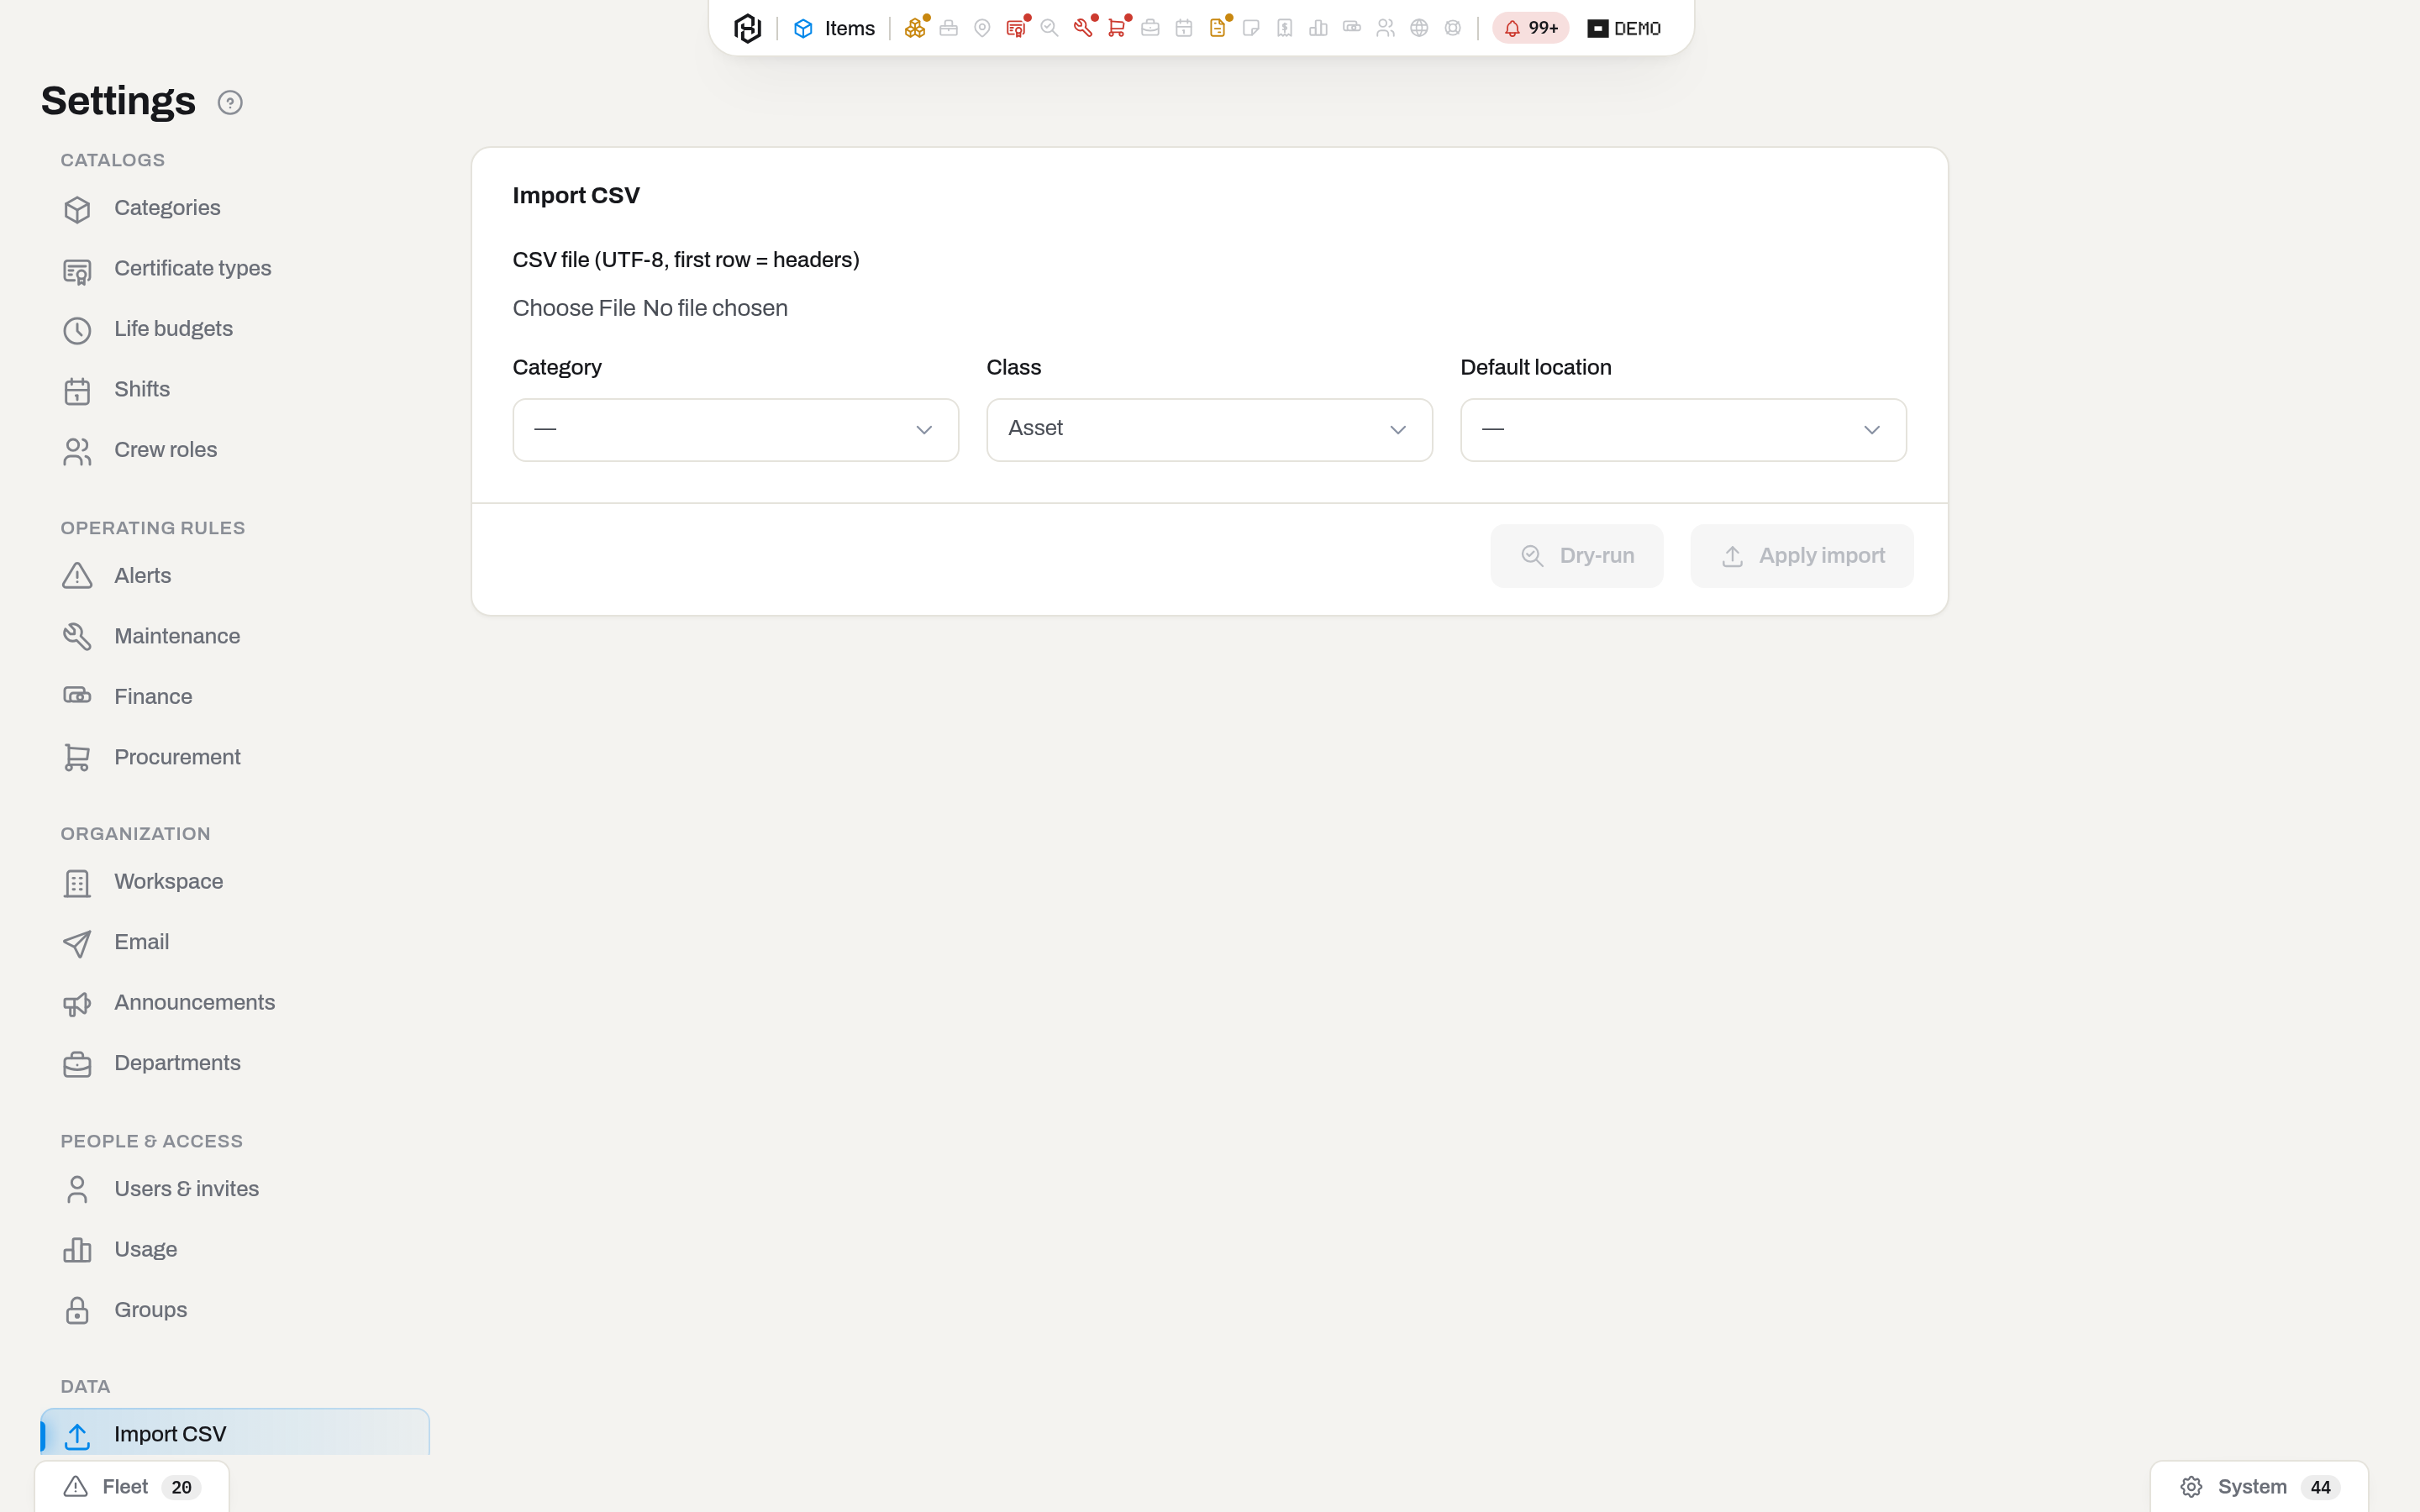
- Open Settings → Import CSV and pick the file. CSV file (UTF-8, first row = headers) is a rule, not a hint: the first row must be the column names, and the file must be UTF-8 and under 10 MB.
- Choose the Category the rows belong to and the Class — Asset for tracked equipment, Consumable for stock. For assets, set a Default location unless the file has a location column.
- Column mapping (
nameis required) appears once the file is read: one row per column in your file, each pointing at a field — or at (skip). Beyond the standard fields, the category's own attributes are offered as targets.statustakes a status or its label as a RigER Condition column writes it — Active, In repair, Scrap.item_roletakes a role or a RigER Purpose: Rent becomes Capital, Sale becomes Goods, Use becomes Spare for assets and Material for consumables.opening_refandopening_dateare for bringing in the fleet you already own: the number and date of the opening-balance document (for exampleIB-00012). Map either one and each item of the row gets an Opening balance event dated by that document instead of a plain Imported one; its acquisition date follows the document unless you mapacquired_atas well.
- Click Dry-run. Nothing is written; you get a Dry-run report with created · already imported · errors and a red line Row {row}: {reason} for every row that would not go in.
- Fix the file or the mapping and dry-run again until the errors are gone.
- Click Apply import. It only wakes up after a dry-run.
Result: the report becomes Import applied with the same three numbers, and the items are in Items. Managers and admins get a line in their notification list saying what arrived — everyone except you, who watched it happen.
If it fails: CSV must be UTF-8. — re-save the file. mapping must include the name field — nothing can be created without a name. asset row without a location (map a location column or pick a default), unknown location …, unknown status … — the row names its own problem. Rows counted as already imported are not an error: the same file name and row number were imported before, so they are skipped rather than duplicated.
Tip
Rename the file between attempts only if you really want the rows in twice. The skip is keyed on file name plus row number, which is what makes a repeated import safe.
Review an import batch
Who: Admin only, and only with the Items section.
- Open Settings → Import history. Each line is one batch: a file brought in through Import CSV, or a RigER opening-balance file loaded during migration. It shows the Source, the File, how many Rows were Created, Skipped or left for Review, and when the Last row went in.
- Click a batch. Its page lists every row of the file by its original Row number, with the document number, date and shop in Note for opening balances, and the Units the row created — each one a link to the item card.
- Go back with Import history in the breadcrumbs; the list opens where you left it.
Result: nothing changes — the history is read-only, and the batch keeps its record even if you later retire its items.
If it fails: No imports yet. — nothing has been imported in this workspace. A row without units was skipped. Batches brought in before this history existed may show no units at all — their rows were recorded without the link.
Rename the workspace
Who: the workspace owner only. Other admins see the name in the Workspace card but cannot change it; the Hafrix team can rename a workspace on request.
- Open Settings → Workspace. The Workspace card at the top shows Name and Time zone.
- Type the new name into Name and click Rename.
- Read Rename the workspace? and confirm.
Result: the new name appears in the app, in emails and in new printouts right away. Emails already sent and PDFs already signed keep the old name — they are records of what was sent. Every admin of the workspace, the owner included, gets an email saying who renamed it, from what, and when. The Hafrix team sees the change in its audit trail.
If it fails: Only the workspace owner can do this. — you are an admin but not the owner; ask the owner, or ask the owner to hand the workspace over in Members. The workspace name cannot be empty. — type a name. The name is up to 200 characters. The workspace address in links (/invite/<address>/…) never changes.
Change the workspace time zone
Who: Admin only. The Hafrix team can set it too, when the workspace is created or later.
- Open Settings → Workspace.
- Pick the zone in Time zone — type a city to narrow the list, for example
RiyadhorDubai. - Click Change time zone and confirm Change the time zone?.
Result:
- Dates and times display in the new zone for everyone, and "today" — the default date in forms, "overdue", "due today" — is counted in it.
- Nightly jobs — alerts, the digest, overdue reminders — move to the same local hour in the new zone. On the day of the change, today's run may be skipped when you move east; it never runs twice when you move west.
- Dates without a time — a due date, a birthday, a service date — do not move.
- Invoices already issued and closed months do not change; new dates (issue dates, overdue, open rentals up to today) follow the new time zone. On the day of the change "today" may shift by one day, so an invoice issued that day can carry the next or the previous date.
If it fails: Unknown time zone. — only the named zones in the list are accepted (for example Asia/Riyadh, not UTC+3).
Change the workspace logo
Who: Admin only.
- Open Settings → Workspace. The Logo card shows the current logo, or No logo yet — printed forms and emails show the workspace name.
- Click Upload logo (or Replace logo) and pick a PNG or JPEG up to 1 MB.
- To take it off, click Remove and confirm Remove the logo? — Printed forms will show the workspace name instead.
Result: the logo is printed in the header of PDF reports and other forms, and it stands in the header of every email about this workspace — a digest, an invitation, an announcement. Without one, both show the workspace name in text.
If it fails: The file is larger than 1 MB. or Only PNG or JPEG images. — the card says which, and nothing is uploaded.
Tip
Empty margins around the artwork are trimmed off for emails, so the logo fills the header instead of sitting there as a speck. On a dark background the mark is lightened, so black artwork stays readable.
Add the workspace website
Who: Admin only.
- Open Settings → Workspace and find the Website card.
- Type the address —
sawafi.comis enough,https://is added for you. - Click Save.
Result: your logo in the header of emails becomes a link to your website. That includes the emails your customers get — invoices, quotes, delivery notes and purchase orders. Leave the field empty and the logo stays a plain picture.
If it fails: an address that is not a web address is refused; use a normal https:// link.
Note
Workspace holds the name, the time zone, the logo and the website. Company address and tax details are not editable here yet.
Turn the item summary tiles on or off
Who: Admin only. The choice covers the whole workspace.
- Open Settings → Appearance.
- Tick Summary tiles on the item card to turn the row of tiles on, untick it to take it away.
- The change is saved as you click it, and everyone sees it on the next item card they open.
Result: with the box ticked, every item card carries a row of tiles above the columns — what is inside, how much life is left, what is expiring, how many files are attached. Each tile is a button that jumps to the card the number came from. With the box clear, the card starts with the columns and nothing else moves.
Why it is off to begin with: the tiles only speak when there is something to say. A workspace where most items have no life budget, no service plan and nothing inside gets an empty strip on nearly every card, and an empty strip is worse than none — it takes the space and says nothing.
Note
A department can still hide the strip for its own people in Settings → Departments → Items, the same way it hides any other block. This switch decides whether the strip exists in the workspace at all.
Send mail from your own address
Who: Admin only. The second half — the part in Microsoft — needs whoever administers your Microsoft 365.
- Open Settings → Email. Sender offers three choices, and the second line under each says what it means:
- Hafrix — mail goes out from
noreply@hafrix.comthrough our server. This is how a new workspace starts, and nothing needs setting up. - Your own relay — mail goes out through your SMTP relay, from your address.
- Your Microsoft 365 — mail goes out from one of your mailboxes. Pick this one if your company already runs on Microsoft.
- Hafrix — mail goes out from
- Fill in Sender address — the address your colleagues will see. Give it a mailbox of its own (
noreply@yourcompany.com) rather than a person's: this address sends invitations, alerts and invoices, and people will reply to it. - For Your own relay: Relay host, Port, Encryption, User and Password. Ports 25, 465, 587 and 2525 only, and the host has to be reachable from the internet — an address inside your own network is refused, and so is one that resolves to one.
- For Your Microsoft 365: the card What your IT team does in Microsoft 365 stands right under the form with the four steps and the ready command. Your IT registers an application in Entra ID, grants it Mail.Send, creates a client secret and narrows the permission to the one mailbox. What you type here is what they hand back: Directory (tenant) ID, Application (client) ID, Client secret, and the Mailbox we send from.
- Leave Fall back to Hafrix if my mail fails ticked unless you have a reason not to. It means a message that cannot go out through you still reaches the person, from our address, instead of not going at all.
- Click Save, then Send test message. We send you a real message the way the workspace sends everything else, and the Delivery card says Test message arrived once it works.
Result: invitations, alerts, digests and the documents your customers get all leave from your address. The Delivery card keeps the answer to the only question that matters: what happened the last time this workspace sent something, and when.
If it fails: the message names the reason and nothing is marked as checked.
- Fill this in first: … — a required field for the chosen mode is empty. The Still missing line on the Delivery card lists the same fields.
- A custom sender address needs your own transport — a sender of yours cannot go through our server: your own domain rules would reject it, which is the very thing this screen fixes.
- Only these SMTP ports are allowed or the relay host may not be a private address — see step 3.
- A message that went out but through Hafrix, not your transport is not a pass either: the fallback carried it, and the transport stays unchecked.
- Too many test messages — five an hour per workspace.
Note
Two letters always come from Hafrix, whatever you set here: password reset and anything to do with signing up. A password reset that depends on your own mail server would lock your people out on the day that server breaks — exactly when they need to get back in.
Tip
Changing the transport is a security event: it decides who your invitations appear to come from. The owner gets an email about it, and the change is written into the access journal — even when we make it for you during onboarding.
When an address bounces
A red Email bounced badge next to a row in Members or Invitations means the last message this workspace sent to that address came back: the mailbox does not exist, or the receiving server refused it outright. A yellow Not delivered means the message failed for some other reason. A grey Not sent (test address) marks an address we never send to at all — a sandbox or example domain, not a real mailbox — so there is nothing wrong to fix.
We read the bounces ourselves: every ten minutes a background job checks the Hafrix sender mailbox and matches what comes back to the message it answers. A workspace that sends through its own mail transport (see above) is the exception: its bounces stay in that mailbox, we never see them, and the badge does not appear. Hover the badge for the reason and the date; both come from that job, not from anything you set here.
What to do: fix the typo in the address, then resend the invitation — the old link dies the moment the new one goes out. For a member whose address starts bouncing after they already accepted, the badge is your cue to reach them another way; nothing here revokes their access on its own.
Set who gets the fleet digest
Who: Admin only, and only where the Alerts section is granted to you.
- Open Settings → Alerts.
- Watch the fleet and raise alerts is the master switch. Unticked, the nightly run stops: no new alerts, no digest.
- Digest — Every day, Mondays or Off. Off stops the letter and leaves the rules running: the queue on Alerts still fills.
- Digest recipients — one email per line. Leave it empty and the digest goes to every manager and admin in the workspace; the line under the box always names who that is right now.
- Click Save.
Result: a toast says Saved. The next nightly run (07:00 workspace time) obeys the switch, and the digest (07:30 workspace time) goes to the new list.
If it fails: an address with a typo is refused by the field — the red note names it, and nothing is saved. A manager does not see this tab at all: alert settings are the workspace's, not the fleet watcher's.
Note
The rule thresholds themselves — how many idle days count as idle, how long a work order may stand — are not on this screen yet. They live in the same settings and today only support can change them.
Fields
Invite user
| Field | Meaning | Required |
|---|---|---|
| Where the invitation goes and the address the account is created on | yes | |
| Name | Shown on the invitation page and pre-fills their card | no |
| Job title | The same, and it stays on their row in Members | no |
| Role | Starting role; Operator by default | no |
| Groups | Sections they arrive with; only shown if the workspace has groups | no |
| Send an invitation email | On by default; off means you deliver the link yourself | no |
New group
| Field | Meaning | Required |
|---|---|---|
| Group | The name people read in the list and in Section visibility | yes |
| Key | The identifier; suggested from the name for a new group, never re-suggested afterwards | yes |
| Description | One line under the name | no |
New announcement
| Field | Meaning | Required |
|---|---|---|
| Title | The line in the list and the subject of the email copy | yes |
| Message | Body, with bold, italic, bullets and links | yes |
| Level | Info, Important or Critical — see levels | no |
| Send by email as well | Sends the same text to the same people by email | no |
Import CSV
| Field | Meaning | Required |
|---|---|---|
| CSV file (UTF-8, first row = headers) | The file; up to 10 MB | yes |
| Category | Category every imported row lands in; it also decides which attributes can be mapped | yes |
| Class | Asset or Consumable | yes |
| Default location | Where assets go when the file has no location column; assets only | no |
| Column mapping | One target per column of your file, or (skip); name must be mapped |
yes |
Fleet alerts (the Alerts tab)
| Field | Meaning | Required |
|---|---|---|
| Watch the fleet and raise alerts | The master switch of the nightly run. Off means no new alerts and no digest | — |
| Digest | Every day, Mondays or Off — how often the letter goes out | — |
| Digest recipients | One email per line. Empty = every manager and admin, named under the box | no |
Mail transport (the Email tab)
| Field | Meaning | Required |
|---|---|---|
| Sender | Hafrix, Your own relay or Your Microsoft 365 | — |
| Sender address | The address your colleagues see; your own mail must be allowed to send from it | outside Hafrix |
| Sender name, Reply-to address | The name beside the address, and where answers go. Empty reply-to sends answers to us | no |
| Relay host, Port, Encryption, User, Password | Your SMTP relay. Ports 25, 465, 587, 2525; a host inside your network is refused | for Your own relay |
| Directory (tenant) ID, Application (client) ID, Client secret, Mailbox we send from | What your IT hands back from Entra ID | for Your Microsoft 365 |
| Fall back to Hafrix if my mail fails | On by default. Off means mail waits for the transport to be fixed | — |
Both secrets — the relay password and the client secret — are stored encrypted and never shown again, not even to us. The screen says Set, ending abcd so you can tell one secret from a reissued one; Replace puts in a new one, and leaving the field empty keeps the one you have.
Logo (the Workspace tab)
| Field | Meaning | Required |
|---|---|---|
| Upload logo / Replace logo | The image itself. Two limits, both checked before anything is sent: PNG or JPEG, up to 1 MB | yes |
| Workspace | The name above the preview — what printed forms show while there is no logo. Not editable here | — |
What the system tells you
| When | Feed row | Who gets it | |
|---|---|---|---|
| Invitation created with Send an invitation email on | — | {inviter} invited you to {workspace} on Hafrix | The invited address |
| Resend | — | Reminder: your invitation to {workspace} on Hafrix | The invited address |
| Invitation accepted | — | {name} joined {workspace} on Hafrix | Whoever created the invitation |
| Ownership transferred | — | You are now the owner of {workspace} on Hafrix | The new owner |
| Announcement published | The announcement itself, plus a centre-screen window at Important and Critical | Only if Send by email as well was ticked | Every active member |
| Announcement revoked | The row disappears from everyone's list | — | — |
| Import applied and created something | N items imported — {who} imported {file} into {category}. | — | Managers and admins with the Items section, except the person who ran it |
| Mail transport changed | — | The mail transport of {workspace} changed | The owner |
| Your transport refused a message | — | {workspace} could not send mail through your server | Admins — once, on the first failure |
| Send test message | — | Test message from {workspace} | Whoever pressed it |
| Role changed, member deactivated or reactivated | — | — | Nobody — the person simply finds the door open or shut on their next action |
| Former member's personal data erased | — | — | Nobody — answering the person is the workspace's job |
A dry-run tells nobody anything: nothing was written.
Related
- Roles & access — the ladder and the section grants as concepts, from the point of view of the person who has them.
- Reference data — the other Settings tabs: categories, certificate types, life budgets, maintenance, finance, shifts, crew roles.
- Getting started — what the person on the other end of the invitation actually does with the link.
- Account — what each person controls for themselves: password, two-factor, their own devices.
- Notifications — the feed rows this page produces and everything else that lands in the list.
- Platform console — the Hafrix-side console at
/platform; announcements and people across all workspaces, not just this one.
FAQ
Can I create a user without sending an invitation? — No. Every account starts as an invitation; you can only choose whether the workspace mails the link or you do. Turn off Send an invitation email, copy the link and send it however you like.
Someone lost the invitation link. Can I look it up? — No. Only a hash of it is stored. Use Resend: new link, new email, old link dead.
Why can't I remove a person? — Because removing them would rewrite history: their name is on certificates, tickets and jobs. active — deactivate closes the door and keeps the record.
I made someone an admin and they still can't see Finance. — Role and group are separate. Check the Groups tab: if Finance is listed against a group in Section visibility, they need to be in that group. Admins are not exempt.
I granted a section to a group and now I can't open it myself. — Add yourself to that group, or untick the section to open it to everyone again. Settings is never restricted, so you can always get back in.
Can I fix a typo in a published announcement? — No. Revoke it and publish a corrected one; what people already read stays read.
Usage says a person has more devices than they own. — Every sign-in opens a session and each browser or script counts as one. The person can end their own on their Account page, under devices.
Do views and actions in Usage include what happened on the phone? — Yes; the From column separates Web, Mobile app and API / script.
Our invitations end up in quarantine and nobody gets them. — That is the case the Email tab exists for: send them from your own address, and for your filters they become internal mail.
Do you get access to our mailbox? — No. The permission your IT grants is Mail.Send, and the last step of the instruction narrows it to the single mailbox you nominate. We can send from that one address and read nothing at all.
We changed the client secret in Microsoft. What happens? — Mail stops going out through you, an email tells the admins so, and — if the fallback is on — messages keep reaching people from noreply@hafrix.com. Paste the new secret with Replace, save, and send a test message.
My import created nothing and everything says "already imported". — The same file name and row numbers went through before. That is the safeguard against a double import, not an error.
Updated 2026-09-14
New to Hafrix?
See this workflow in your operation
Explore the platform behind these guides: equipment inventory, rentals, maintenance and operational finance. Tell us which workflow you want to see.