Item card
One unit on one page: what it is, where it is, what papers it holds, what it cost and earned, and everything that has ever happened to it. Nearly every day-to-day action starts here.
Where: open any row in Items (/items/{id}). The card is the same page whether you arrived from the list, from a job, from a work order or by scanning the label's QR code.
Who can do what
| Role | On the card |
|---|---|
| Viewer | Read everything the grants allow — facts, certificates, files, money, timeline. The facts strip reads as plain text, and there is no toolbar |
| Operator | + acting on a fact in the facts strip, the toolbar and Quick action, Edit, Print, files (upload, rename, remove their own); with the Compliance section — add and correct certificates |
| Manager | + Void a certificate (still with Compliance), and with the Finance section the money card Edit, Impair, Add a cost and Capitalise; removing anyone's file needs no extra grant |
| Admin | + nothing extra here — a card is never deleted, and neither is a line of its history |
Note
Six parts of the card answer to a section grant of their own: Certifications belongs to Compliance, Finance and Cost of ownership to Finance, Remaining life to Alerts, Next service to Maintenance, Upcoming reservations to Dispatch and Aramco field history to Connectors. If your group has not been granted one of those, that part of the card is missing or empty — see Roles & access.
At a glance
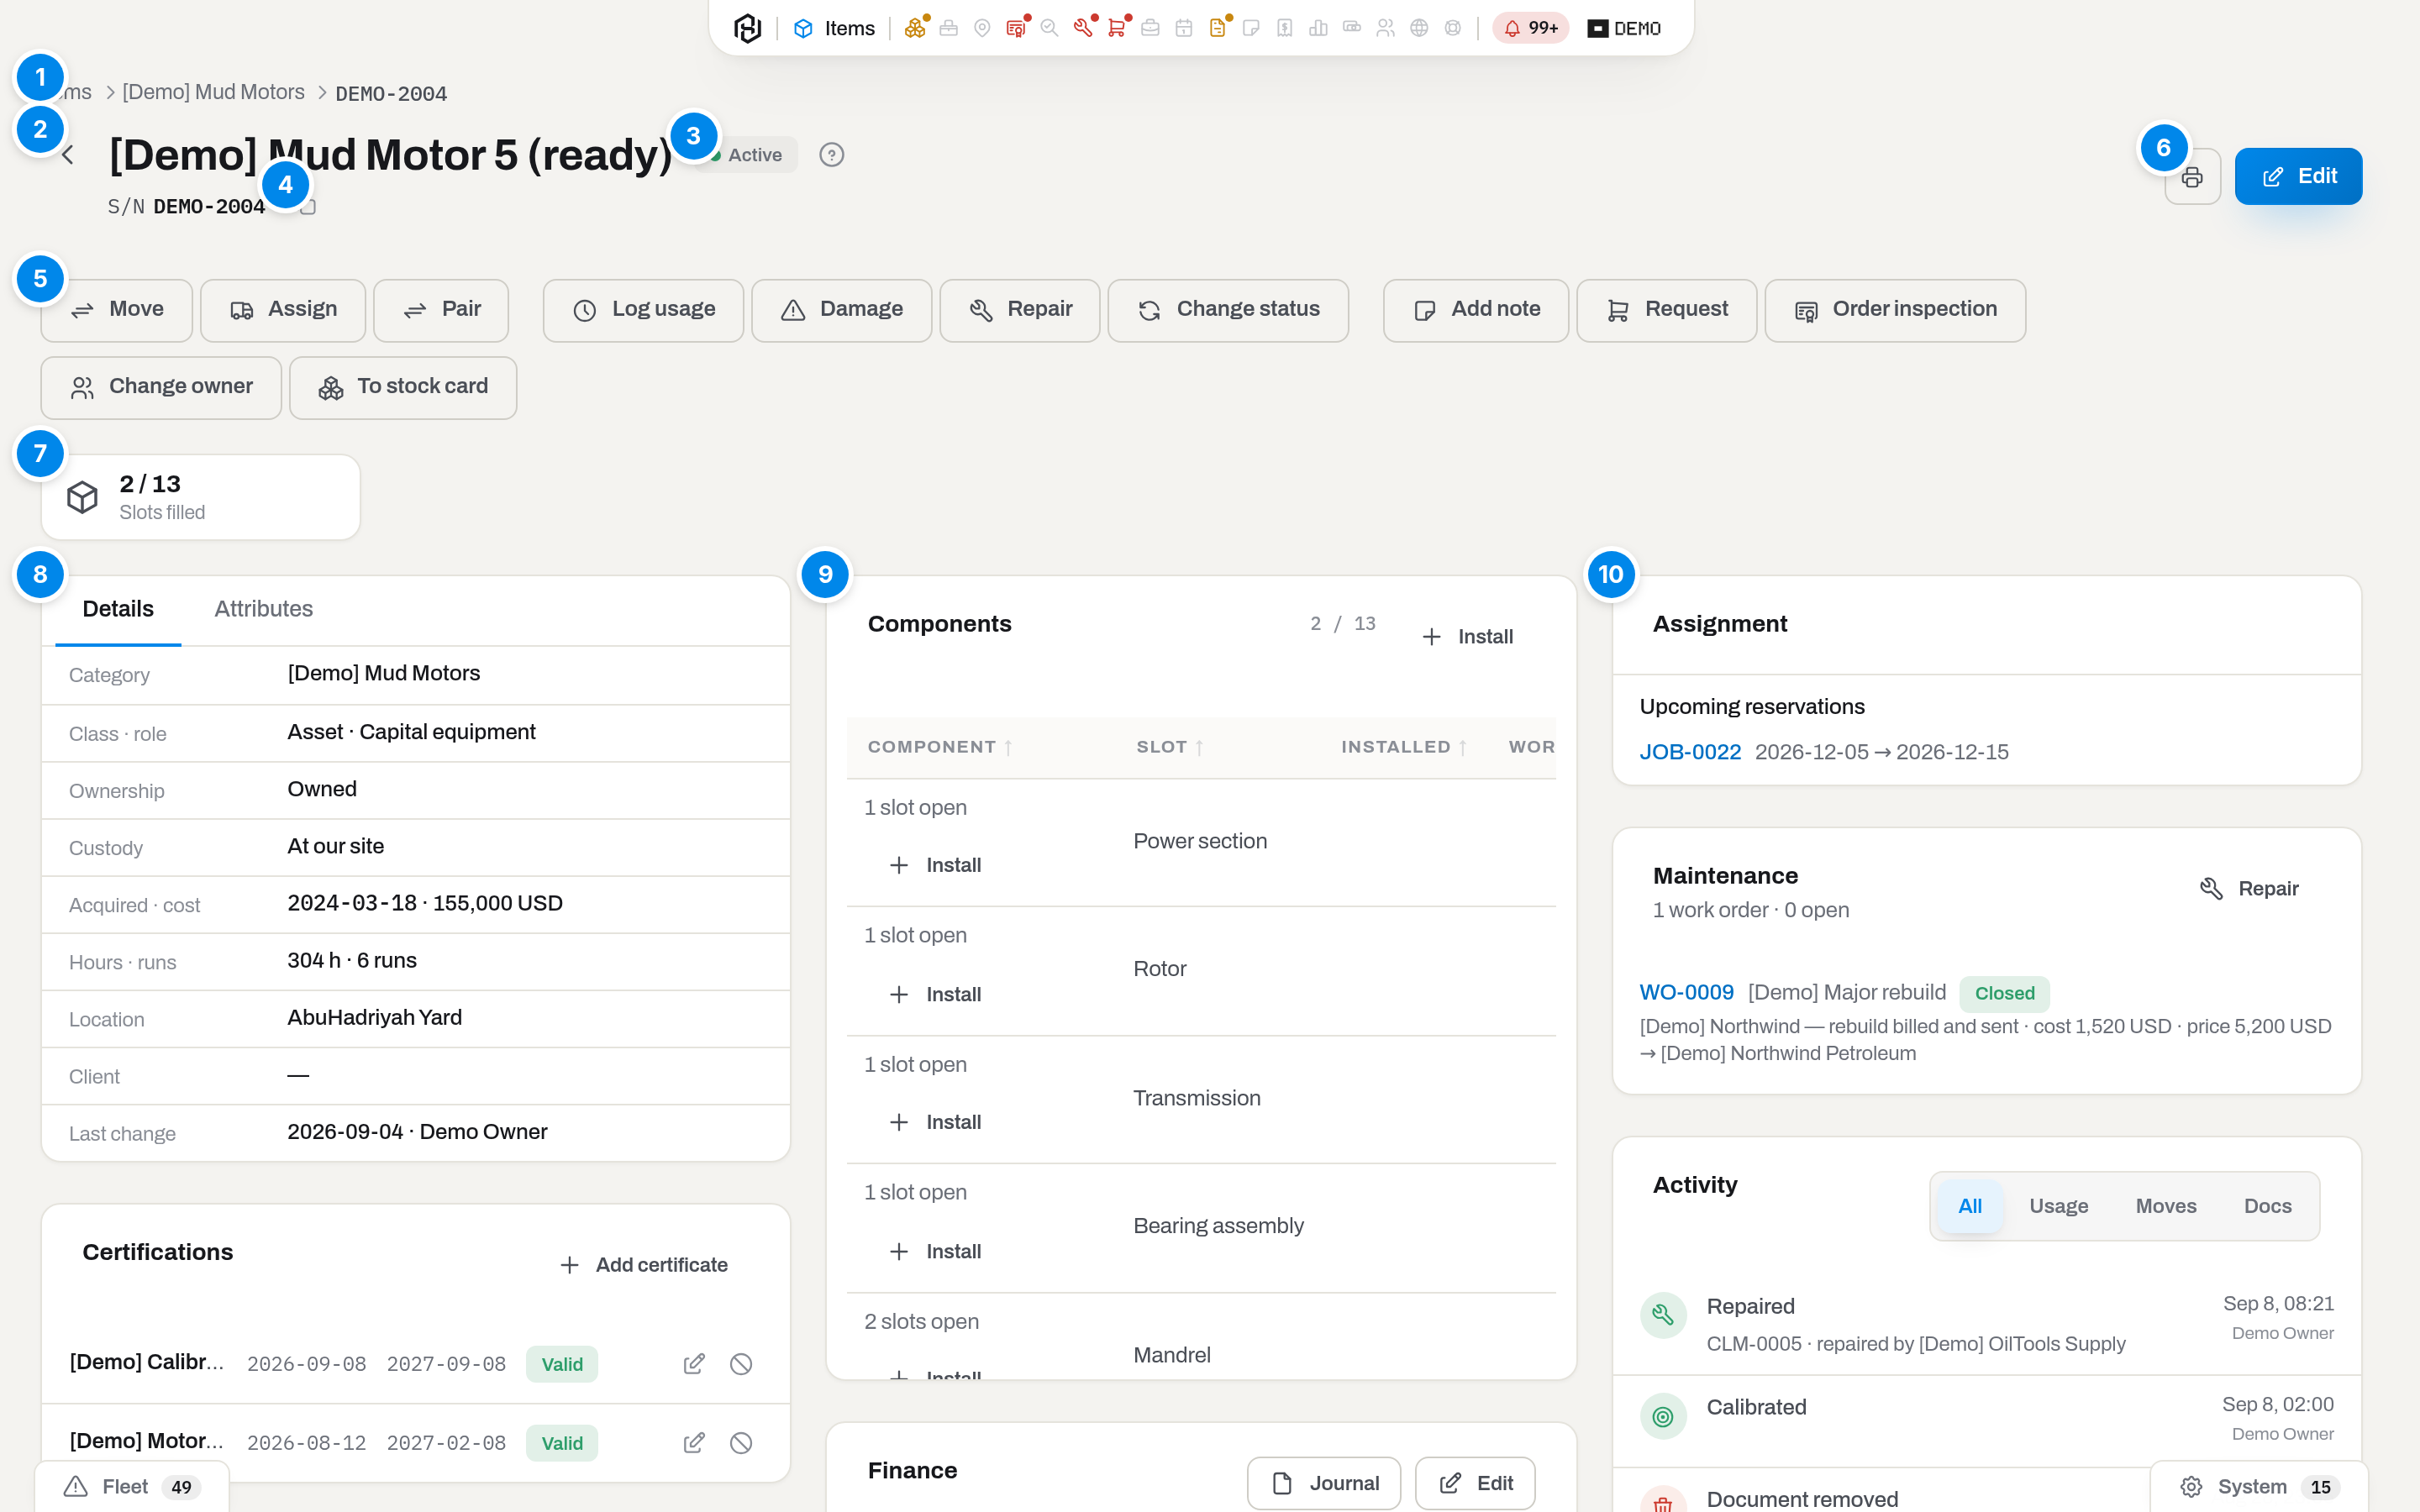
- Breadcrumbs — Items › category › the unit's identifier. Items returns to the list you came from, with its filters; the category opens the list filtered by it.
- Back — the arrow before the name goes back where you came from: the list, or the card you dropped in from.
- Badges — the status, and only what is wrong on top of it (see Reading the header).
- Identifiers — S/N, Asset ID, Mfg., P/N, Was, and the Copy identifiers → Copied button. It copies three of them — serial, asset ID and part number; the manufacturer's number and the former ones are shown but not copied. That same trio decides whether a label can be printed at all. Was lists the numbers this unit used to carry — the plate it wore before it was renumbered, the kit number a laptop used as its own, the old form of a probe's serial. It appears only when the unit has some, and search finds a unit by an old number exactly as it finds it by the current one: somebody arriving with a five-year-old certificate or an accountant's register lands on the right card.
- Facts strip and toolbar — two rows under the header that replace the old action bar. The facts strip is a row of clickable facts — Status · Location · Customer / rig · Owner · Pair · Class · Hours (a consumable reads Status · Class · On hand · In boxes · Supplier) — each one opening a menu of what can be done to it; a fact you may not act on reads as plain text. Below it, the toolbar opens with Quick action (keycap ⌘K), then the record buttons your role and grants allow — Usage · Past hours · Damage · Failure · Repair and Note · Request · Inspect · Claim. See The facts strip and Quick action.
- Print and Edit — top right of the header: the label or the PDF report behind the printer icon, and the form described in Items.
- Summary — an optional row, off until an admin turns it on in Settings → Appearance. The tiles under the toolbar answer "what is going on with this unit" before you scroll: what is inside, how much life is left, whether a service or a certificate is burning, where the unit is, how many files it holds. A tile appears only when it has something to say, and clicking one jumps to the card it was taken from and flashes it.
- What it is (first column) — Details / Attributes with the Condition bars at the bottom, Certifications, and Documents & photos.
- What is inside, and what it costs (second column) — Components for an assembly, Contents and Consumables for a box, and below them the money: Rental & PO or Stock, Finance, Cost of ownership. Inside a card every list is a row, not a table: the name on top, one line of detail under it, a badge or a number on the right and icon buttons at the edge — nothing wraps, and the full text is in the tooltip. The lists have a fixed height and scroll inside, so a motor with fifty parts no longer pushes the rest of the page down. The column is absent on a unit that holds nothing and has no money to show — and the money half is only there for people who may see the Finance section.
- What happens to it (third column) — Assignment, Next service, Maintenance, Activity, Aramco field history.
Note
A block with nothing in it and nothing to add is not drawn at all. No life budget, no maintenance plan, nobody holding the unit, no field history — you see one card fewer, not an empty card. Where such a thing is set up is written in Settings, not on the unit's own page.
Key concepts
Reading the header

The header prints the status always and the exception only. On top of that a clock chip appears when the nearest certificate is close to its date or past it: Cert · {days} d in yellow within thirty days, Cert · overdue {days} d in red after. An On rig badge appears while the unit is out with a client. When there is field, money, health, composition or off-the-books data to show, an Intel button appears in the action row next to Print — see Read the field intel.
A yellow Provisional S/N badge means the serial number under the name was issued here because the real one clashed with another unit — nobody has read the number off the iron yet. Hover it to see why, and replace the number from Edit: see A serial number we issued ourselves.
No readiness badge means one of two things, and they are not the same. Either the unit is Ready, or it has no readiness at all — a consumable never has one, and neither does an asset that has left the fleet (Disassembled, Obsolete, Scrap, Lost, Sold), because from then on the status is the whole answer. The clock chip follows the same rule: it hangs off readiness, so a sold unit with an overdue certificate shows no chip either.
Status and readiness are two different axes, and the readiness rule is narrower than people expect:
| Readiness | What puts it there |
|---|---|
| Need repair | A certificate came back with Result = Fail, or the status is In repair |
| Need inspection | A certificate has expired, or the status is In inspection, or the unit has worked since its last post-use inspection |
| Ready | None of the above |
Readiness reads only the current certificate of each type — the most recent one that has not been voided — and takes the worst of them. That is how a red badge is cleared: a Need repair left by a Fail goes away when a newer certificate of the same type comes back Pass, and a Need inspection left by an expired paper goes away when that type is certified again. Nothing is deleted; the new row simply supersedes the old one.
Note
A certificate that merely expires soon does not spoil readiness — that is what the clock chip is for. A life budget that has run out does not spoil it either: that argument is made by Remaining life and by the nightly alert, not by the badge.
Certificate states
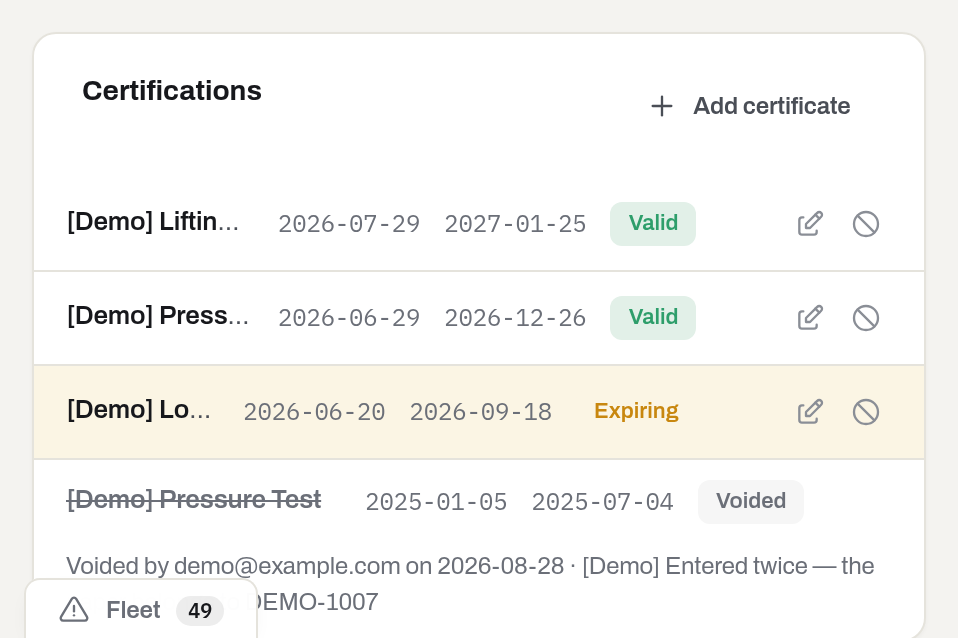
Each row is one piece of paper: the type, the date it was done, the date it runs out (or no expiry), a result and a badge. The result decides the badge before the expiry date does — a piece of paper that failed is never "Valid" just because the clock has not run out on it yet.
| Badge | Meaning | Row |
|---|---|---|
| Failed | Result is Fail | tinted red, regardless of the expiry date |
| N/A | Result is N/A — an inspection that carries a date but no verdict | plain, no countdown |
| Valid | Result is Pass, and more than 30 days left, or no expiry at all | plain |
| Expiring | Result is Pass, 30 days or fewer to go | tinted yellow |
| Expired | Result is Pass, and the date has passed | tinted red |
| Voided | Struck out by a manager — it no longer counts towards compliance or readiness | struck through, with Voided {date} · {reason} under it; hover the line to see who voided it |
Voided rows sink to the bottom of the card and stay there for good. An Expiring badge says how many days are left — Failed and N/A never show a countdown, because the date on them is not the thing that matters. The ⋯ menu on a row opens the scan attached to it, corrects a typo or voids the record.
A Fail result also moves the unit itself: recording one sends the unit to In repair, with the note from the certificate carried into the status change and a line in Activity addressed to the unit's department. Recording a Pass on a unit that is In inspection, or In repair with no open work order, returns it to Active — a unit In repair under an open work order stays there until the work order closes, so a certificate never jumps ahead of the repair itself. A Retired, Lost or Sold unit is left alone — a certificate does not buy it back into the fleet.
Note
A badge on a row describes that row, not the unit. An old Expired line that a newer certificate of the same type has already superseded keeps its red badge here for ever — and the unit is still Ready, because readiness looks only at the current paper of each type. Read the card top to bottom: the newest row of a type is the one that counts.
Open slots in an assembly
An assembly's Components list is ordered by the slots the category declares — Power section, Rotor, Transmission — and a slot that is not filled is a short row of its own with a + that installs into that very slot. Nothing is filled means every slot is listed as open; nothing is missing means no such rows at all. More than five open slots fold into the card footer — N more slots open · Show all. The counter next to the card title adds them up ("12 / 17"). A component whose slot has since been dropped from the category is still listed, at the end — it is in the assembly, and hiding it would be a lie.
Containers, assemblies and what is inside
A unit marked This is a container (kit box, basket) can hold other units. What the fourth card in the facts column is called depends on the category: a category whose composition is Assembly shows Components, everything else shows Contents.
They are not the same card. Contents is a list of what is inside right now, filled with Move. Components is a history: every serialized part that has stood in this assembly, from when to when, with the hours and KREV it earned there and what is left of its life — filled with Install and emptied with the arrows button on the row. See Components for what the row carries and Install a cutter set for the two actions.
Items inside a container have no location of their own — they inherit the container's, and their Details carries an Inside row with the chain of parents as links. That is also why the Location field on their edit form is disabled: they move with Move → Into container, not by editing.
A box holds two different kinds of thing, so it gets two cards. Contents lists the serialized units and the compartments — everything with a card of its own. Consumables, right below it, lists the quantities addressed to this box in Stock: the part, its number and how many. Empty, it reads No consumables in this container.
- The list is this box only. A compartment such as Box 1 is a container in its own right: it appears in Contents, and its own consumables are on its own card. There is no running total down the whole kit yet — that is completeness against a standard, and it is the next step of this work.
- An assembly has no Consumables card at all. A mud motor is a product, not a place; what goes inside it is its component list, not a stock line.
- Nothing is edited here. Quantities change through the four movements in Stock — loading a kit is a Transfer into the box, unloading it is the same transfer back; see Load a kit and unload it again.
Condition: life and the next service
Details ends with Condition — one bar per measure of the life budget ("hours 74% · 260 hours left") and one for the nearest service interval. The bars are there only when the category has a life budget or a maintenance plan; the numbers are the server's own, the same ones that raise the alerts. Marking a service done and overriding an interval still happen in Next service in the third column, where that plan keeps its history.
Below those, one more bar per counter the unit's category carries — amp-hours on a battery, flow hours and peak temperature on a pulser. A counter with a budget reads the same way the life budget bars do — a value against a limit, turning amber past the warn percentage and red past the budget — "142 °C of 175 °C". A counter with no budget set on its category shows only its value, with no bar: there is nothing to measure it against, so none is drawn.
A stator carries two lives. Its card hours are the metal tube, which keeps the hours of every run it was ever in; the Elastomer hours counter is the liner, which starts again at every reline. The liner counts itself — every hour a run puts on the stator, directly or through the motor it sits in, lands on both. Hours brought in from before the system (a shop's run book or a motor build sheet) are the exception: the sheets give tube and liner separately, so each number goes to its own place. Runs recorded before the liner counter existed were added to it once, as a single system entry in the history, and a reline recorded back then now restarts the liner rather than the tube. After a reline the bar shows the hours since then, and the line underneath says from which day and how many the liner has run in its whole life. See Start the life budget over after an overhaul.
When the next service is due
Next service answers one question — when this unit is next due in the shop — and it answers it with the same numbers the alert queue uses. There is no second counter: the card and the nightly rule run the same code, so a unit that reads On schedule here is never the one shouting in Alerts, and the other way round.
One row per maintenance plan of the unit's category (a category can have several — Minor repair every 1000 hours and Major rebuild every 800). Each row says three things: which plan, what state it is in, and what it is counted on — hours, runs or the calendar. The line underneath is the raw count: 850 of 800 hours · 106%.
| State | What it means |
|---|---|
| Due now | The interval is used up. This is the row that raises a Maintenance due alert |
| Due soon | Past the plan's warning threshold (80% unless the plan says otherwise) — Maintenance due soon in the queue |
| Repair open | A work order of that level is already open, and its number is a link. The queue stays quiet about it on purpose: the repair is booked, asking twice is noise |
| On schedule | Inside the interval. Nothing to do |
| No start date | A calendar plan on a unit with no in-service date and no closed repair — there is no day to count months from, so no date is invented |
The cycle starts at the last closed work order of that same level, or, if there has never been one, at the unit's in-service date. A cancelled order does not move it (no repair happened), and neither does an order of a different level — Minor does not reset Major. Hours and runs are counted from the timeline events after that point, not from the lifetime counters in Details: a unit imported with a year of history behind it would otherwise look freshly serviced.
Not every service is a work order. Rotating a shaft on the rack takes two minutes, and nobody books a repair for it — so a row that is Due now or Due soon carries a tick, Mark as done. It opens a small dialog: Done on is the day the work was actually done (today by default; it cannot be in the future) and Note is optional. Confirming records a Serviced event with that date, the row leaves the queue, and the next cycle counts from the day you gave — not from the day you clicked. Nothing else changes: no work order, no price, no parts. A plan flagged Reminder (the three-month rotation is one) is exactly that — past due, it still leaves the unit ready for work; it just stays yellow until someone marks it done.
Dates are given to the month, never to the day. A calendar plan gets a real date — the cycle start plus the plan's months. Hours and runs get an estimate at the unit's current pace (≈ 2026-12 at the current pace), the same pace Remaining life projects with; when the unit has not worked lately there is no pace and the row says so instead of guessing. A row that is already past due gets no date at all — the answer there is now.
A plan may carry more than one interval — 1000 hours or 12 months, whichever comes first — and then the date belongs to whichever runs out first, which is not always the one the count line shows. A unit at 70% of its hours but eight months into a twelve-month cycle is due by the calendar, and the row names it: 2027-01 · calendar. That is the month the alert queue will fire on, not a second opinion.
One unit may run on numbers of its own — this engine goes 200 hours between rebuilds, not 300, ever since the 2026 overhaul. Such a row is marked Own interval, with the reason on the badge, and everything else about it is unchanged: it is the same plan, the same cycle start and the same alert as before, only the interval and the warning threshold are this unit's. Setting one is below; the rest of the category is untouched, and Settings → Maintenance marks the plan with how many units left it.
Two things silence the card completely, and both say why: a category with no maintenance plan at all, and a unit that is out of service (sold, scrapped, disassembled). Plans are set in Settings → Maintenance — see Maintenance.
Who sees the money
The money column is one grant and two roles. Anyone whose group can see the Finance section reads Finance and Cost of ownership, and can open Journal and Costs. Writing — Edit, Impair, Add a cost, Capitalise and the Sale proceeds field in Change status — is Manager and above and the same grant. An operator without the grant does not see the column at all, so there is no button to press and no refusal to read.
What a rented-in tool shows
A card whose Ownership is Rented in carries one more block in the money column: Sub-rental — who we rent it from, from when to when, at what rate, and how much rent has been accrued so far. Opening a period, extending it and sending the tool back all happen there; the steps are in Procurement.
The rent lands in Cost of ownership as Rental lines, one per calendar month, so the cost per hour of a rented tool is as honest as the cost per hour of one we own.
The facts strip
Right under the header, a row of clickable facts stands in for the old action bar: Status · Location · Customer / rig · Owner · Pair · Class · Hours on an asset, or Status · Class · On hand · In boxes · Supplier on a consumable. Each cell is both the answer and the button — the action that changes a fact opens from that same fact, not from a bar of its own. Click a cell to open its menu:
| Cell | Opens |
|---|---|
| Status | The list of statuses, with a check on the current one — pick another to open Change the status |
| Location | Move to another location…, with a Recent section of places used lately — see Move the item |
| Customer / rig | Assign to a customer / rig… or Reserve for a job… while the unit is in the yard; Return from rig while it is out |
| Owner | Change owner… — Manager and above |
| Pair | Pair with a unit…, or Unpair once it already has one |
| Class | To stock card or To serialized unit, whichever the unit is not already |
A cell you may not act on — a Viewer, or an Operator without the grant a fact needs — still shows its value, but as plain text, not a button: there is nothing to click, so nothing looks clickable.
Note
The strip does not add a new action — it moves where each one lives. What a menu item does, what it asks for and what it changes is unchanged, and is described under How to.
Quick action (⌘K)
Quick action is the first button in the toolbar, in the same place on every card, with a ⌘K keycap on it. Press ⌘K (Ctrl+K on Windows/Linux) from anywhere on the card to open it without reaching for the mouse. It opens a search palette over the card with one field — What do you want to do with this unit? — and four groups below it:
- Suggested — up to three rows, picked for this unit right now, most urgent first: Return while it is assigned; Assign once it has sat Ready in the yard for 7 days or more; Log usage while it is assigned and nobody has logged hours in the last 3 days; Mark service done once a service is due, or the unit is within 48 running hours of one; Order inspection once a certificate expires within 60 days; Send to repair once the unit is damaged or needs repair. Never more than three rows, and only the ones that actually apply to this unit.
- Facts — the same menus as the facts strip: Status, Location, Customer / rig, Owner, Pair, Class.
- Records — everything the toolbar's record buttons do, listed by their full names: Log usage, Hours before Hafrix, Report damage, Report failure, Send to repair, Add note, Request from procurement, Order inspection, Claim to vendor.
- Documents — uploading a file and the item's paperwork.
Type to filter, ↑ / ↓ to move, ↵ to run the highlighted row, Esc to close. The footer reads Only what your role may do is listed — a row you cannot act on is not shown greyed out, it is simply never in the list.
How to
Move the item
Who: Operator and above. Assets only — consumable quantities move in Stock.
- In the facts strip, open Location and choose Move to another location… — or pick a place straight from the Recent section of the same menu to skip the dialog.
- Pick To location — or Into container, to put the unit inside a kit box or a basket. The list holds boxes only — an assembly (a reamer, a motor) takes its parts through Install, not through Move. One or the other, never both: picking one clears the other, and the Move button stays disabled until one is chosen.
- Click Move.
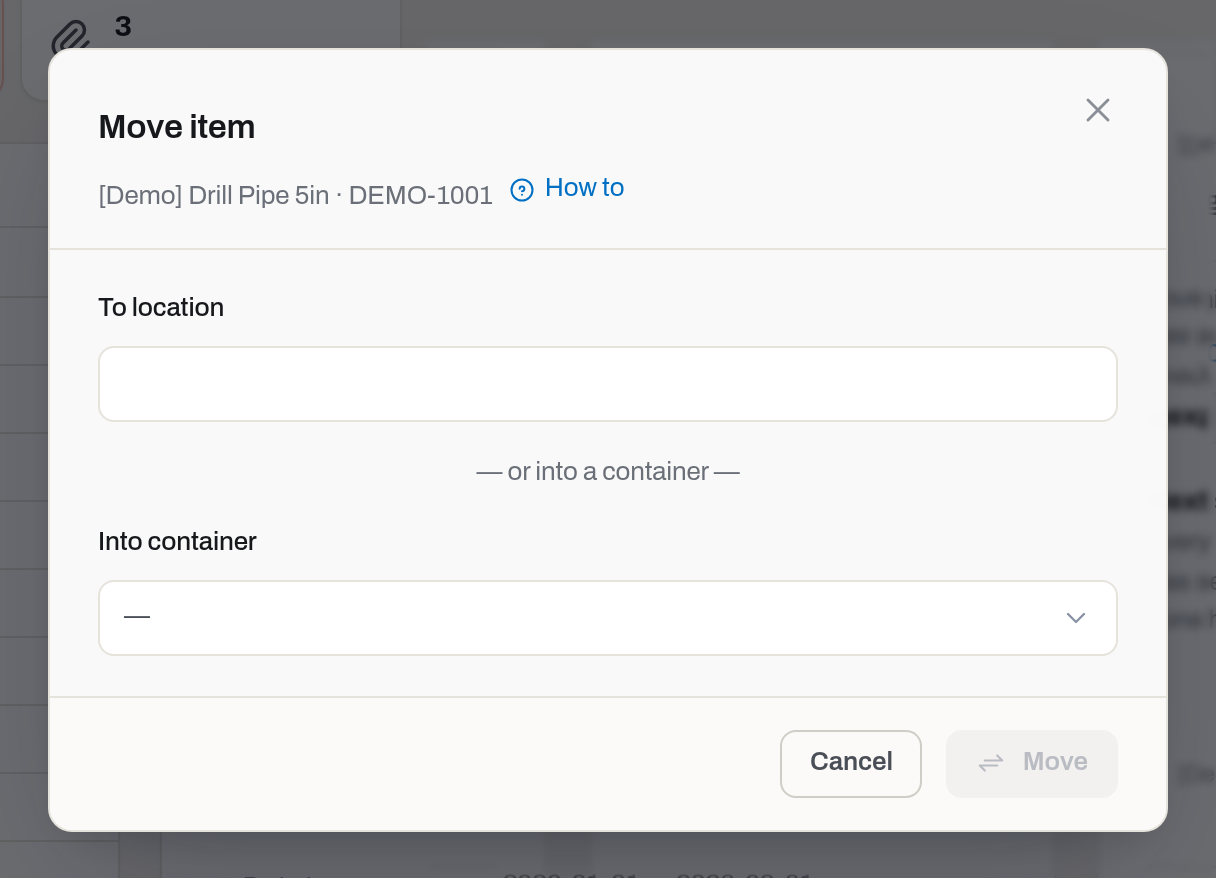
Result: Location (or Inside) in Details shows the new place, the Activity feed gets a Moved row, and a toast confirms the save. Moving a container moves everything inside it.
The dialog warns, it does not block. If the place you picked does not meet the category's storage requirement, a line under the selects says what is wrong — the shelter it offers against the one required, and the conditions it does not have. Move stays enabled on purpose: sometimes there is nowhere else to put it tonight, and the person holding the unit knows that better than the system does. The unit then shows up in Alerts until it is somewhere better.
If it fails: Destination item is not a container. — the unit you picked is not marked as one. Container chain would become a cycle. — you are putting a box inside itself or inside its own contents. Moving a unit that is out on a job does not bring it back from the job: use Return first, or the dispatch board still shows it out.
Log usage
Who: Operator and above. Assets only.
- Click Usage in the toolbar, or press ⌘K and choose Log usage.
- Fill in Hours and/or Runs — at least one of the two, unless a counter below carries a value instead.
- Well and Rig open to a search box on the Aramco mirror (2+ characters), a rig's row naming its contractor; pick a row, or type your own and press Enter. Naming one fills the other in if the pair is known; a value you typed yourself is never overwritten.
- If the unit's category carries any counter — amp-hours, flow hours, a peak temperature — a field for each active one sits under Hours and Runs, labelled with its name and its unit (Amp-hours (Ah)). Fill in what the field measures; leave the rest empty.
- Position and Mud type are optional context for this run — where in the BHA the unit sat, and what was circulated (water-based, oil-based, synthetic-based, air/foam, or other). Neither feeds a budget; they only ride along in Run history.
- Tick Failed on this run when this is the run that broke the unit, and choose a Failure mode — the same catalogue as Report failure in the toolbar. This marks the run itself and records the same failure as Report failure does — it shows in Activity and counts toward reliability and MTBF. Use Report failure instead when downtime, components installed and a work order need recording too.
- Job (optional) already points at the job the unit is working on, if it is on one. Click Log.
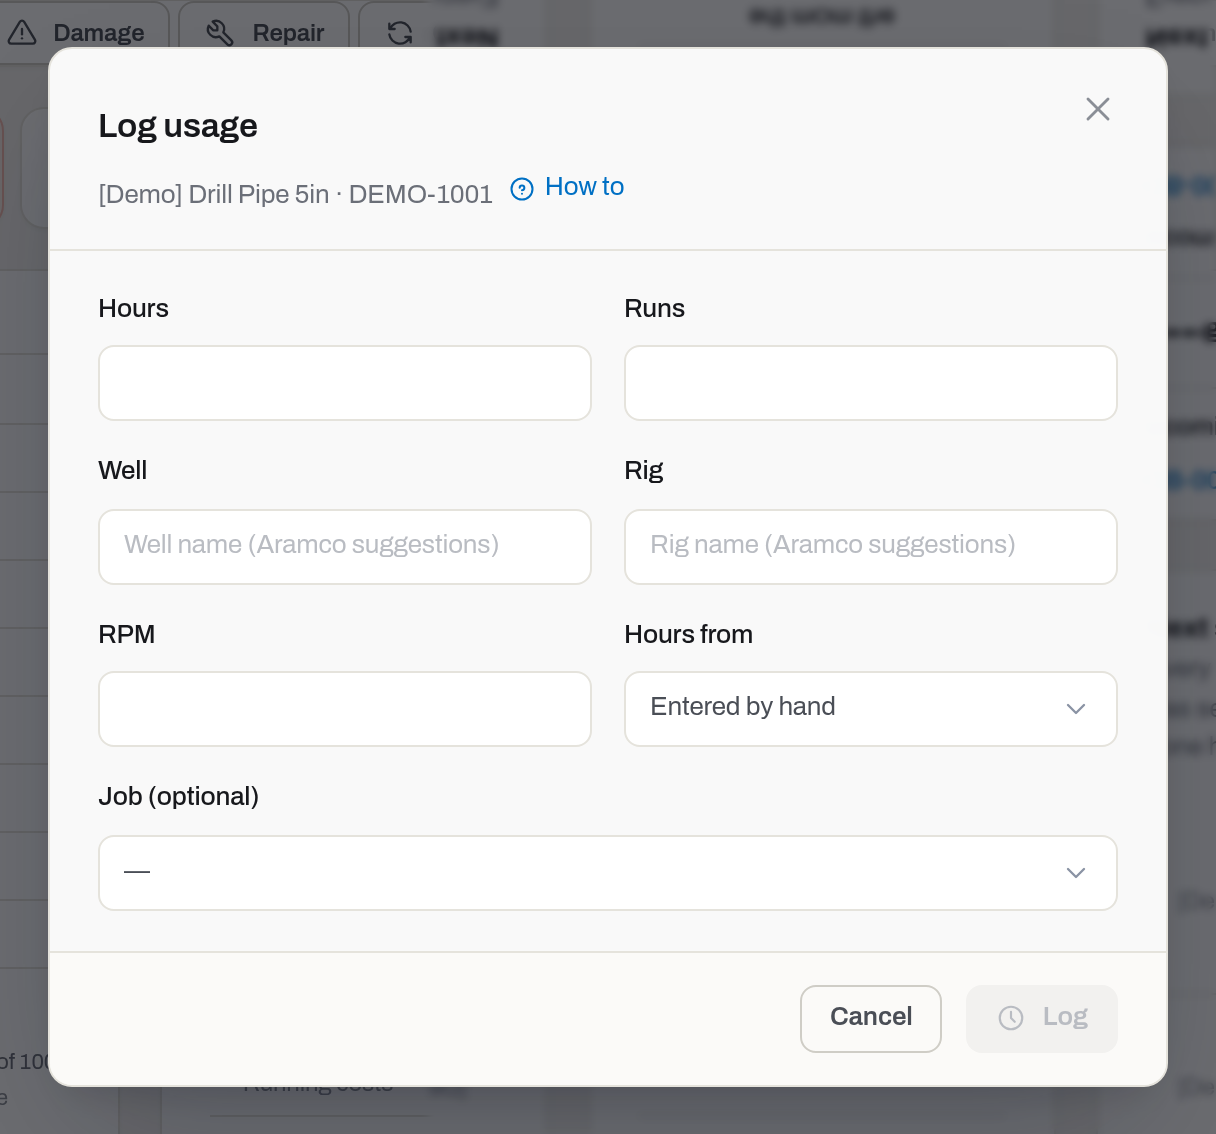
Result: Hours · runs in Details grows, Remaining life moves, and a Usage row lands in Activity with the hours, the runs and the well and rig you named. A counter you filled in moves the same way — added to the running total, or replaced by your reading if it is higher, depending on how the counter type is set up — and its bar in Condition follows. Assets get a Run history table further down the card, once the unit has at least one run: one row per entry, with the job, rig, position, mud type, circulating hours and, per counter, how much this run used and how much of the budget is left, counted from the counter's last reset the way the Condition bar counts it; runs from before a reset or rebuild show no running total — a failed run carries a red Failed badge naming the mode.
If it fails: the Log button stays grey while Hours, Runs and every counter field are empty — one number, of any of them, is the minimum, and a run marked Failed on this run also needs a Failure mode chosen. A negative number in Hours or Runs is not an error: that is how a run entered by mistake is reversed, since the timeline is never edited or deleted. A counter that only keeps its peak cannot be reversed the same way — a mistaken high reading stays the recorded peak.
Tip
Hours also arrive on their own — from a field ticket, and from the Aramco connector. A Usage row carries a link to the ticket it came from, and a run reversed because an Aramco trip already covers the day says so: reversed — day covered by an Aramco trip.
Log hours run before Hafrix
Who: Operator and above. Assets only.
Use this when a component — a stator, a rotor, a sleeve — already had hours on it before Hafrix started tracking it: a rebuilt part from the workshop book, or a unit carried over from another system. Those hours still count toward the MP-40 life budgets, so they need to be on the card, not just in someone's memory.
- Click Past hours in the toolbar, or press ⌘K and choose Hours before Hafrix.
- Fill in Hours and As of — the date the hours were counted as of; it defaults to today.
- Name the Source — where the number comes from (a workshop book, an export, a client report), so it can be checked later. This is required: an untraceable number is worse than none.
- Note (optional) for anything else worth keeping — a job, a client, a caveat.
- Click Log hours.
Result: the hours are added to the unit's life the same way logged usage is, and the Hours · runs row in Details splits into two lines: the total, and before Hafrix — in Hafrix. The Activity feed gets a Usage row tagged before Hafrix with the source (and note, if any).
Assign the item to a client
Who: Operator and above. Assets only. Ad-hoc needs the Clients section as well (the client is picked from it); On a job needs Jobs and Dispatch. With only one of the two open, the dialog opens straight in that mode; with neither, there is no Assign at all.
- In the facts strip, open Customer / rig and choose Assign to a customer / rig….
- Choose the mode: Ad-hoc (client + rig) when the unit simply goes out, or On a job when there is a job to book it against.
- Ad-hoc: pick the Client and, if you know it, Rig (optional). On a job: pick the Job — The item is reserved on the job and mobilized right away.
- Set Assigned from (optional) if the unit left earlier than today, then click Assign.
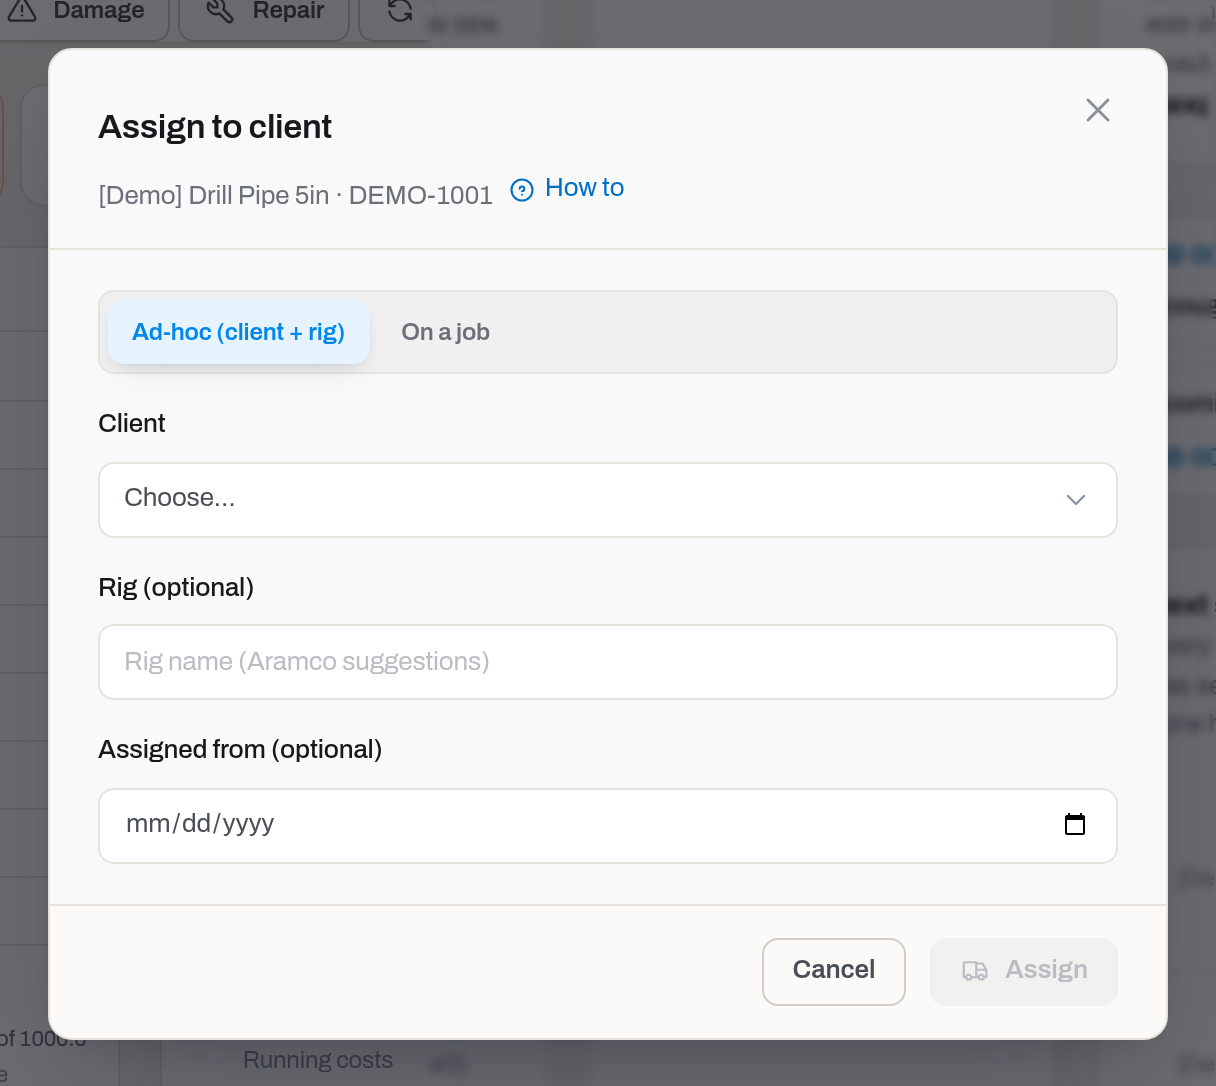
Result: the Assignment card fills in, an On rig badge appears in the header, the unit counts as out of the yard in Utilization, and Activity gets an Assigned row. The Customer / rig cell now reads the client and rig, and its menu offers Return from rig instead.
Tip
Reserve for a job… in the same menu does the same thing in one step, for a unit not yet out: pick the Job, and it is reserved and mobilized right away.
If it fails: Item is already assigned — return it first. Company is a vendor — mark it CLIENT (or BOTH) first. — fix the company in Clients. No client companies yet — add one on the Clients page. / No open jobs — create one on the Jobs page. — the list you are choosing from is empty.
Return the item from the rig
Who: Operator and above.
- In the facts strip, open Customer / rig — it now names the client and rig — and choose Return from rig.
- Read the confirmation — The item will be marked as returned to the yard; the assignment is kept in the timeline. — and click Return.
Result: the On rig badge and the Client row clear, Activity gets a Returned row, and the assignment stays in the history. If the category expects a post-use inspection, readiness turns Need inspection by itself, without anybody pressing anything.
If it fails: Item is not assigned. — someone returned it before you.
Report damage
Who: Operator and above. Assets only.
- Click Damage in the toolbar, or press ⌘K and choose Report damage.
- Write what happened in Description — required. Put the repair estimate in Cost (optional — feeds TCO) if you have one.
- Click Save.
Result: a red Damaged row appears in Activity, the fleet's managers get a notice and an e-mail, and the cost joins Cost of ownership. Nothing changes status on its own — a damaged tool still counts as available until somebody says otherwise. To send it for repair, use Repair in the toolbar or Quick action: see Open a repair.
Cutter sets are not repaired. A category can be marked as not repairable — reamer cutter sets are, out of the box. For such a unit the dialog says so in its hint, and Save first asks Scrap this unit?: confirming writes the Damaged row and moves the unit to Scrap with the reason damaged beyond repair in one go. There is no Repair button on that card and no work order can be opened for it — the good rollers of a damaged set live on in another set of the same size, but the set itself is written off. A damage reported on a set that is already scrapped stays a note; the status does not change again.
If it fails: the Save button stays disabled while Description is empty.
Report failure
Who: Operator and above. Assets only.
- Click Failure in the toolbar, or press ⌘K and choose Report failure.
- Choose the Failure mode — a code the office defined for this fleet (cutter bearing, cutter jammed, body crack…), not a free-text guess.
- Failed at defaults to now; Downtime (h), Rig, Well and Description are optional. If the item currently has components installed, tick the ones the failure is about under Components installed at the time.
- If you can see the Maintenance section, tick Open a work order to send the tool for repair from the same form, with a title you can edit.
- Click Save.
Result: a Failed row appears in Activity with the mode and description, a snapshot of the tool's hours, runs and KREV at that moment, and — if you opened one — a work order marked as a failure repair. The fleet's managers get a notice and an e-mail. The failure counts toward Reliability in Utilization; nothing about a repair on its own does — a failure is a fact somebody records, not something the system infers from a work order.
If it fails: the Save button stays disabled until a Failure mode is chosen; a component that is not currently installed on this item is rejected.
Open a repair
Who: Operator and above. Assets only.
- Click Repair in the toolbar, press ⌘K and choose Send to repair, or click New work order in the Maintenance card. All three open the same form; the card's button also fills in the service level of the unit's nearest service plan (and the repair category, when one matches it), so a scheduled service is two clicks — see Open a work order from the Maintenance card.
- Fill in the work order and save it. The form is described in Maintenance.
Result: the work order appears in the Maintenance card with its number, level and status; while it is open the item's status is In repair and its readiness Need repair.
If it fails: a work order needs a service level and someone to bill; see Maintenance. A unit whose category is not repairable (reamer cutter sets) has no Repair button at all, and the server refuses a work order for it with not repairable — report damage instead, which scraps the set: see Report damage.
Open a work order from the Maintenance card
Who: Operator and above with the Maintenance section. Assets only.
The Maintenance card lists the unit's work orders — number, level, status and, for those who see the money, cost and price. Its header carries New work order; when the unit has no work orders yet, the card says so and offers the same button.
- Click New work order in the Maintenance card.
- The form opens on this unit with the service level of its nearest service plan already chosen (the plan the Next service card shows first), and the repair category filled in when exactly one category points at that level — otherwise pick it yourself. Change either if the job is something else: while you have not touched the category it follows the level you pick, and a category you choose suggests its level, as in the queue.
- Click Open work order.
Result: the same as Open a repair: the order appears in the card and the unit is In repair.
If it fails: the button is missing on a unit whose category is not repairable, and for roles without the Maintenance section — the card itself is hidden then. A unit with no service plan opens the form empty, as the toolbar button does.
Ask for one to be bought
Who: Operator and above with the Procurement section.
Request on the card opens the same Ask to buy dialog every other screen uses, and the card fills it in for you — but not with the same thing on both kinds of unit:
- a consumable asks for itself. The line points at this very card, so you only say how many and why.
- a serialized asset asks for a replacement. The description arrives written — replacement for S/N … — because the serial number means nothing to a supplier: what you want is another one like this, not this one back.
- Click Request.
- Check the Quantity, say Why it is needed, and click Add to request.
Result: the line lands in your open draft — the basket every screen shares — and the request opens. Nothing is bought yet: a request is submitted, approved and only then ordered. The whole route is in Procurement.
If it fails: no Request button means your group has not been granted the Procurement section — see Roles & access.
Give one unit its own service interval
Who: Manager and above with the Maintenance section. Assets only.
- In Next service, click the pencil on the plan's row.
- The form opens on the category's own numbers, and the hint above them says what the plan holds. Change Every, hours, Every, runs or Every, months — at least one has to stay filled.
- Warn at, % of the interval moves the Due soon threshold for this unit; Why this unit differs is the line other people will read on the badge.
- Click Save.
Result: the row starts counting against the new numbers straight away, and is marked Own interval. The alert queue follows on its next run — the same alert as before, with the new figures in it; nothing about the cycle moves, because the cycle still starts at the last closed work order of that level. The rest of the category keeps the plan's numbers.
To undo it: open the same form and click Use the category numbers. The unit goes back to the plan's intervals on the spot.
If it fails: the Save button stays grey until at least one interval is filled — an empty override would silence the reminder instead of moving it. The pencil is missing altogether for operators and viewers: an interval decides when the alert queue calls, so it is set by whoever sets the plan itself.
Change the status
Who: Operator and above. Sale proceeds — Manager and above with the Finance grant.
- In the facts strip, open Status — the list shows every status with a check on the current one — and pick another.
- The Change status dialog opens with that status already chosen. Say why in Reason.
- Click Change.
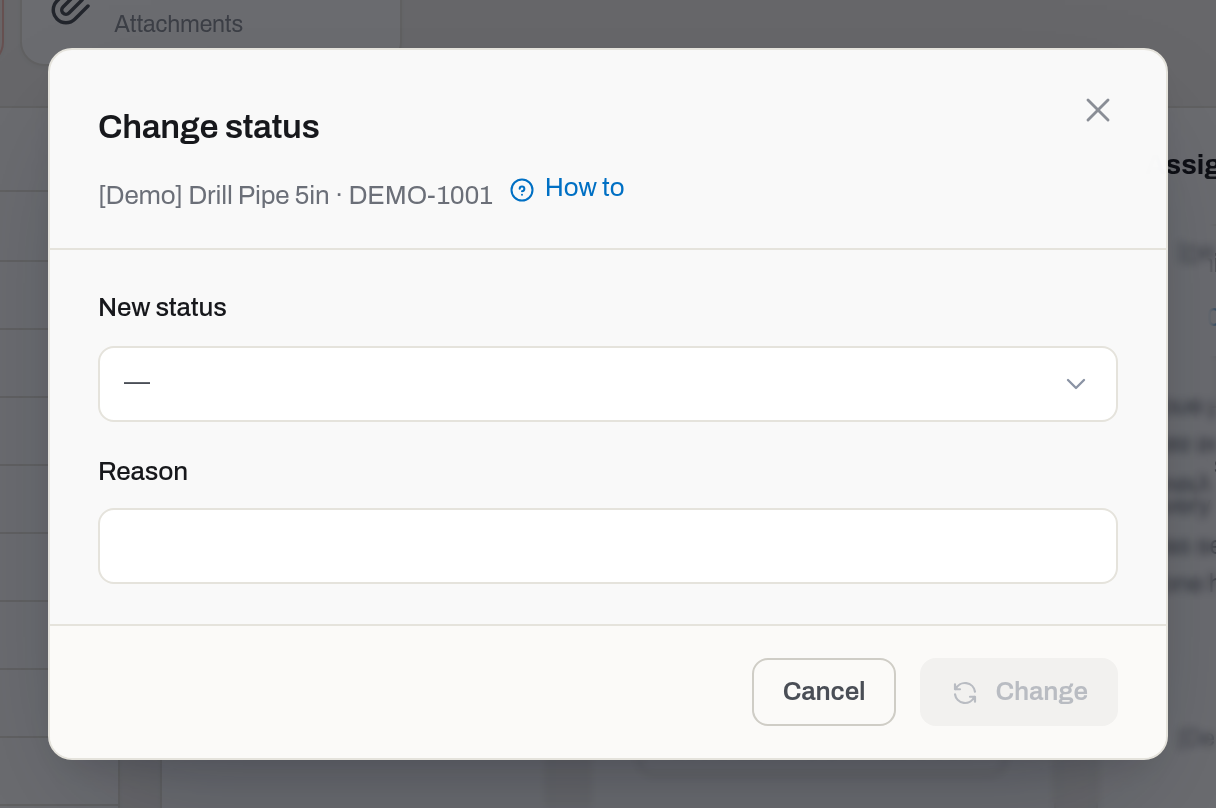
Result: the header badge changes and Activity gets a Status changed row reading {from} → {to} · {reason}. Statuses that take a unit out of the fleet — Disassembled, Obsolete, Scrap, Lost, Sold — also take away its readiness: the status is the whole answer from then on.
If it fails: the Change button stays grey until a New status is picked. On a consumable the list itself is short — only Active and Obsolete: a stock card has no rig to be lost on and no workshop to sit in.
Warning
Picking Sold adds a Sale proceeds field for people who can see the money. Fill it in now: profit or loss is frozen into the disposal line when the month closes, and a figure typed later cannot rewrite a closed month.
Bill the disposal to the customer. When the new status takes the unit out of the fleet — a spent battery going to Scrap, say — Operators with the Tickets section also see Bill disposal to a ticket. Tick it, pick a Draft ticket (the list shows drafts of the job the unit last ran on, or of the client it is with) and a Service — a catalogue service with the code BATT-DISP is chosen for you. Change then does both at once: the status changes and a service line Disposal: {serial} lands on the draft. The line reaches the invoice the usual way, once the ticket is approved. If the ticket is no longer a draft, nothing changes — neither the status nor the ticket.
Add a note
Who: Operator and above.
- Click Note in the toolbar (or press ⌘K and choose Add note), type the text, click Save.
Result: a Note row in Activity under your name. Notes are for what the fields do not hold — "left thread galled, watch it next run". For something that belongs to the unit permanently, use Notes on the edit form instead: that one shows in Details.
Add a certificate
Who: Operator and above, with the Compliance section.
- In the Certifications card click Add certificate.
- Pick the Type — the list shows each type with its validity, {name} ({days}d).
- Set Done at — it cannot be a future date. Expires (auto from validity) fills in from the type; override it if the paper says otherwise.
- Set the Result — Pass, Fail or N/A — and, if you have them, Cost (feeds TCO) with the currency picker beside it (it carries no label of its own), Inspector and Notes for whatever the paper says beyond the verdict (a defect code, what needs redoing).
- Attach the scan in Document: pick a file already on this item, or press Upload a file… to add one now.
- Click Add.
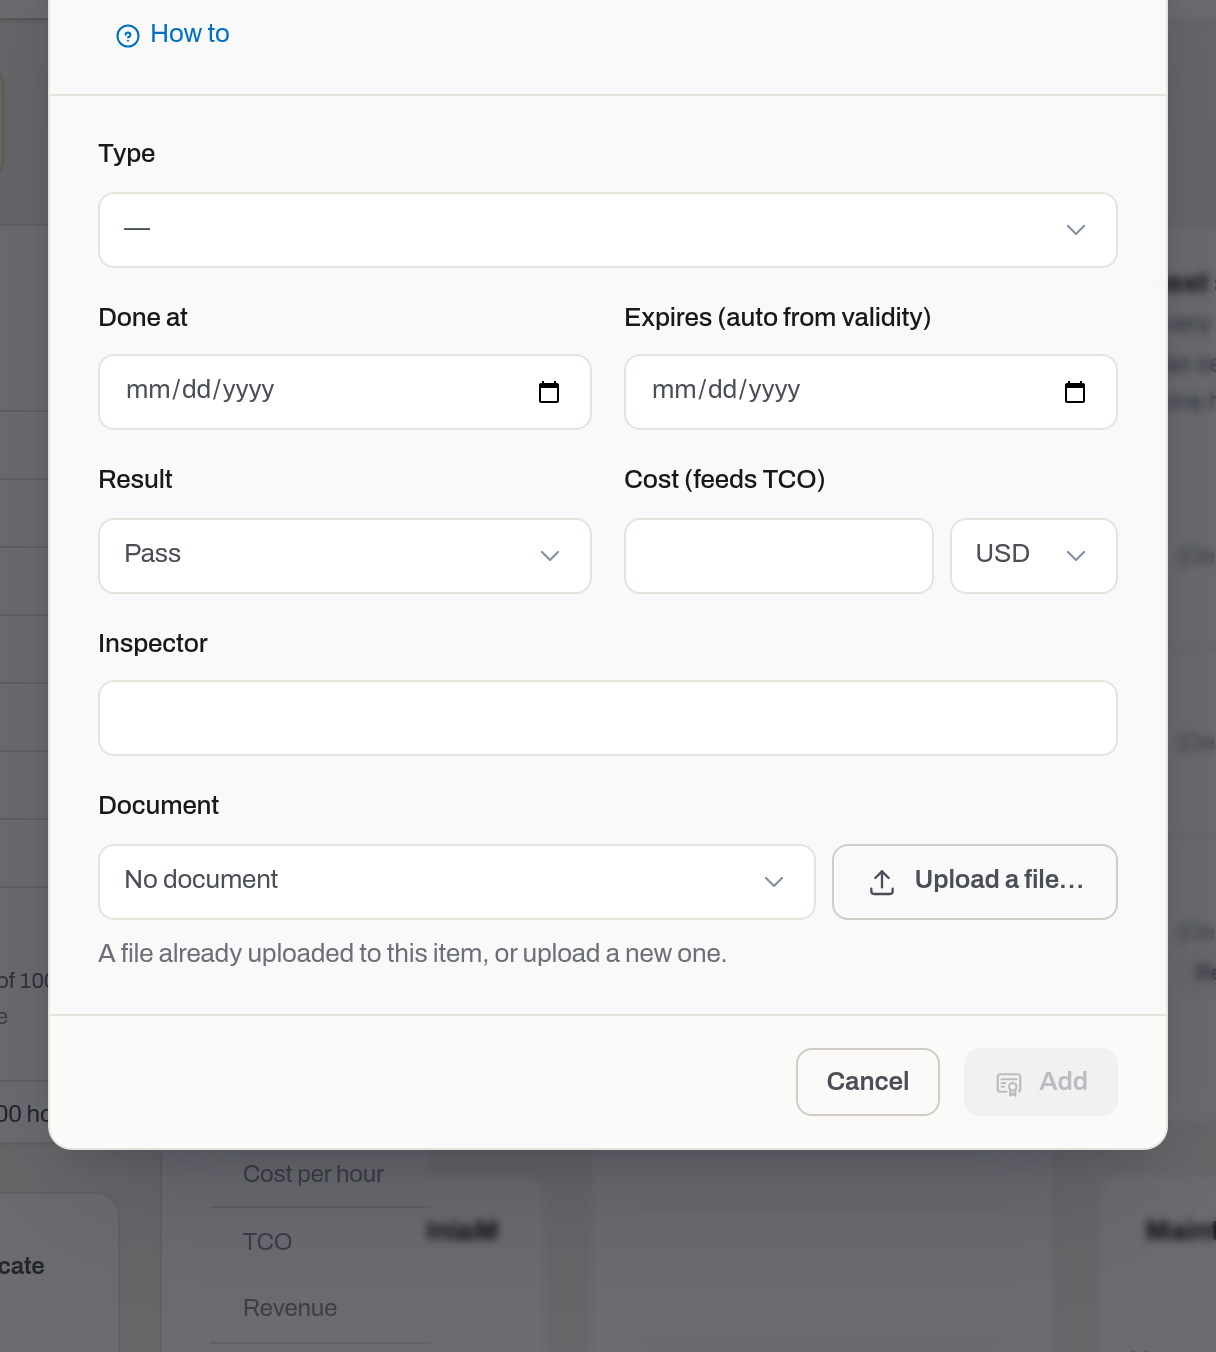
Result: the row appears in Certifications with its badge, Activity gets an Inspected or Calibrated row, and the cost joins Cost of ownership.
If it fails: Type and Done at are required and Add stays grey without them; a Done at in the future is refused outright. A Fail result sends the unit to In repair on purpose — a failed inspection is not paperwork, it is a verdict — carries Notes into the reason for that status change, and posts a line to Activity for the unit's department, plus an email to whoever manages the fleet. It is also how you come back out of it: add a newer certificate of the same type with Result = Pass while the unit is still In inspection or In repair with no open work order, and it returns to Active on its own — the badge clears too, because readiness and compliance both read only the current paper of each type. A unit already under an open work order keeps its status until the work order closes.
Correct a certificate
Who: Operator and above, with the Compliance section.
- Click the pencil on the row — Correct this entry.
- Change what was mistyped and click Save. Type is frozen: a different type is a different paper, not a typo.
Result: the row shows corrected next to the type, and Activity gets a Certificate corrected row spelling out every touched field as field: was → now. The dialog says it plainly: The paper stays as it is — you are correcting how it was typed in.
If it fails: the pencil is not there on a voided row — a voided record is finished.
Void a certificate
Who: Manager and above, with the Compliance section.
- Click the ban icon on the row — Void this certificate.
- Read what it will do, write the Reason — required, and it stays visible on the row forever — and click Void certificate.
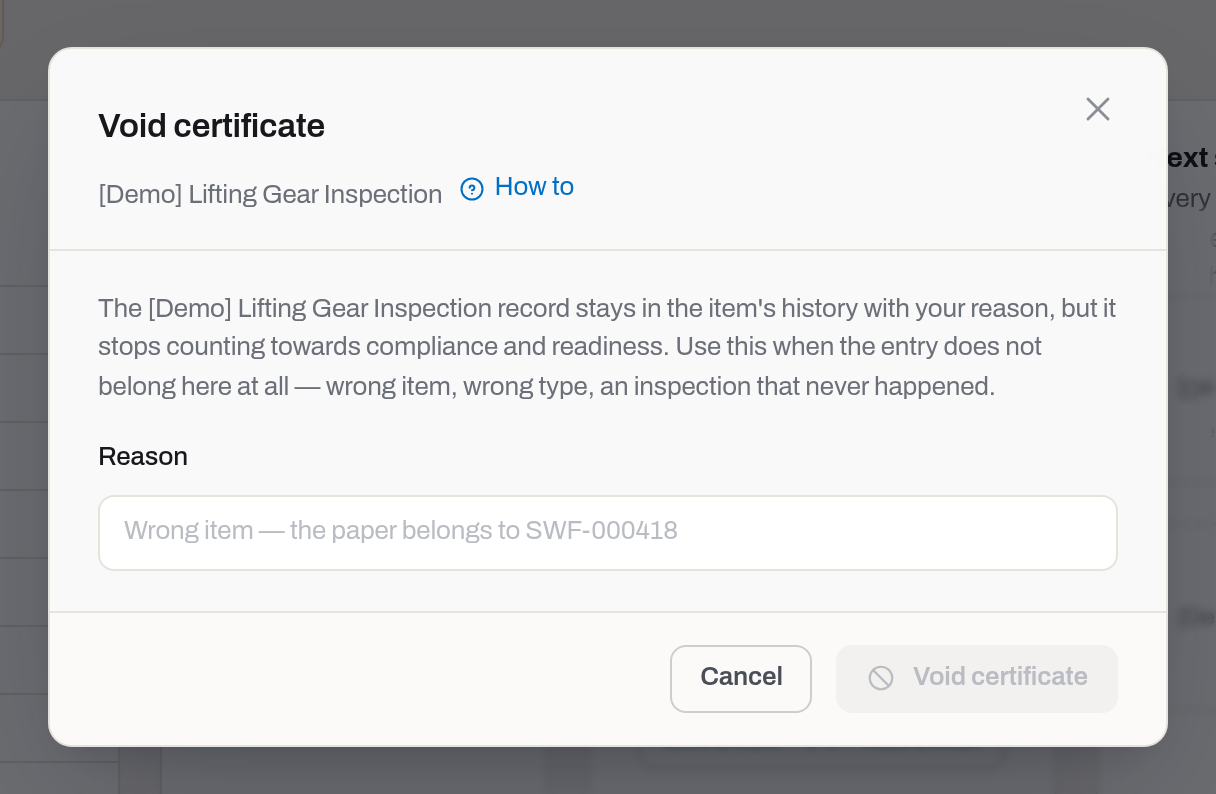
Result: the row greys out and sinks to the bottom with Voided by {who} on {when} · {reason}, its money leaves Cost of ownership, compliance and readiness are recomputed without it, and Activity gets a Certificate voided row. If the paper was the current one for its type, everyone on the fleet's alert list gets the e-mail A certificate was voided on {item}. Voiding a Fail does not undo what it already did to the unit's status — a unit sent to In repair stays In repair; bring it back with a Pass on a newer certificate, not by voiding the old one.
If it fails: Voiding a certificate changes the compliance picture of the fleet — it takes a manager. This certificate is already voided.
Warning
Void means "this entry does not belong here at all" — wrong item, wrong type, an inspection that never happened. A paper that simply ran out is not voided; it expires, and a new one replaces it.
Upload documents and photos
Who: Operator and above.
- Drag files onto the Documents & photos card, or click Upload.
- File details opens by itself for each file: give it a Name people will recognise, choose the File type — Document, Photo or Certificate — and add a Description. Click Save.
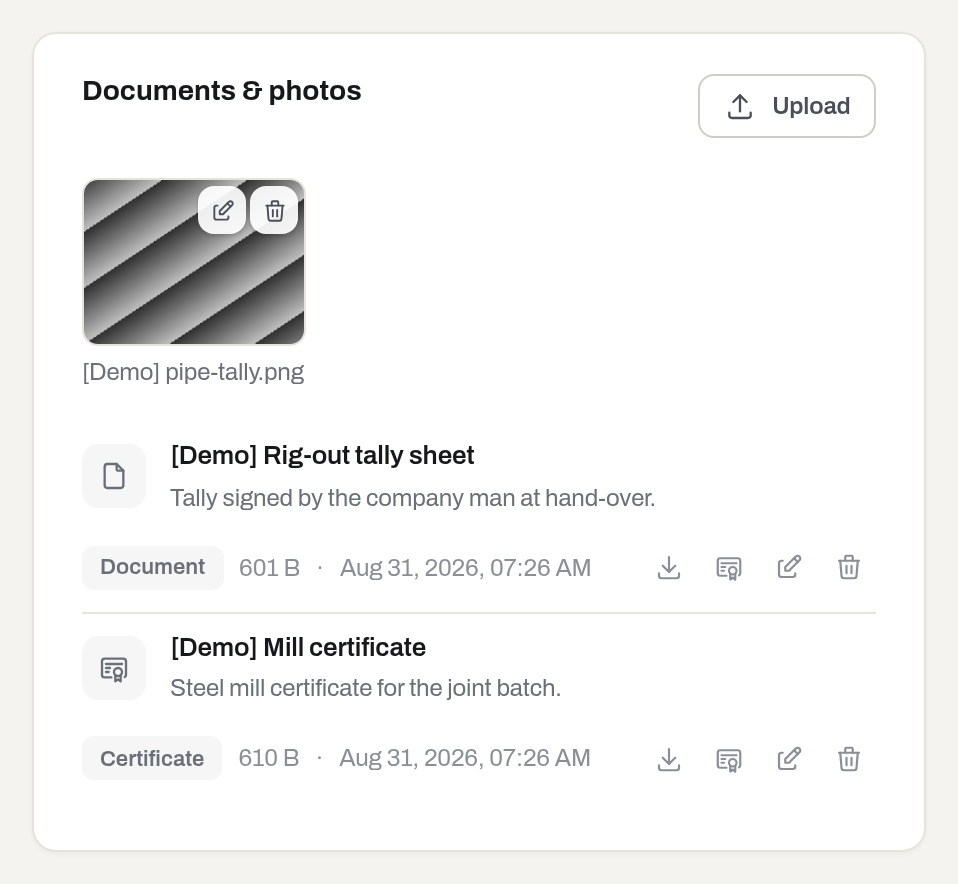
Result: images become tiles captioned with the name you gave them; everything else becomes a row with the type, size and date under the name, Download at the right and a ⋯ menu with Link, Edit and Remove. Activity gets a Document added row. Edit in that menu reopens File details later.
Warning
On the card the name you type is not shown on file rows at all — as the picture above shows, the row is squeezed in the narrow column and only the badge, the size and the date survive (issue #163). Until that is fixed the name is visible on hover, in File details and everywhere else the file is listed, so it is still worth typing.
If it fails: Upload failed ({status}) — the file did not reach storage; try again. Removing is stricter than uploading: Only the person who uploaded this file, or a manager, can remove it. A signature picture taken at a handover or return is not listed on this card — it sits under that movement in Activity and cannot be removed by anyone (This file is part of a signed document — it cannot be removed.). A removal is permanent, and Activity keeps the Document removed row to say it happened.
Note
Files outlive a rebuild of the register. When a workspace is imported again from scratch, the documents are put back on the new cards under the same names and dates, and their Document added rows say restored from a backup with the day the file was first uploaded.
Virus check
Who: everyone who can see the file.
Every document, photo and certificate scan uploaded to a card is checked by the antivirus before anyone can rely on it. While the check runs, its row or tile reads Scanning for viruses…; the card checks again on its own for up to two minutes, so there is no need to reload.
Result: a clean file settles into its usual row or tile, ready to download, link to a certificate or print. An infected file never stays: it is deleted the moment the check finds it, its row reads Blocked: malware found, and a cover photo or a certificate link pointing to it is cleared. Activity keeps the Document removed row and names the reason. A feed row (Blocked: {filename}) and an email go to whoever uploaded the file and to the admins, naming what the check found.
If it fails: the check itself can be the thing that is down, not the file. A profile photo, a tenant logo, an invoice signature or a Care attachment is checked before it is saved, so while the check is down it is refused outright: Files cannot be checked for viruses right now. Try again in a few minutes. Files on a card — documents, photos and certificate scans — are never refused for this: they are accepted, stay at Scanning for viruses… a little longer, and still resolve to clean or blocked once the check is back. If the file is not found in storage, the row reads File missing and nothing can be opened: remove the row and upload the file again. A signature image is the exception — it cannot be removed, and the signature itself stays on record.
Set a cover photo
Who: Operator and above.
A cover photo is what the item shows on its tile in the Tiles view of Items. Only one photo can be the cover at a time.
- On a photo tile in Documents & photos, click the photo icon button — hover it to see Set as cover.
- To take a photo back off cover duty, click the same button on the photo that is currently the cover — its hover text now reads Remove cover — and the item's tile in Tiles goes back to showing its category icon.
Result: a Cover badge marks the photo, and the item's tile in Tiles shows this photo instead of the category icon straight away.
If it fails: the button is offered on the item's own photos only — a document, a certificate scan or another item's photo cannot become the cover.
Put files in your own order
Who: Operator and above.
- Take a file row by the ⠿ handle at its left edge and drag it up or down — with the mouse, or with a finger on the phone. Let go where it should sit.
- Without dragging: open the row's ⋯ menu and pick Move up or Move down. With the handle focused, the arrow keys do the same.
Result: the order is saved the moment you let go and is what everyone sees on this card from now on. A newly uploaded file still goes to the top; drag it down when it should sit lower. Photos keep their tiles and are not part of the order.
If it fails: Ticket … is SUBMITTED — a signed ticket is frozen. — files on a submitted ticket are locked, order included; reopen the ticket to a draft first.
Link a document to a certificate
Who: Operator and above.
- On a file row click the certificate button — Link to a certificate.
- Answer Which certificate of this item does this document confirm? by picking one, and click Link.
Result: a paperclip appears on that certificate's row and opens the scan straight from Certifications.
If it fails: No certificates to link to yet. — add the certificate first; the button is offered on files, not on photos.
Print the label or the report
Who: Operator and above.
- Click Print.
- Label 50 × 25 mm prints one sticker: a QR code that opens this very card, the unit's name and its identifiers. It is offered only when the unit has at least one identifier — an empty sticker is no use.
- Item report (PDF) downloads the one-page passport of the unit for the rig, the audit or the insurer.
Result: nothing changes in the data — printing leaves no trace in the timeline. Scanning the label on a phone opens this card, which is the point of putting it on the tool.
If it fails: the browser's print dialog is where paper size is chosen; the label is laid out for 50 × 25 mm stock.
Read and correct the money
Who: read — anyone with the Finance section; write — Manager and above.
- Finance carries Gross book value, Accumulated, Net book value, the depreciation Policy with where it came from, In service since, List rate and any Price book line that covers this unit today, plus the curve of what has been posted (Posted) and what is projected (Forecast).
- Journal opens the Depreciation journal — one line per month plus opening balance, adjustments, impairment and disposal. Lines are never rewritten.
- Edit opens Money card: In service since, Rate at purchase, Method, Useful life, months, Residual value, List rate and Rate unit, Opening balance and Opening as of, Cost center. These are overrides for this item only — the category policy stays as it is.
Result: A new life or residual applies from the next open month; closed months are never rewritten. Below Finance, Cost of ownership adds what the unit actually costs and earns over a Period — Running costs, Depreciation, Cost per hour, TCO, Capitalised, and, once it has earned anything, Revenue, Contribution, Utilization and Payback. Costs opens the Cost journal; Add a cost records what is written nowhere else — washing, transport, customs. Repairs and certificates arrive there on their own.
If it fails: This item worked, but it has no list rate — its revenue reads as zero until a rate is set. If the whole money column is missing, your group has not been granted the Finance section.
Capitalise a cost
Who: Manager and above with the Finance section.
- In Cost of ownership click Costs to open the Cost journal.
- Find the line — repairs, inspections and tickets arrive here on their own — and click Capitalise on it.
- An improvement, not a repair (IAS 16): the money goes into what the item is worth and comes back as depreciation. Fill in Extends the life by, months if the work bought the unit more life, and confirm.
Result: the line moves from running costs into the book value, Gross book value grows, Capitalised appears in Cost of ownership, and the extra months start counting from the next month. Closed months are not rewritten — it works forward.
If it fails: Back to costs on the same line undoes it — the money leaves the book value and counts as a cost of the period again. Without the Finance grant there is no Costs button, and without the manager role the line has no buttons at all.
Impair the item
Who: Manager and above with the Finance section.
- Click Impair at the bottom of the Finance card.
- Enter the Amount lost and say What happened. Both are required.
- If the loss happened earlier, pick the day in Date it happened. Leave it blank for today. A future day or a day before the item went into service (or, without a service date, before it was acquired) is not accepted. This is the date of the event, not the accounting month: the line is always booked in this month's journal, and past months stay as they were closed.
- Click Impair. If monthly depreciation is behind, the missing months are posted first, and the loss is checked against the book value after them.
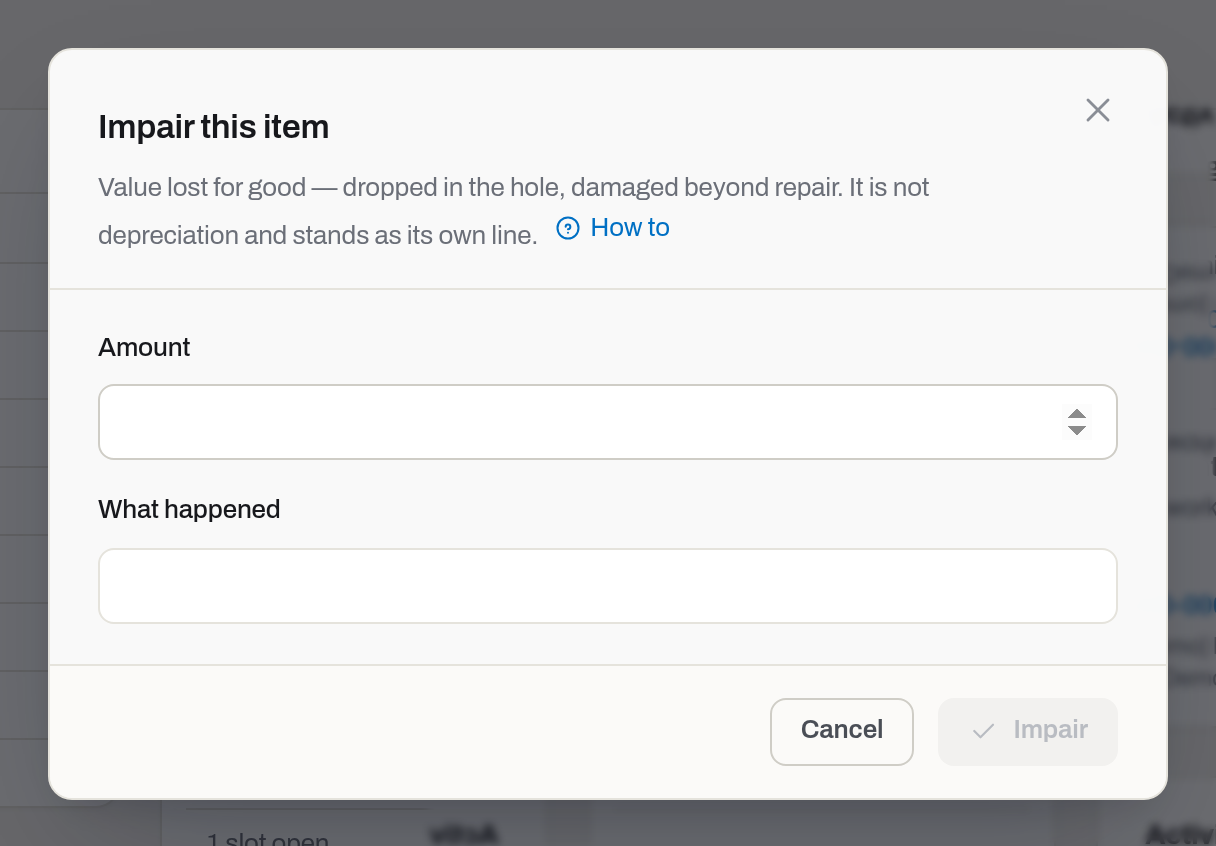
Result: net book value drops at once, an Impairment line lands in the Depreciation journal in this month's journal, and Activity gets an Impaired row on the day you picked, reading −{amount} · NBV {value} after · {reason} — the money in one place, the fact in the other.
If it fails: This item has no book value to impair — set its cost and rate first. Impairment must be positive. Impairment {amount} is more than the item is worth ({value}). This item already has an impairment entered this month. — two impairments entered in the same month are refused, whatever days they happened on. Impairment date cannot be in the future. Impairment date is before the item was put in service ({date}). The button is not there at all on a unit that has already been disposed of, or on one without a depreciation policy and a service (or acquired) date — without a schedule its book value is unknown, so set the policy first.
Warning
Impairment is value lost for good — dropped in the hole, damaged beyond repair. It is not depreciation, it stands as its own line, and it cannot be undone from the card.
Follow the unit's work and history
Who: Viewer and above.
- The Assignment card says who has it and since when, with the Job it works under and any Upcoming reservations.
- Remaining life projects how long the budget lasts, with a bar per dimension, Most spent, Remaining and Runs out. The headline always names the assumption it made — at the current pace from the unit's own use, or at the category pace when the unit has not worked enough to judge by. No pace at all is said out loud too: No usage in the last months — nothing to project from.
- Maintenance lists the work orders — number, level, status, cost and price — with a No rate badge on anything closed without one.
- Activity is the whole memory of the unit. The All · Usage · Moves · Docs filter narrows it; Docs is documents added and removed, Moves is moved, assigned and returned. Each row shows the event in full and, under it, who and when on one line — Nasser B. · 2h ago: the first name and the initial of the last one (the e-mail when there is no name), then where it came from if not typed by hand — Import, API, System, Field ticket or Aramco — and how long ago. Events older than a week show the date instead. Hover the line for the exact time and the full e-mail. A usage row adds a line of figures — hours, runs, footage, well and rig, e.g. 21.75 h · × 1 · 2027 ft · well KHRM-399818 · rig T902.
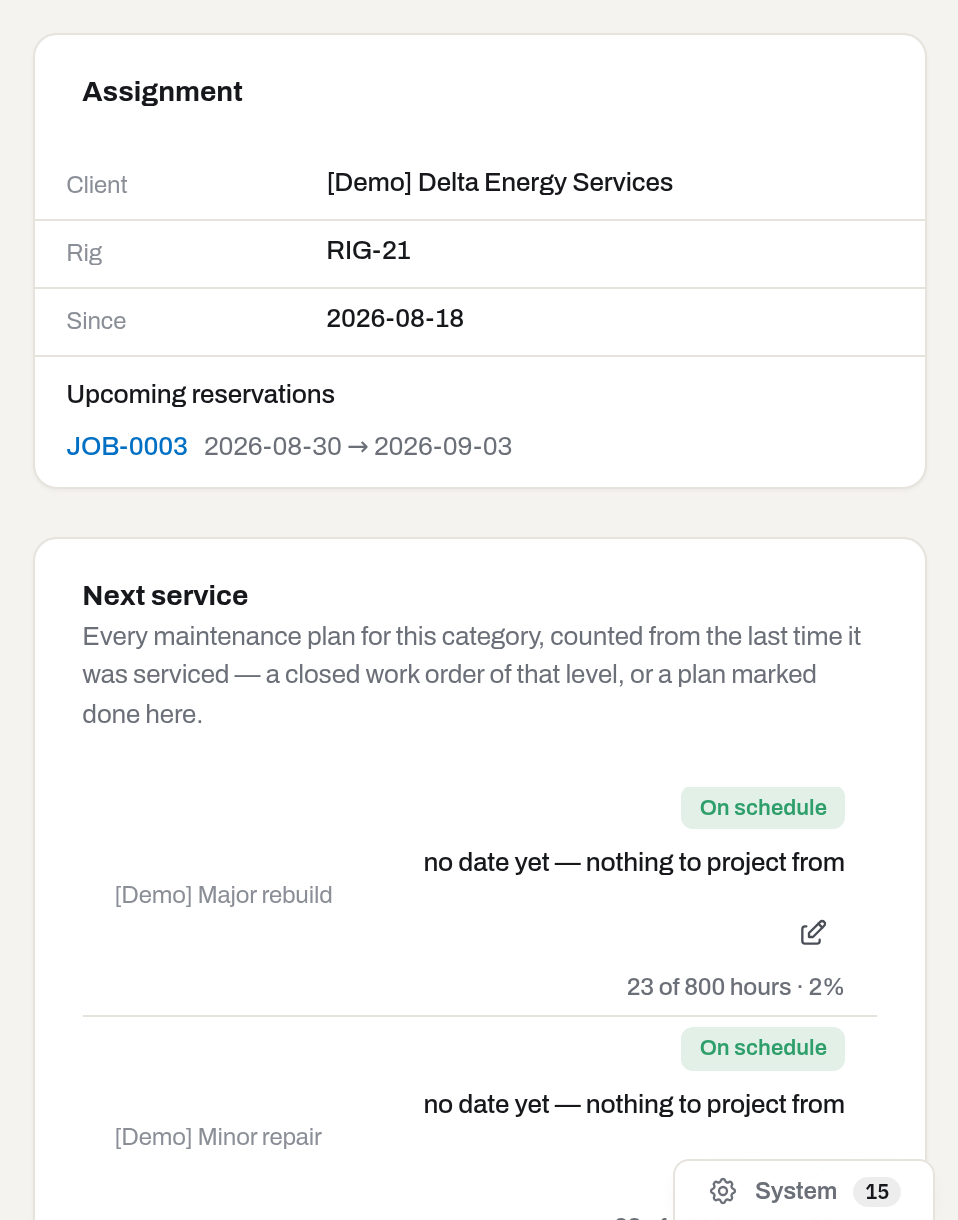
Result: nothing — this column is read-only. Opening a repair is Repair in the toolbar or Quick action, not a button on the column itself: see Open a repair.
If it fails: Bookings are limited to specific groups — reservations are not shown. means the Dispatch section is closed to your group, which is not the same as "no reservations". No life budget for this category — set one in Settings → Life budgets. means there is nothing to measure against. {count} older events not shown under the feed means the unit has more history than one page.
Read the field intel
Who: Viewer and above; each band still needs its own section — Field and Market need Connectors, Money needs Finance, Off the books needs Invoices.
- Click Intel in the action row at the top of the card — it only appears once there is something behind it.
- Field lists every run: totals, hole sizes worked, an ROP trend by hole size, the last six runs with Show more for the rest, and a Trust list naming what is measured against what is assumed — imputed RPM, snapped hole sizes, runs still queued. KREV and Trust are data-profile columns: they only appear when at least one run actually carries that value, so a tool that never gets one — a mud motor's KREV, for instance, is a reamer-only measure — simply shows the table without that column, rather than a column full of dashes. Footage is the bit run's own, not the tool's lifetime wear, and an ft / m switch converts it on the spot. Each run also carries the drilled depth interval, the IADC dull grade (inner-outer-characteristic-location, such as
1-1-WT-A), and NPT — the well's own downtime in those days, not evidence the tool caused it; the breakdown by object sits behind the NPT value, and the formation in/out with the bit's own type sit behind the depth value. - Market compares this tool's runs against a KSA-wide benchmark from beat, one row per hole size and metric (Krev, hours in hole, drilling hours, footage) — no well, rig or company names, and a cell built from too few runs simply is not shown. Ours is this tool's own median next to the market's p25/p50/p75, with a below/within/above marker against that range. Footage here is still the bit run's own footage, not tool wear.
- Money repeats the numbers from Cost of ownership for the same period, so the two screens never disagree.
- Health carries Remaining life, why an inspection is due, and the open repair count.
- Composition shows what this unit is installed in and what is installed inside it, with hours, runs and KREV counted since each install.
- Off the books mirrors this unit's own rows from the unbilled report, with a link back to the full report.
Result: one page, six bands in a fixed order — a band with nothing to show, or closed by section, is simply absent.
If it fails: Not enough data yet means none of the six bands found anything for this unit. A single missing band means either there is nothing there yet or your group lacks that section.
Read the specification
Who: Viewer and above.
- The first card in the facts column has two tabs. Details is what the unit is, whose it is and where. Attributes is the specification schema of its category — and it only appears when at least one of those fields is filled.
- The hint next to the tabs names the schema the order and the labels come from: schema: {category}.
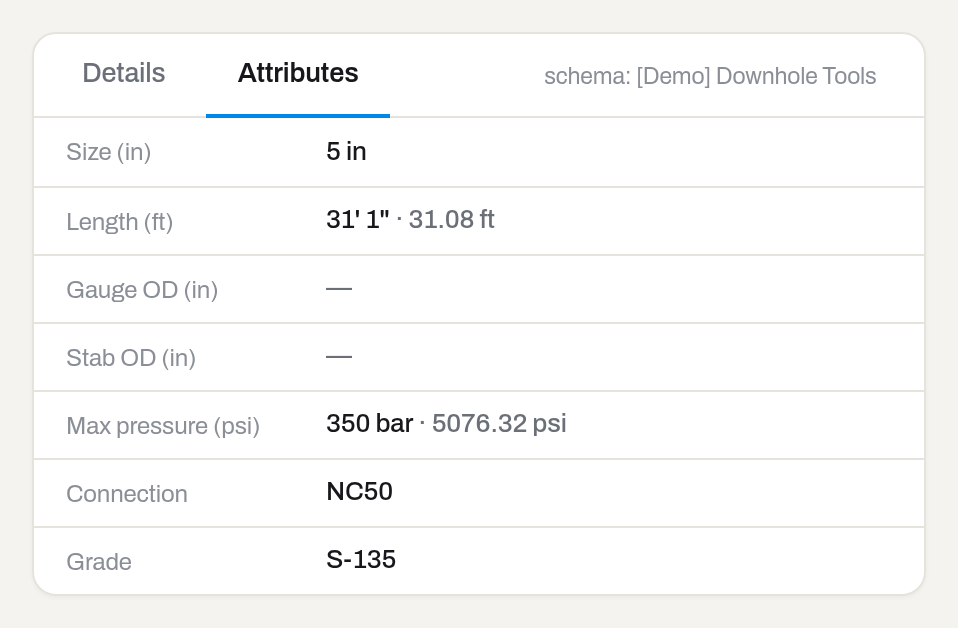
Result: lengths, diameters and pressures show as they were typed and as they convert — 31' 1" · 31.08 ft, 350 bar · 5076.32 psi — so a field note and a spreadsheet can be compared without a calculator.
If it fails: no Attributes tab means the category has no schema, or nothing has been filled in yet. Both are fixed on the edit form.
Fields
The card's own forms. Everything on the Edit form is in Items.
| Field | Where | Meaning | Required |
|---|---|---|---|
| To location / Into container | Move item | A place in the yard, or another unit that is marked a container | exactly one |
| Hours / Runs | Log usage | What the unit did this run; negatives reverse a mistake | at least one |
| Well / Rig | Log usage | Where it worked: search the Aramco mirror or type your own; one fills the other | no |
| Job (optional) | Log usage | The job the hours belong to; prefilled from the current assignment | no |
| Hours / As of | Hours before Hafrix | Hours run before tracking started, and the date they were counted as of | hours yes |
| Source / Note (optional) | Hours before Hafrix | Where the number comes from, and anything else worth keeping | source yes |
| Client / Rig (optional) | Assign, ad-hoc | Who has the unit and on which rig | client yes |
| Job | Assign, on a job | The job to reserve and mobilize against | yes |
| Assigned from (optional) | Assign | Backdate the hand-over | no |
| Description | Report damage | What happened, in words the next person can act on | yes |
| Cost (optional — feeds TCO) | Report damage | Estimate of the damage; joins Cost of ownership | no |
| New status / Reason | Change status | The new administrative state and why | status yes |
| Sale proceeds | Change status, on Sold | What it sold for; frozen into the disposal line at month close | no |
| Type | Add certificate | Which check this is; frozen after the record is created | yes |
| Done at / Expires (auto from validity) | Add certificate | When it was done, and when it runs out — prefilled from the type | done yes |
| Result | Add certificate | Pass / Fail / N/A; Fail turns the unit Need repair | no |
| Cost (feeds TCO) + currency / Inspector | Add certificate | What the check cost, in which currency (the picker beside it has no label), and who did it | no |
| Document | Add certificate | The scan: a file already on the item, or Upload a file… | no |
| Reason | Void certificate | Why this record does not belong here; stays on the row for good | yes |
| Name / File type / Description | File details | How the file is listed: Document, Photo or Certificate | no |
| Extends the life by, months | Capitalise | Optional; the longer life starts from the next month | no |
| Amount / What happened | Impair this item | Value lost for good, and why | both |
| Every, hours / Every, runs / Every, months | Service interval for this unit | This unit's intervals instead of the plan's; the form opens on the category's numbers | at least one |
| Warn at, % of the interval | Service interval for this unit | When the row turns Due soon for this unit | no |
| Why this unit differs | Service interval for this unit | The reason, shown on the Own interval badge and in the alert | no |
| In service since, Rate at purchase, Method, Useful life, months, Residual value, List rate, Rate unit, Opening balance, Opening as of, Cost center | Money card | Overrides for this unit only; the category policy is untouched | no |
What the system tells you
| When | Feed row | Who gets it | |
|---|---|---|---|
| Damage is reported from the card | Damage reported: {item} | Damage reported on {item} | managers and admins who can see Items; the e-mail goes to the fleet recipients |
| A current certificate is voided | Certificate voided in the item's own timeline | A certificate was voided on {item} | fleet recipients (Settings → Alerts) |
| A repair is closed on this unit | Repair closed — ready to bill | Repair {number} closed on {item} | managers and admins who can see Maintenance |
| The month closes on a unit that was sold, written off or fully depreciated | Sold / Written off / Fully depreciated | — | managers and admins who can see Finance |
| A certificate expires, a life budget runs out, a returned unit owes an inspection | Certificate expiring / Certificate expired / Life budget exceeded / Inspection due | in the nightly fleet digest | everyone who can see Alerts |
Every write on the card also raises a toast, and every write lands in Activity. The feed is append-only: nothing on this page is ever edited away, only added to.
Related
- Items — the list this card opens from, the create form, and everything you can do to many units at once.
- Stock — the quantities behind a consumable's Stock card.
- Compliance — the fleet-wide view of the certificates this card holds one unit's worth of.
- Maintenance — the work orders behind the Maintenance card, and the plans behind Next service.
- Jobs — the jobs behind Assignment and Upcoming reservations.
- Locations — the places Move offers.
- Procurement — where the line goes after Request, who decides on it and how it is ordered.
- Roles & access — why a card, a button or a whole column may be missing.
FAQ
There is no toolbar, and the facts strip reads as plain text. — Actions are for operators and above. A viewer reads the card and prints nothing from it; ask an admin for the role. On a consumable both are short by design: Status and Class are the only facts strip cells that open a menu, and the toolbar carries only Note (plus Request with the Procurement section), because a stock card has nowhere to be moved to, nobody to be assigned to and no hours to log.
The card has two columns, not three. — The middle column is money, and it needs the Finance section. Without that grant it still appears when there is something else to say about money — the unit is Rented in, or it carries a PO no., or it is a consumable with stock. Otherwise the card closes up: two equal columns beat a hole in the middle.
Certifications says there are none, but I know there are. — Certificates answer to the Compliance section, not to Items. If your group has not been granted Compliance, the card is empty for you even though the papers exist.
Why can I not delete a certificate, a file or the item itself? — Because the card is the yard's memory and the register's evidence. A wrong certificate is voided with a reason, a wrong file is removed and the removal is recorded, a unit that has left the fleet gets a status. Nothing disappears without a trace.
I moved the item but the job still shows it out. — Moving changes where the unit is, not who has it. Use Return to end the assignment.
The unit is Active but not Ready. — Readiness is computed. Look for a failed inspection, an expired certificate, the In inspection status, or a run logged after the last post-use inspection. The way back is always a fresh certificate of the same type: readiness reads only the current paper of each type, so a newer Pass supersedes the old verdict without anything being deleted.
A row says Expired but the unit is Ready. — That row has already been superseded by a newer certificate of its own type. Badges on rows describe rows; readiness looks only at the current paper of each type, and old lines stay on the card because the history is the point.
The unit has no readiness badge at all. — Either it is Ready, or it has no readiness to show: consumables never have one, and neither do assets that have left the fleet — Disassembled, Obsolete, Scrap, Lost, Sold. The clock chip disappears with it, so a sold unit shows nothing even with an overdue certificate.
Someone else logged the hours before me. — Hours arrive from field tickets and from the Aramco connector as well as by hand. Check the source at the right of the Usage row before entering them again; a duplicate is undone by logging the same number as a negative, not by deleting.
Updated 2026-09-24
New to Hafrix?
See this workflow in your operation
Explore how Hafrix connects equipment records, locations and readiness across your fleet. Bring your inventory workflow to a demo.