Locations
The places your equipment lives — yards, rigs, workshops, vehicles, client sites — kept as one tree, with a straight answer for any of them: what is standing there right now.
Where: capsule → Fleet → Locations (/locations). If the entry is missing, your group has not been granted this section — see Roles & access.
Who can do what
| Role | In Locations |
|---|---|
| Viewer | Open the tree, filter and search it, read what sits in a node, Print labels |
| Operator | + nothing extra here — equipment is moved from Items and Stock, not from this screen |
| Manager | + New location, Edit storage and Delete on the selected location |
| Admin | + nothing extra on this screen |
At a glance
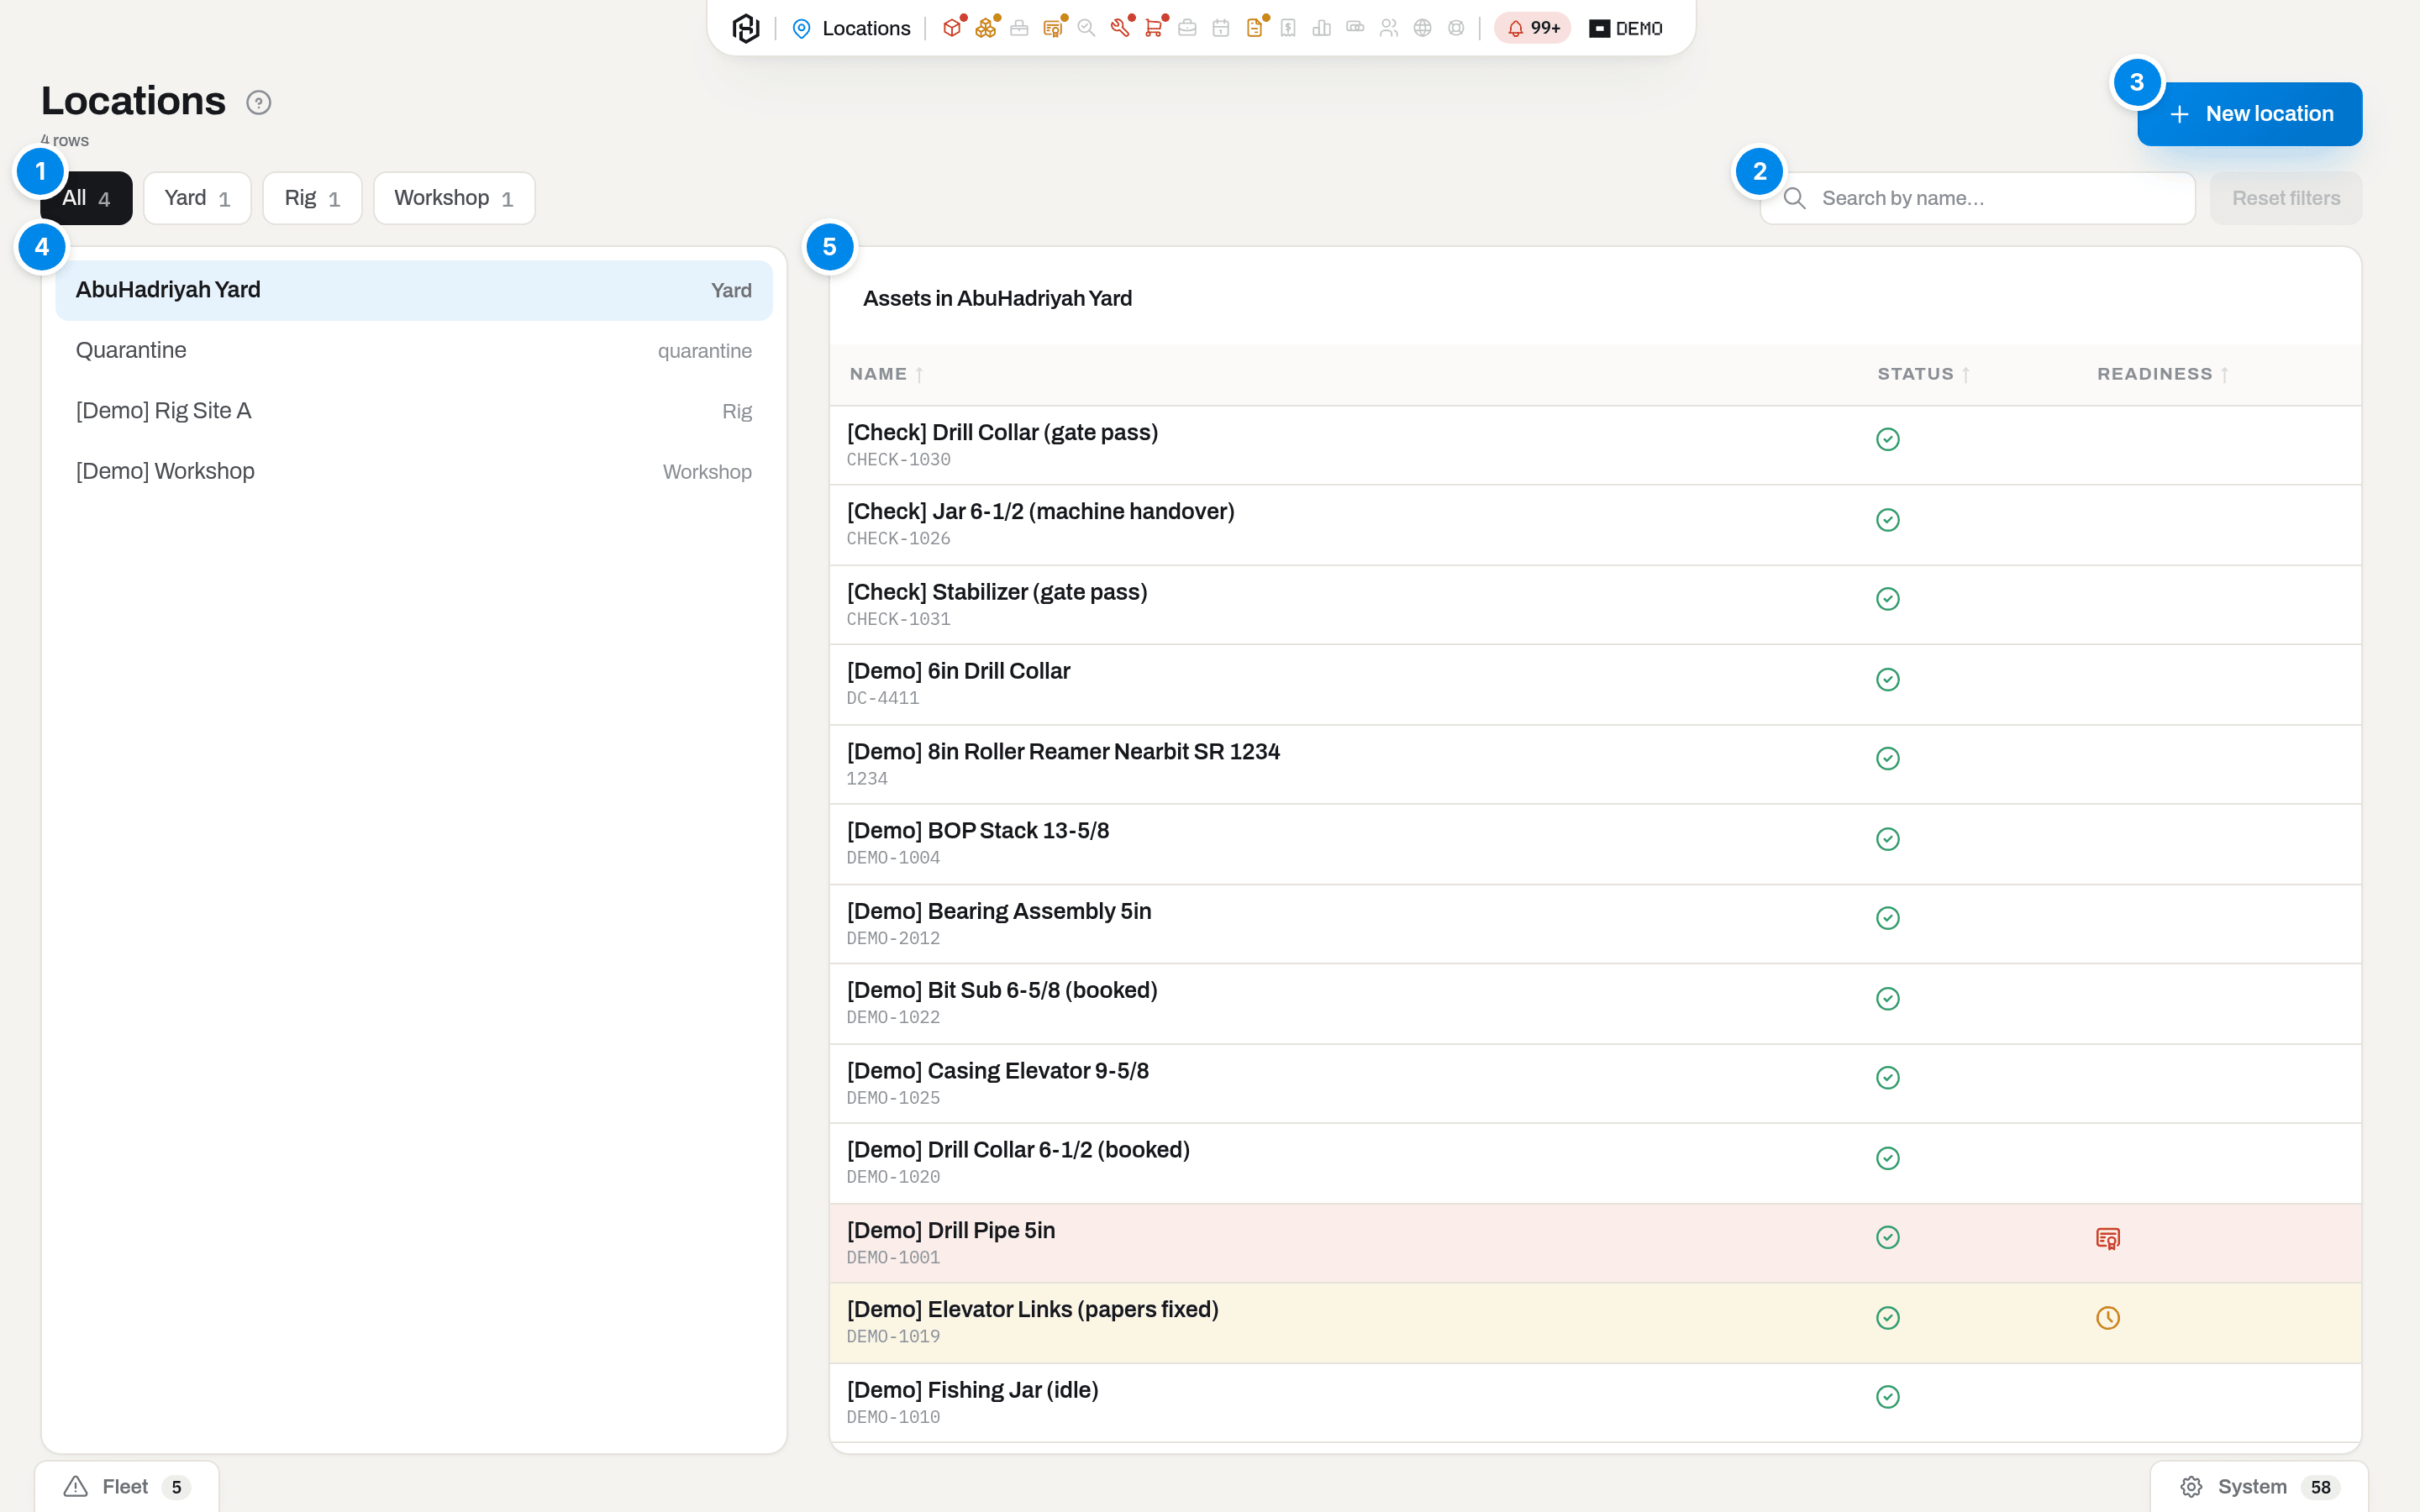
The tree with a yard selected.
- Type chips — All, then one chip per type actually in use — Yard, Rig, Workshop — each with a count. A chip filters the tree; the counts are of the whole tree, not of what the filter left standing.
- Search by name… — matches the location name only. Reset clears the chip and the search together.
- New location — opens the create dialog (Manager and above). Viewers and operators do not get the button.
- The tree — the locations of the workspace, children under their parent, each row with its type on the right. Click a row to select it. It is one load of up to 500 rows: a workspace past that number will not see the rest here.
- The contents — two tables for the selected location: Assets in … and Consumable stock in …. Until you pick a row the card says Select a location to see its contents.
The line under the title, N rows, counts every location in the workspace — it does not follow the filter.
Key concepts
A location is a place, not a status
Every asset is somewhere: either in a location, or inside a container (a basket, a kit) that is itself in a location. Consumables work the same way, one level down: a quantity is addressed either to a location or to a container, and that is a stock balance rather than a card — which is why a node has two tables and not one.
A location says nothing about who is using the thing. An asset rented out to a client, or booked on a job, keeps standing in the yard on this screen until somebody actually moves it — see Items.
The tree: parent and children
A location may have a parent, and that is the whole hierarchy: yard → zone → rack, or rig → cabin. Nothing else about a location changes with depth — a child is not "inside" its parent for stock purposes, it is simply filed under it.
Depth matters, and the two tables treat it differently — this is the one thing worth learning about this screen:
- Assets in … rolls the subtree up. Pick a yard and you get the equipment filed on the yard itself, everything in its zones and racks, and everything inside containers standing there. It is the same answer Items gives when you filter by Location.
- Consumable stock in … rolls it up the same way, and by the same rule: a balance counts here if it is physically here. That is the balances addressed to the node itself, the balances on the racks under it, and the balances inside kits and boxes standing there. The Where column says which of the three each line is.
Location types
The type is a label and a filter chip. It does not change any rule — nothing behaves differently because a node is a Rig rather than a Yard.
| Type | What people use it for |
|---|---|
| Yard | Your own base: the main store and its zones and racks |
| Rig | A rig or well site where equipment stands |
| Lab | Inspection and calibration bench |
| Workshop | Repair shop, where things go and come back |
| Vehicle | Truck or trailer — kit that travels with the crew |
| Client site | A client's premises that is not a rig. Carries a Client — see below |
| Vendor | A third party holding your kit — repair contractor, testing house. Carries the vendor Company — see below |
| Other | Anything the seven above do not describe |
A client site has an owner
Pick Client site as the type and one more field appears: Client. It says whose premises this is. Vendor asks the same question with vendor companies instead of clients. No other type has it — a yard, a workshop or a truck has no owner to name.
It is not decoration. Hafrix works out who is holding each unit from where the unit stands, and without the company on the location a customer's warehouse and your own yard look exactly alike. Fill it in and two arrangements become readable at a glance: your tool parked at a customer's base, and a customer's tool standing on your shelf. See Whose it is, and who is holding it.
What a node holds
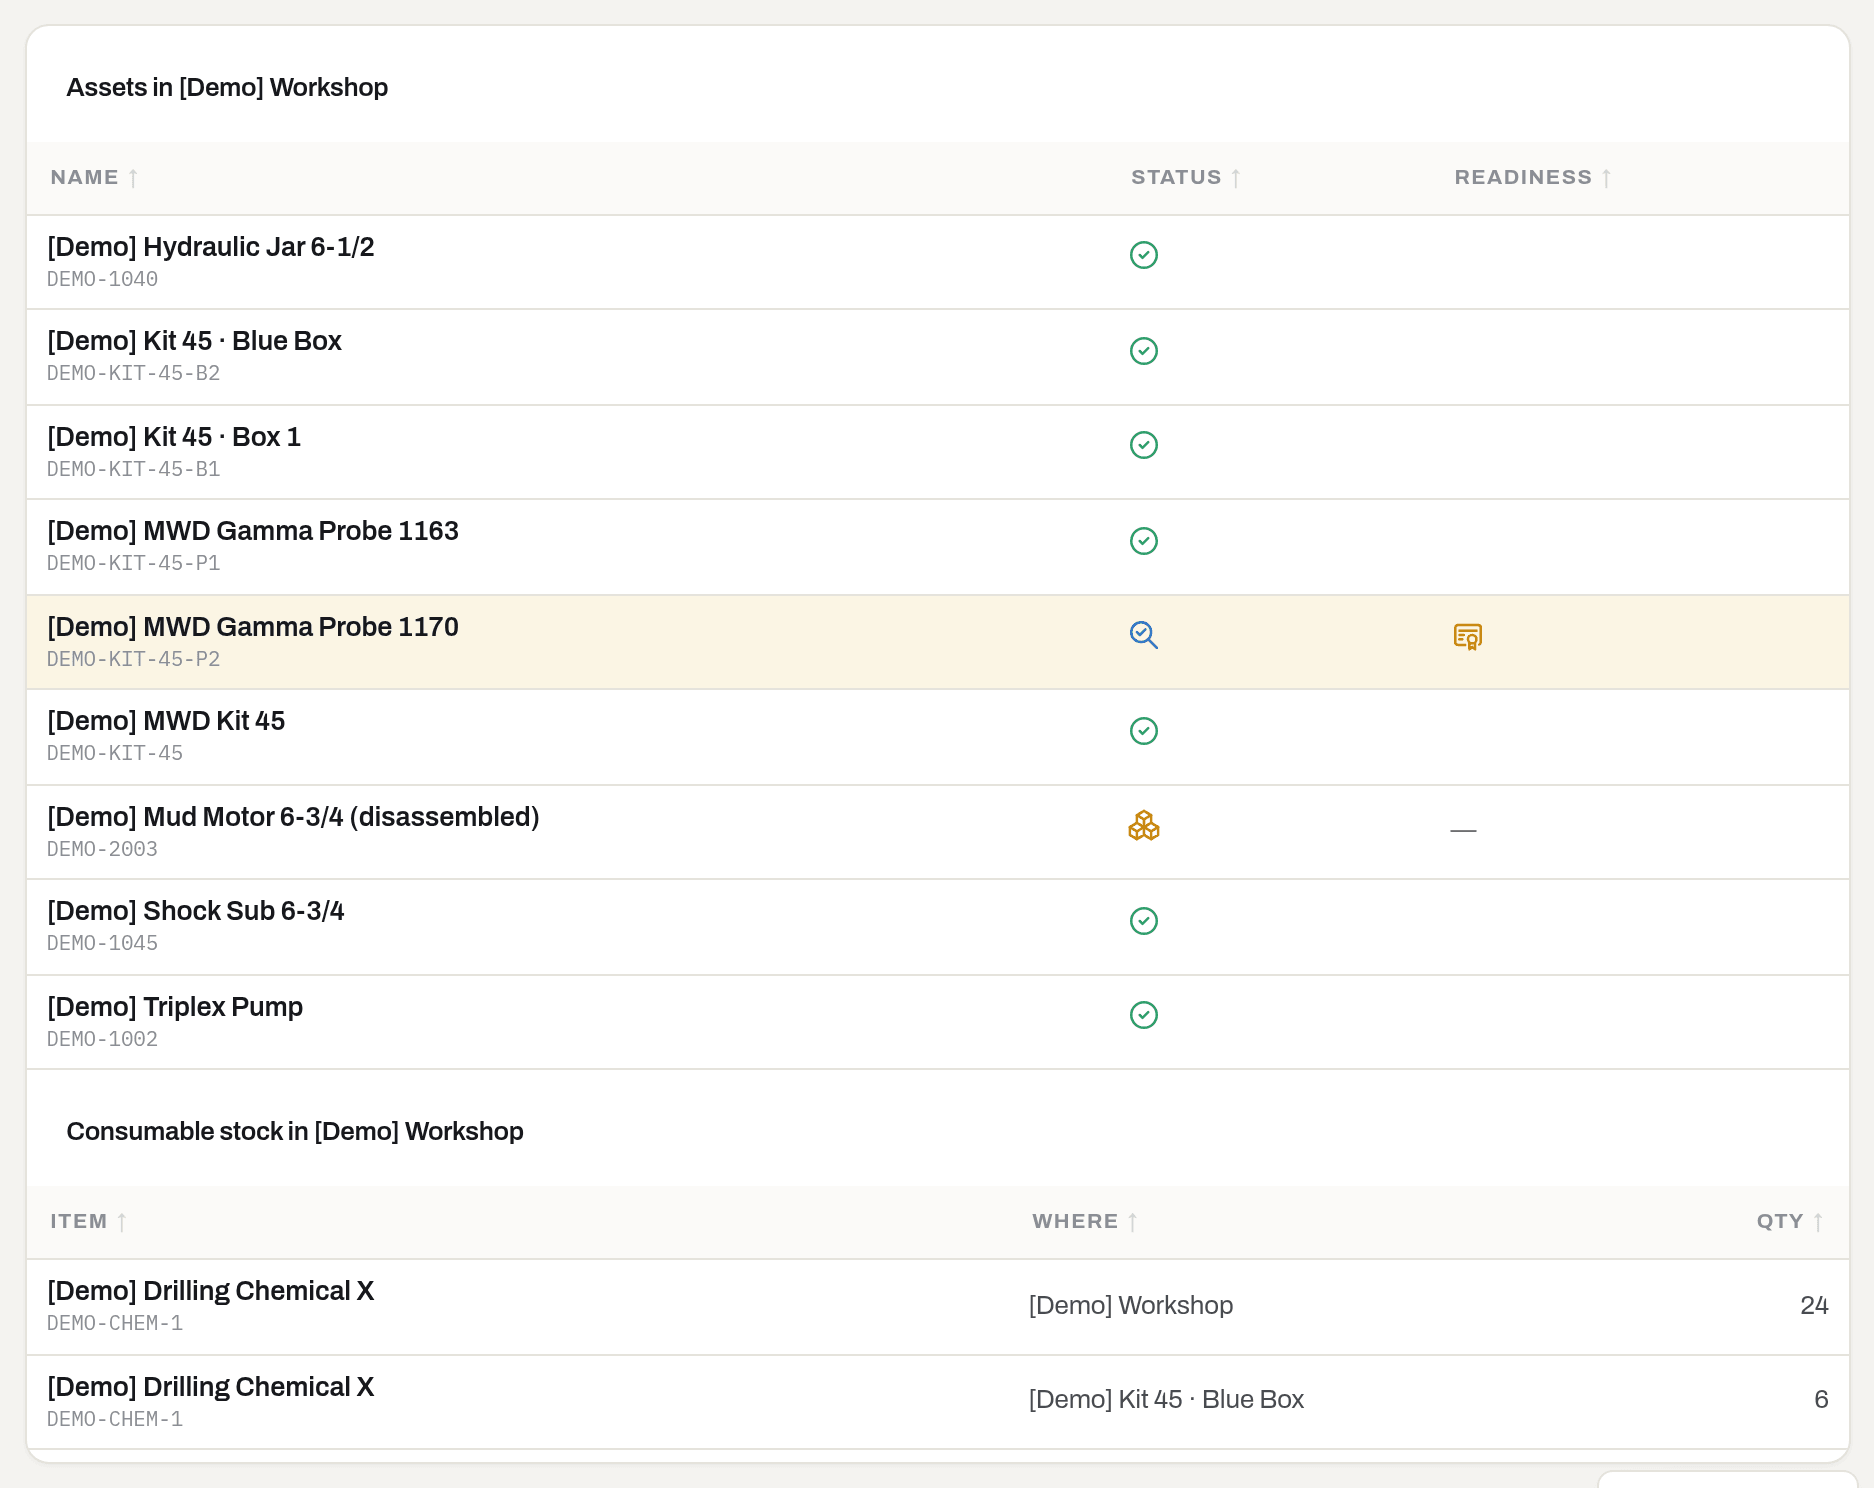
The contents of a workshop: two assets, then the balances held there.
Assets in … lists serialised equipment for this node and everything under it: Name with the serial underneath, Status, Readiness. Rows are tinted when readiness needs attention, and the icons read the same as everywhere else — an empty Readiness cell simply means the item raises nothing. A click opens the item card.
Consumable stock in … lists the balances standing here: Item with the part number underneath, Where, Qty. Where is the address the quantity actually carries — the location it was received into, or the kit box it sits in — so twelve O-rings in Box 1 and twenty-four on the shelf read as two lines, not one. A click opens the consumable's card. There is no money on this screen — value and average cost live in Stock.
Both tables sort by clicking a column header. Neither offers Columns: what you see is the whole choice. Neither has pages either — the screen loads up to 200 assets and 200 stock lines for a node, with no "show more". A yard with more equipment than that is better read from Items filtered by Location, which pages properly.
Storage conditions travel down the tree
A place is not only a name. Sun, sand and 50 °C ruin rubber, seals, batteries and MWD electronics faster than running hours do, so a location can also say what it is like to be stored there. Two separate things, both optional, both inherited by everything filed under them.
Shelter is a ladder with a single rung on it, from least to most protected: Open yard → Covered → Indoor → Climate controlled. A node with no shelter of its own is not "outdoors" — it simply has not been told, and it takes the answer from the nearest parent that has one. Setting a shelter on a node overrides the parent in both directions: a climate cabinet inside a workshop is Climate controlled, and a fenced-off open bay inside a hangar is Open yard.
Conditions is a set of flags, and it works the other way round — it adds up along the branch: Dry, Secure, Hazmat allowed, Power available, Clean area. If the yard perimeter is Secure, everything inside it is secure too, and a shelf that adds Dry ends up Secure + Dry. A flag that arrives from a parent cannot be switched off further down, on purpose: a spot inside a guarded perimeter does not stop being guarded because somebody forgot a tick box.
Both apply to any location, including a Client site or a Vendor — knowing your tool is lying in the open on someone else's yard is worth knowing. An item inside a box takes the conditions of the place the box is standing in: a box is a thing, not a place.
Note
These are labels, not measurements. Nothing here records a temperature or a humidity reading, and nothing takes them from a sensor — if it did, the number would be invented. What a location claims is what somebody typed.
How to
Add a location
Who: Manager and above.
- Click New location (top right).
- Fill in Name — the only required field. Create stays disabled until it has something in it.
- Pick a Type. It opens on Yard; the eight choices are the ones in the table above.
- If the type is Client site or Vendor, pick the company whose premises it is.
- Optionally pick a Parent (optional). The select offers what the tree is showing right now — if a type chip or a search is on, the parent you want may not be in the list. Clear the filter first. Leave the select on — for a top-level location.
- Click Create.
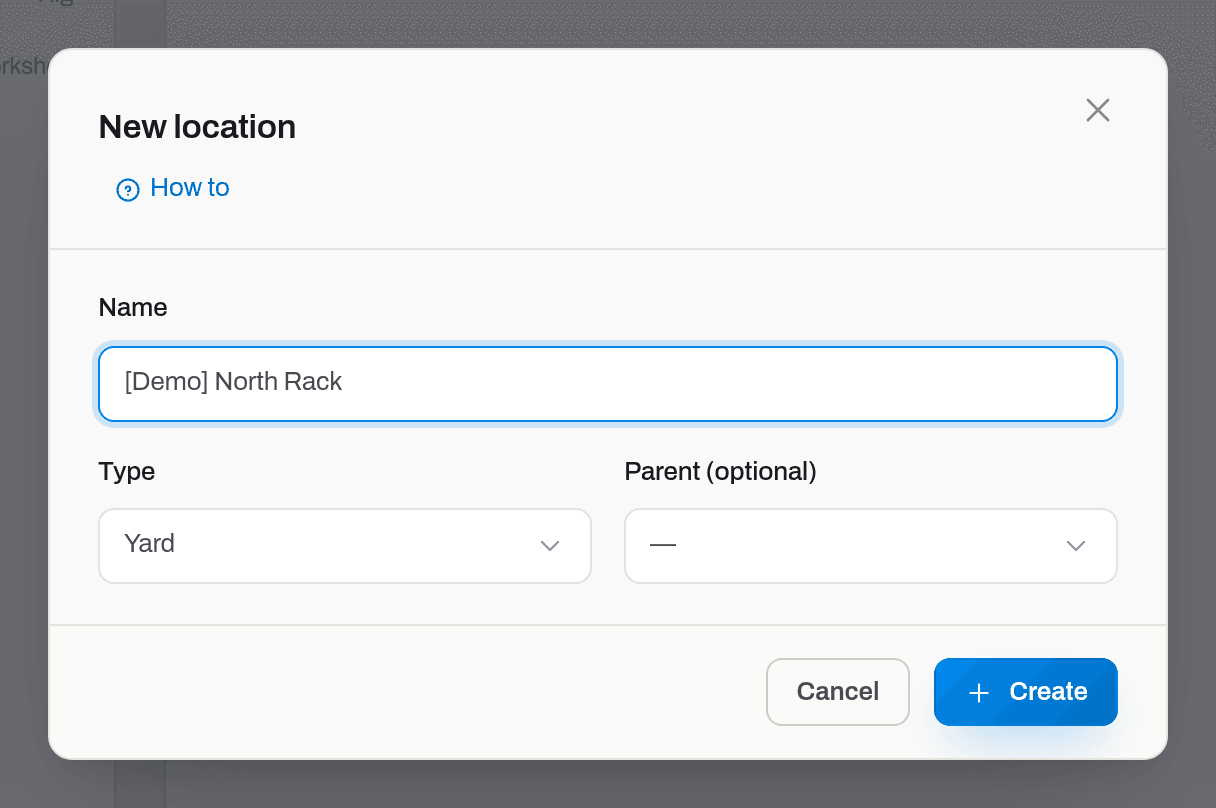
Result: a toast says Saved, the type chips pick up the new count, and the location appears in the tree — unless a filter is on that it does not match. It is available in every Location select in the app: the item form, Move, the stock dialogs, CSV import.
If it fails: the dialog does not close, and a red bar at the bottom of it carries the server's words with the field in front — Name: This field is required. A name already in use under the same parent will not be created either.
Warning
That last guard only holds inside a branch. Nothing stops two top-level locations from carrying the same name, and the tree will show both rows with no way to tell them apart. "Rack 3" repeated under two different yards is fine; "Yard" twice at the top is a trap you set for yourself.
Note
Apart from storage conditions, this screen does not rename a location. A location added by mistake can be deleted while nothing points at it — see Delete a location.
Add many locations at once
Who: Manager and above.
Numbered slots under one node — "Shelf 1" through "Shelf 8" on a rack, "Bay 1" through "Bay 20" in a yard — used to mean one New location per slot. This dialog fills the whole range in one request.
- Click New locations (bulk) (top right, next to New location).
- Parent opens to a search box, e.g.
Sawafi Yard / Rack 3— the same field as everywhere else in the app (see Find a location). Type any word of the path to narrow the list and pick the row: only an existing location can be chosen, so there is nothing left to resolve. - Pick a Type, and, for Client site, a company — same rules as the single-location dialog above.
- Pick Leading zeros if the numbers should all be the same width — 01, 02… or 001, 002… — otherwise leave it on None.
- Type a Prefix. It is used exactly as typed, including spaces:
Shelf(with a trailing space) makesShelf 1,Shelf2makesShelf21. - Type From and To. The line under the fields updates as you type, spelling out the names it will create: Shelf 1, Shelf 2, Shelf 3 … Shelf 8 — 8 locations. This is the whole point of the dialog — check it before clicking Create, not after.
- Click Create.
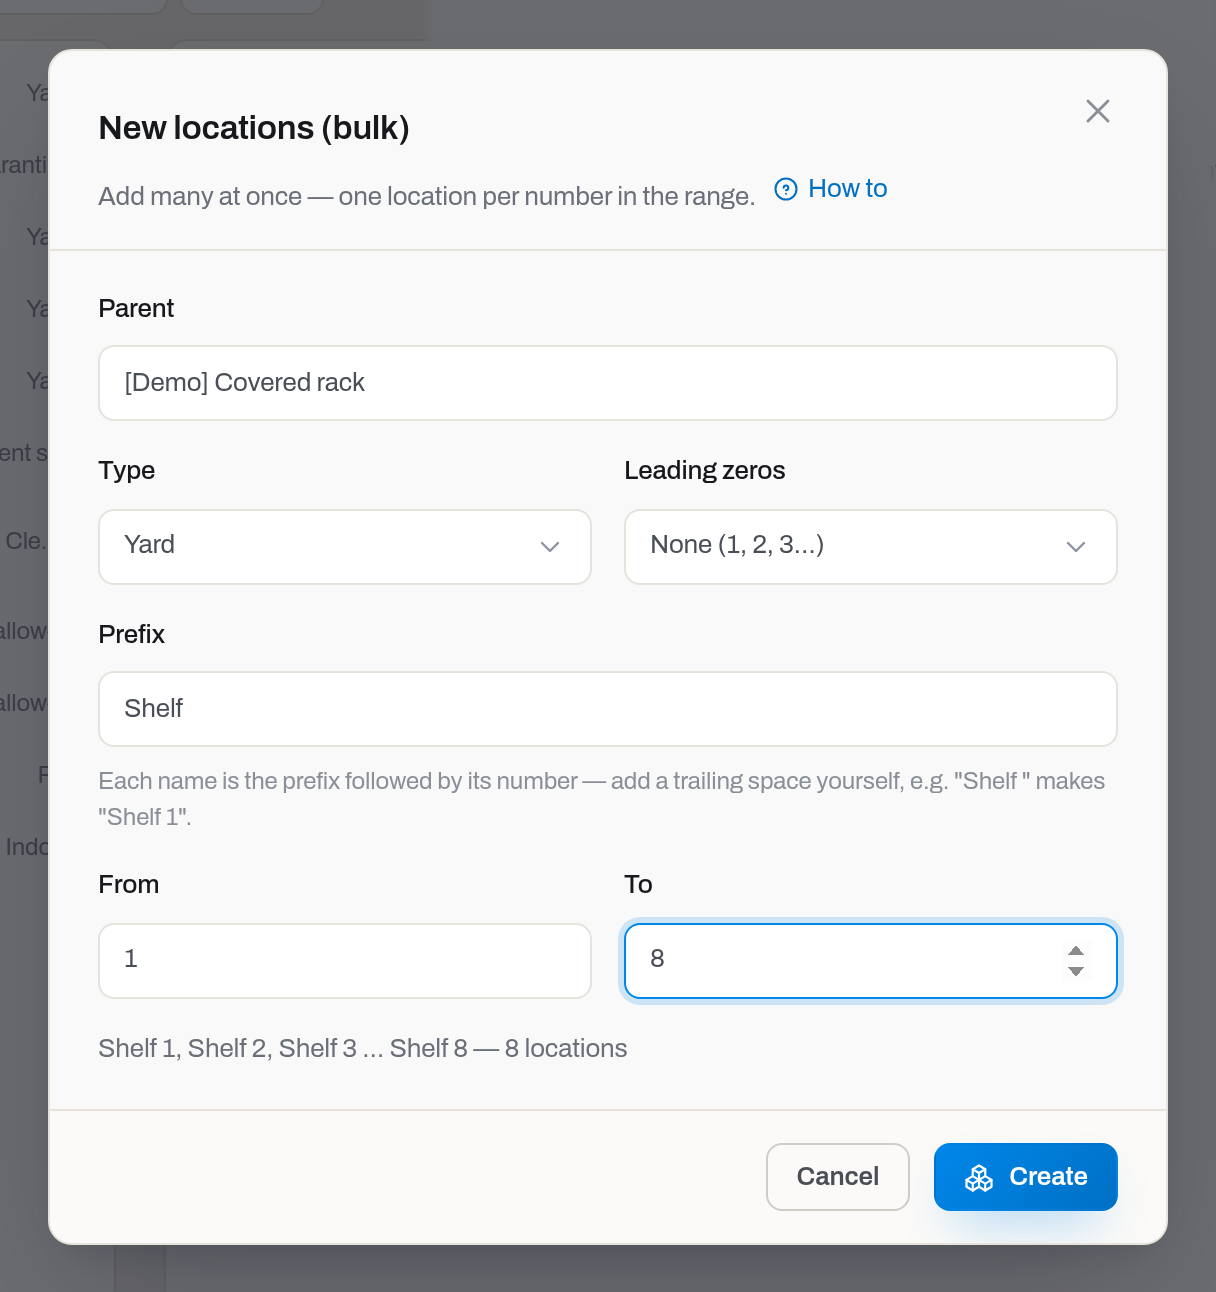
Result: a toast reports how many were created; a name that already existed under that same parent is not an error — it is silently skipped, and the toast counts it separately (8 locations created, 2 already existed). Running the same range twice in a row is safe.
If it fails: the dialog stays open with the server's words at the bottom. Nothing is created until the request as a whole succeeds.
Note
The range tops out at 200 names per request. A rack with more slots than that is split into two runs, or the range is narrowed.
Set storage conditions
Who: Manager and above.
- Select the location in the tree. Its current storage reads under the name on the right — Storage: Indoor · Secure, Dry, or Storage: None if nothing applies.
- Click Edit storage.
- Pick a Shelter. The first choice is Not set — same as parent: …, which names what the location would inherit if you leave it alone; it reads plain Not set when no parent says anything either. The other four run from least to most protected.
- Tick the Conditions that hold here. Flags that arrived from a parent are already ticked and greyed out — they cannot be removed at this level, and a line under the boxes lists them as Inherited: ….
- Click Save.
Result: a toast says Saved, the tree row picks up the new shelter next to its type, and every location filed under this one inherits the change immediately — including the phones, on their next sync.
If it fails: the dialog stays open with the server's words at the bottom.
This is half of the pair. What a place offers is set here; what the equipment needs is set on its category, under Storage requirement. Only when both halves are filled in does the nightly run start naming the units that are kept in the wrong place.
Tip
Set the coarse truth high in the tree and only the exceptions below it. One Open yard on the yard and one Climate controlled on the MWD cabinet describe a hundred shelves correctly; filling the same two fields on every shelf describes them no better and goes stale one shelf at a time.
Delete a location
For a node added by mistake or twice, before anything was put in it.
- Select the location in the tree.
- Press Delete in the header of its card and confirm. It is there only for a manager, and only while nothing points at the location; otherwise the header says Used by N records in its place — move those items, stock or records elsewhere first.
- The location moves to Settings → Trash and drops out of the tree and every picker. An admin can restore it from there.
Print location labels
Who: Viewer and above.
- Select the location in the tree.
- Click Print labels.
- A dialog names the count — 8 labels — before anything prints: Print labels on a rack prints the rack and everything under it, one label per node, not just the row you clicked. Check the number against what you meant to print.
- Click Print labels again to confirm. The browser's print dialog opens, sized for the same 50×25 mm stock as item labels.
What prints: one label per location in the batch, each carrying a QR code and the address rather than the bare name — the location's own name large, the chain of parents small underneath it, so Rack 3 / Shelf 2 and Rack 4 / Shelf 2 read apart even stacked side by side. Scanning the code, in the mobile app or with an ordinary camera, opens that exact location — in the yard the same as at a desk.
If it fails: nothing to fail here short of the printer itself — the dialog only closes once the count looks right.
Note
A location's address also opens on a computer, not only a phone: follow the link (or type it in) and it lands on this screen with that location already picked in the tree. If the label was printed in a different workspace, the screen says so instead of guessing — This location isn't in your workspace.
Find a location
Who: Viewer and above.
- Click a type chip to keep only locations of that type.
- Or type into Search by name… — it filters as you type.
- Reset puts the whole tree back.
Result: the tree keeps matching rows and their parents, so a match never floats without its context. That is why a search for a rack can leave a yard row on screen that does not match the words you typed: it is there to hold the branch together. The chip counts and the N rows line stay on the full tree either way.
See what is in a location
Who: Viewer and above.
- Click a row in the tree.
- Read Assets in … and Consumable stock in … on the right.
- Click a row's name, click the row again, or press Enter to open that item's card (Choose how a row click behaves).
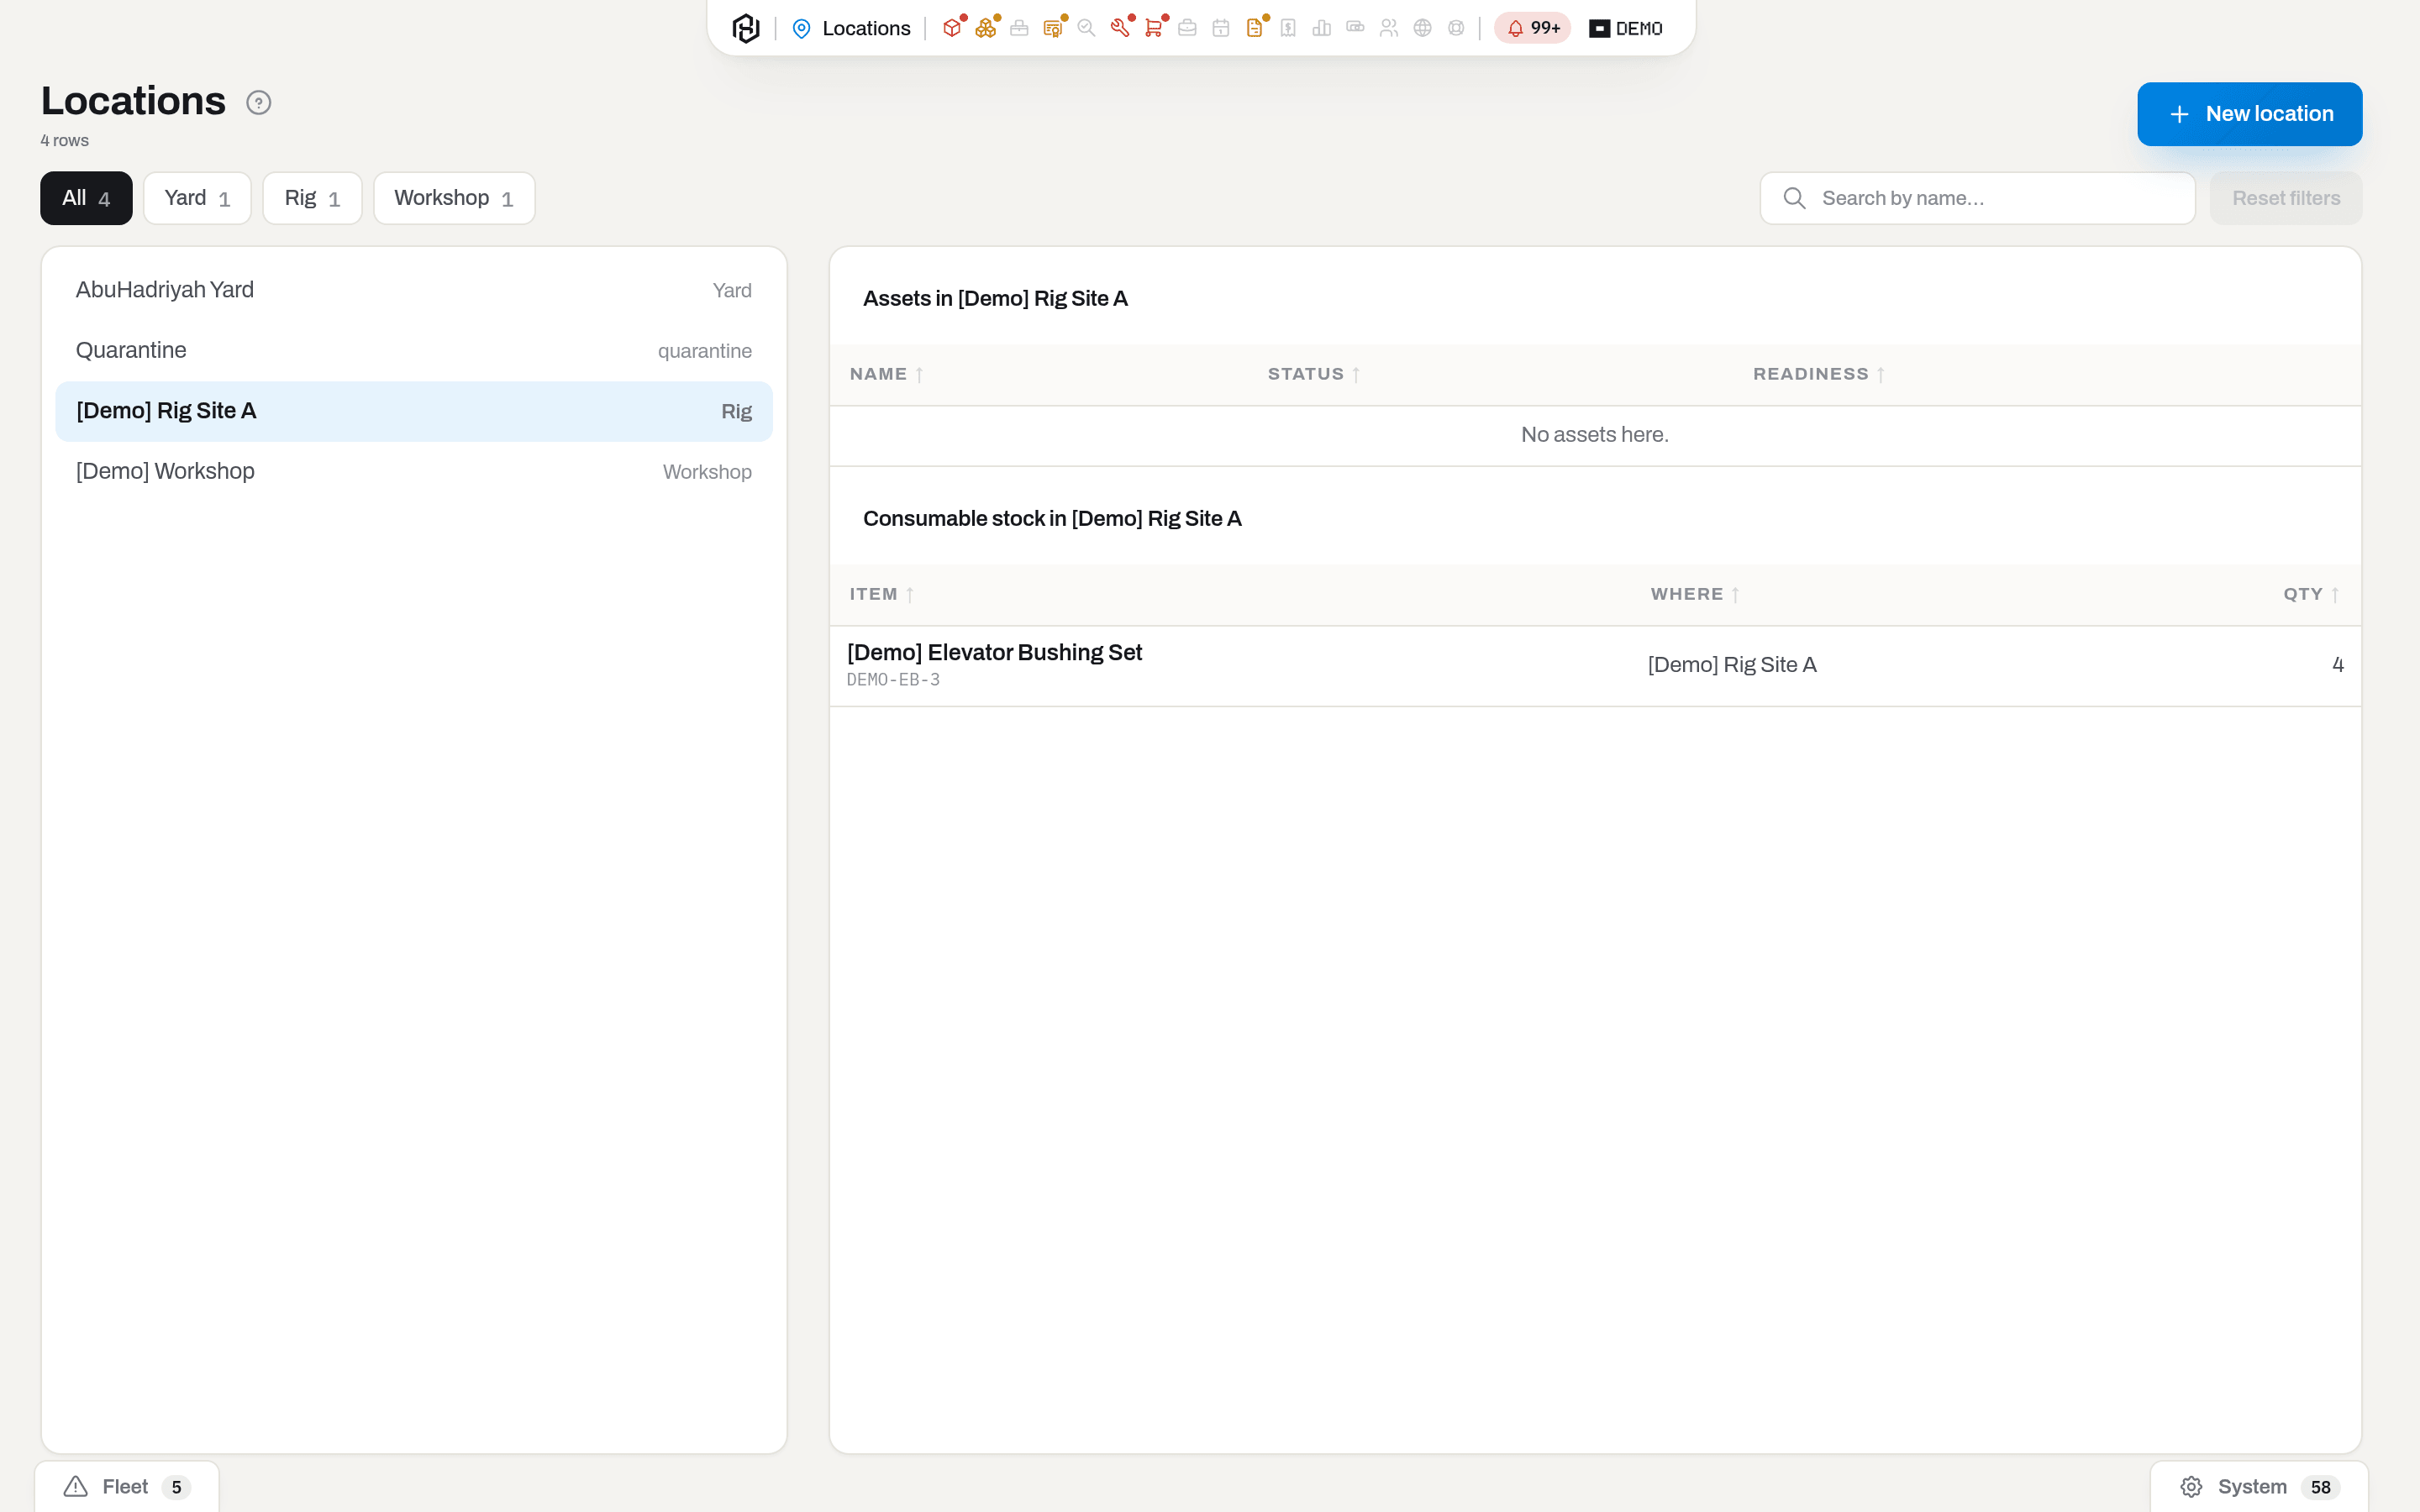
A rig site answering both questions at once: no equipment standing there, one consumable balance held on it.
Result: the two tables answer independently, and one of them being empty says nothing about the other.
If it looks empty: No assets here. means neither this location nor anything under it holds equipment. No stock here. means the same for quantities: nothing on this node, nothing on a rack under it, nothing in a kit parked here. Both tables also come back empty, without saying why, if your groups have no grant for Items or for Stock: this screen reads their data, so it inherits their access.
Put something in a location
Who: Operator and above — and never from this screen.
- One asset that already exists: open its card in Items → Move → To location → Move. To move several, select the rows in the list and use Move on the bulk bar.
- A new asset: the item form has a Location field and will not save without it.
- Consumables: go to Stock and use Receive (into Location), Transfer (From / To), Consume or Adjust. Quantities never move by editing a location.
Result: the location's contents show the change on the next visit; the item's own Location and its Activity feed record the move.
To location is a pick from a list, not free text: it opens to a search box, and the label on each row is the full path (Yard / Rack 3 / Shelf 2), matched word by word in any order — rack 3 shelf 2 finds it as well as shelf 2 rack 3 — so two shelves both named "Shelf 2" are never confused. Your own sites come first. Sites of other companies — Client site and Vendor locations — are listed after them and only once you have typed two characters, so a motor going back to the rack does not wade through client stores; a reamer heading to a client site or a tool sent to a vendor still resolves as usual. Show them now under the field lists the other companies' sites at once.
If it fails: You do not have permission to perform this action. — moving is Operator and above; ask an admin for the role. Only assets move; consumable stock moves via stock transfer. — you reached for Move on a consumable: the two halves of the yard travel by different doors.
Import a spreadsheet into locations
Who: Admin only.
Settings → Import CSV matches a location column against location names, case-insensitively, and rejects a row whose location it cannot find (unknown location …); Default location covers rows that have none, and an asset row with neither is rejected too. Import never creates a location, so build the tree here first.
Fields
| Field | Meaning | Required | Who edits |
|---|---|---|---|
| Name | What people call the place. Shown in the tree and in every Location select in the app | yes | Manager+, at creation only |
| Type | One of the eight labels; drives the filter chips and nothing else. Opens on Yard | yes | Manager+, at creation only |
| Client | Whose premises it is. Only a Client site or a Vendor has one | no | Manager+, at creation only |
| Parent (optional) | Where this node is filed in the tree. — means top level | no | Manager+, at creation only |
| Shelter | How sheltered the place is — Open yard, Covered, Indoor, Climate controlled. Empty means inherit from the parent, not outdoors | no | Manager+, any time |
| Conditions | Flags that hold here — Dry, Secure, Hazmat allowed, Power available, Clean area. Flags inherited from a parent are always on | no | Manager+, any time |
What the system tells you
Creating a location is quiet: a toast, and nothing else. No feed row, no email — a new shelf is not news.
The location shows up in messages later, as the place something is happening in:
| When | Feed row | Who gets it | |
|---|---|---|---|
| A consumable falls below its minimum in one location | Item · part no. — Stock below minimum — "5 left, minimum 20 — Main yard" | Fleet digest, subject "… fleet: N open alerts" | Feed: everyone granted Alerts. Email: managers and admins, or the explicit recipient list configured for the workspace |
| An asset stands in a location untouched too long | Item · serial — Idle asset | The same digest | The same people |
The minimum itself belongs to the pair item + location — the same part on two shelves is watched separately. Stock shows it in the Min column.
Related
- Items — the equipment itself: Move, the Location column and filter, containers.
- Stock — consumable balances, receive, transfer, consume, minimums.
- Alerts & notifications — the queue where a location below minimum turns up.
- Admin settings — the admin tabs of Settings, CSV import among them.
- Roles & access — why the section, or the New location button, may be missing.
- Glossary — yard, rig, BHA and the rest.
FAQ
Why can't I see this section? — Locations can be granted to specific groups. If your group has no grant, the entry is not in the capsule at all. An admin fixes it in Settings → Groups.
Why is there no Delete on this location? — Something still points at it: the card says Used by N records where the button would be. Move what is there elsewhere and the button comes back — see Delete a location. Renaming is not offered on this screen.
I filtered by Rig and a Yard is still on screen. — It is the parent of a match, kept so the branch still reads top to bottom. Only rows that match, and the rows above them, survive the filter.
The yard shows fewer assets than I know are there. — The pane loads at most 200 rows and has no paging. Items filtered by Location gives the same set, paged and sortable across the whole fleet.
Why does the same part appear twice in the stock table? — Because it is in two places. A balance has one address, and both tables answer what is physically here, so a part on the shelf and the same part inside a kit box parked here are two lines with two quantities. Where tells them apart; adding them up is your call, not the screen's.
An asset is out with a client. Why is it still in my yard here? — Because nobody moved it. Assignment and location are separate facts: one says who is using it, the other says where it physically is.
Can I see the value of what is in a location? — Not here. Stock shows inventory value, and Finance groups the register by Location.
Updated 2026-09-14
New to Hafrix?
See this workflow in your operation
Explore how Hafrix connects equipment records, locations and readiness across your fleet. Bring your inventory workflow to a demo.