Maintenance
Every repair as a document: what the workshop is doing now, what it cost us, what the client owes for it, and what is still waiting for a price.
Where: capsule → Fleet → Maintenance (/maintenance). If the entry is missing, your group has not been granted this section — see Roles & access.
Who can do what
| Role | In Maintenance |
|---|---|
| Viewer | Open the queue and the work orders, switch views, filter, choose columns |
| Operator | + New work order, edit an open order, consume parts, upload files, Save revision, Close, Cancel order, and the same in bulk |
| Manager | + Billing — who pays and how much, on one order or on a selection |
| Admin | + nothing extra here — a work order is never deleted, by anyone |
At a glance
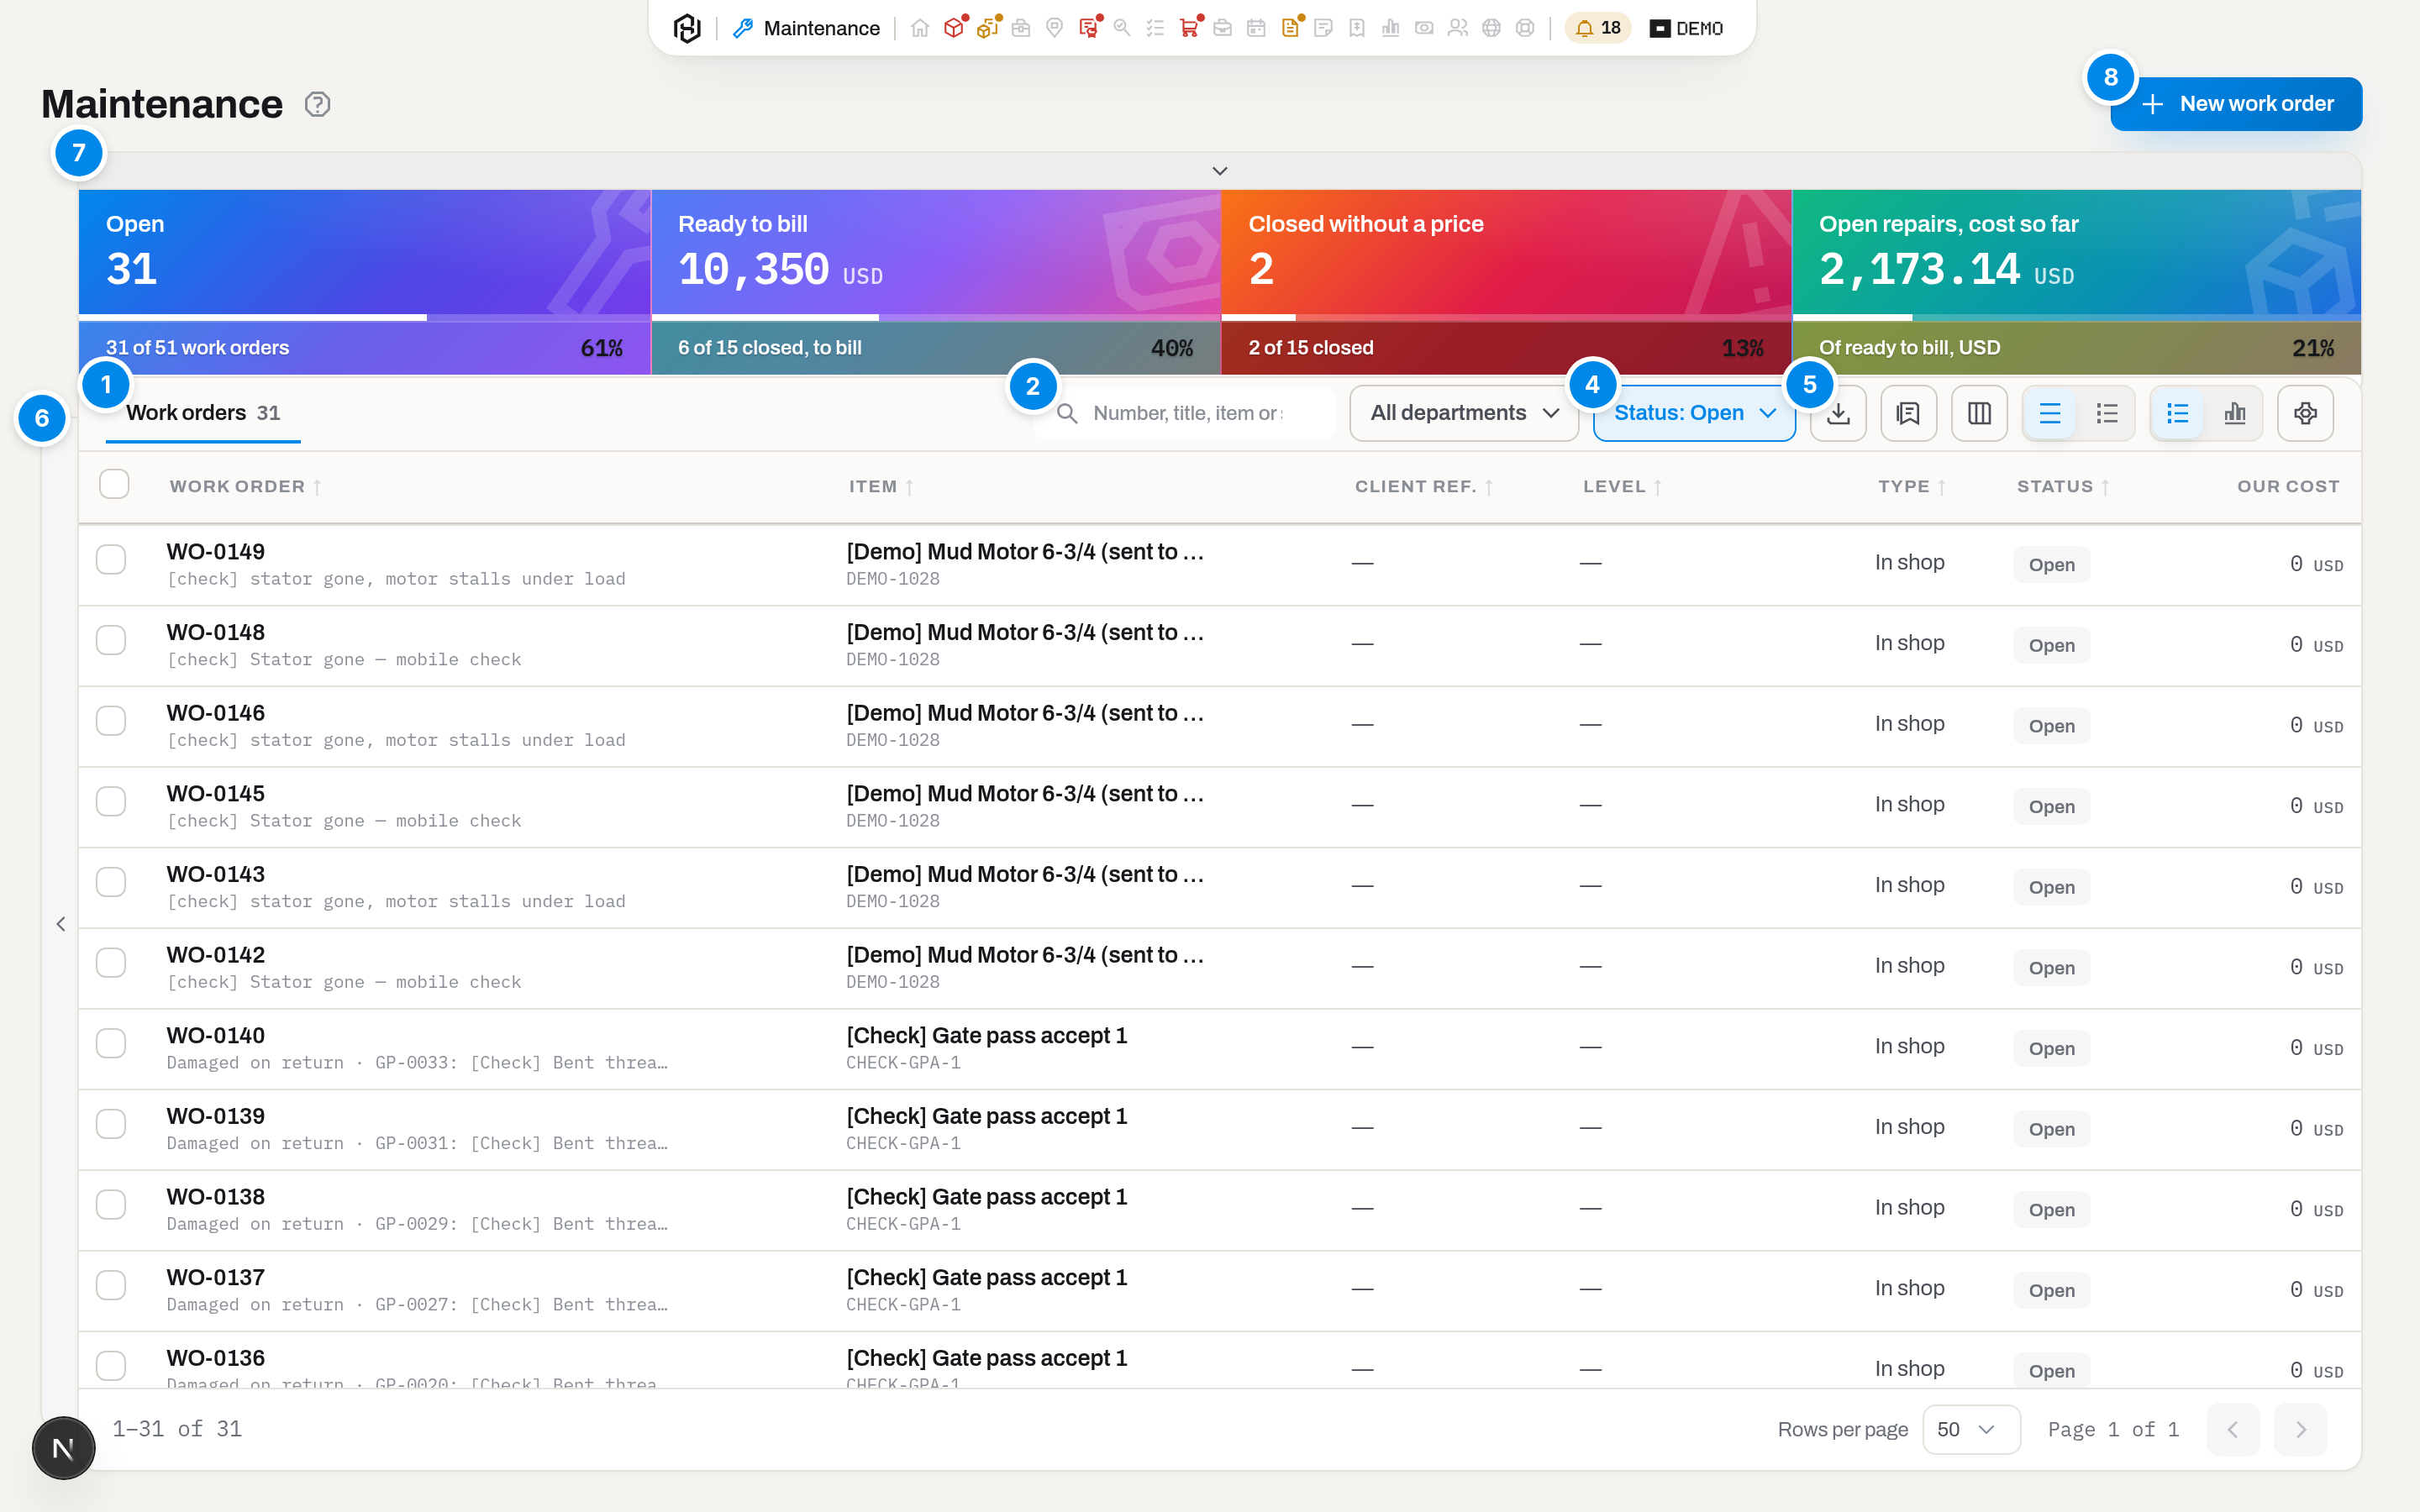
The section opens on Open — the queue is work, not history. The filter panel and the key figures start closed every time you come in; nothing is picked yet, so the table gets the whole screen.
- Work orders — the tab in the table's header, with the number of rows that match right now.
- Search — Number, title, item or serial…: matches the order number, its title, the item's name, serial and asset ID, and a quote reference.
- All departments — whose fleet you are looking at. Make this my default is in the same menu.
- Status — who is waiting: Open waits for the workshop, To bill waits for the office, then Closed and Cancelled. The button reads Status: Open once a status is picked and All statuses when none is; each option carries its own live count.
- Export · Views · Columns · density · List | Overview · department view — the square icons at the right end of the header, in this order: download what you see (Excel, CSV, PDF), save and reopen a set of filters, show or hide columns, Comfortable or Compact rows, switch to the board, and the view your department's admin set up.
- The filter handle — the thin strip with an arrow on the left edge of the table. Click it to slide the panel out: Level, Type, Result, Client, Opened, and the document dimensions. Opened is one menu — This month, Last 30 days, This quarter or Custom range… with two dates — counted by the day the order was opened, not closed. Below 1200px the panel opens from the Filters button instead.
- The key-figures handle — the thin strip with an arrow above the table. Click it to slide out four figures: Open, Ready to bill (money, per currency), Closed without a price, Open repairs, cost so far. Each shows a share with a bar and a percentage underneath — 21 of 37 work orders, 6 of 20 closed, to bill, 2 of 20 closed, and the open cost against what is ready to bill when both are in one currency. The figures only show numbers — clicking them does nothing; the status is set with Status in the header above the table. They count the whole workspace, not the rows on screen, so they do not move when you filter; picking a filter does not fold the strip either — only its handle does.
- New work order — the Repair dialog. Operator and above; a viewer does not see the button.
The table starts with Work order, Item, Client ref., Level, Type, Status and Our cost (the last one only with Finance). Department, Result, Opened, Closed, Price and Billing are there too, hidden until you tick them under Columns; the To bill view shows Price and Billing on its own. To bill has its own set of columns: your ticks are kept separately for it and for the other statuses (Open, Closed, All…), so ticking Price on Open does not change To bill, and the other way round. Each row reads in two lines — the order number over its title, the item over its serial — and a text too long for the column ends in …: point at it to read it whole.
Once anything is picked in the panel — or the status is not Open — a tray of active filters appears between the key figures and the table, with Reset all at its end. Reset all returns the section to how it opened: status Open, no filters.
A click on a row highlights it; click its name, click the row again, or press Enter to open the order (Choose how a row click behaves). The back arrow on the order brings you where you came from.
Key concepts
Our cost and the client's price are two different numbers
Our cost is what the repair took out of the yard: labour, parts consumed from stock, and the outside workshop's invoice. It feeds the item's total cost of ownership and never reaches the client.
Price is what the client is charged. It is not typed in: it comes from the repair price book on the day the order closes, or from an agreed quote. One field for both numbers would hide the margin and lie about the cost — so there are two.
Who pays
Every order carries one of three answers, and they are not interchangeable:
| Who pays | What it means | What happens on closing |
|---|---|---|
| Internal cost | Your own planned service on your own iron | Cost only. No price, no letter, nothing to invoice |
| Bill the client | The kit broke on a client's rig and the contract says they pay | Priced from the price book (or a quote) and queued for the invoice |
| Claim to vendor | Warranty — the maker or the outside workshop owes you | Priced by the claim document. It is a claim you chase yourself; no client invoice is built from it |
The client is pre-filled from wherever the item is assigned, but a person confirms it. Who pays can be corrected later — see Set who pays and how much.
The field sees its own jobs
An operator sees the work orders they opened themselves and the ones on jobs they are already on; a viewer, a manager and above see the whole workshop queue. The limit lives on the server, so the list, the counters and bulk actions all agree, and somebody else's order opened by address answers Not found. Details: Roles & access.
Statuses
| Badge | Meaning | What changes it |
|---|---|---|
| Open | With the workshop. Parts can go in, costs can be edited | Close or Cancel order |
| Closed | Done. Costs are frozen, the price is set, the item's history has a repair entry | Nothing — a closed order is never reopened |
| Cancelled | It never happened: parts went back to stock, the item returned to its previous status | Nothing — the order stays, with the reason |
In field vs in shop
Most repairs are In shop: the item comes off the rig, or was never on one, and the work happens at the yard. A repair opened In field happens where the equipment already is — usually from a service ticket written on a job, when the work on site turns up something bigger than a service line. Costs, parts, billing and closing all work the same way for both; the kind is a record of where the wrench turned, not a different workflow.
A work order opened from a service ticket carries that ticket as its Basis — a line on the order's details pointing back to the ST- number it came from, so a repair found on the rig is never separated from the paper that first described the job.
Ready by, downtime and mileage
Ready by is the date and time the repair is promised back — the ETTC on a repair card. Set it when opening the order or later with Edit; leave it empty when nobody has promised a date. The order's details then show the ETTC in hours: how long is left until Ready by, or, for a closed order, how early it was finished. A minus means late — an open order past its Ready by, or one closed after it — and an Overdue badge says so next to the date.
Downtime is counted for you: the hours from Opened to Closed, or to now while the order is still open. A cancelled order has no downtime — the repair never happened. There is no separate "back in service" date: the item is back when the order closes.
Mileage, mi is the trip to the rig and back, in miles, and belongs to In field orders only — an order in the shop does not take it. It is a record of the distance; charging for it is a service line on the invoice, not a number on the work order.
On the section's Overview, the Repair downtime by category widget averages downtime over the shop repairs closed in the last 90 days, one bar per repair category, longest first, and counts the open orders already past their Ready by.
What the Billing column is telling you
The Billing column answers a different question, and it answers it differently depending on the row:
- an internal order shows —: there is nothing to bill;
- an order that is still Open, or one that was Cancelled, shows who would pay — Client or Vendor;
- only a Closed order shows where the money actually is: To bill or Invoiced.
To bill is broader than it sounds. It means closed, someone owes for it, and no invoice has gone out yet — so it also covers a claim to a vendor, which will never appear on a client's invoice, and an order already collected into a draft invoice. The badge turns Invoiced only when the invoice is sent; voiding that invoice puts the order back to To bill.
The third value, Not billable, exists in the data but never reaches this screen: internal orders are shown as — in the queue, and the Billing row of a work order is drawn only for a closed, non-internal one.
Where the price comes from
The price book is a list of rows: this client · this service level · this category of equipment · this flat price · effective from this date. When an order closes, the closest matching row wins — a row for your client beats the general one, a row for the exact category beats a row for its parent, and among equals the latest one that is not dated after the closing day. The winning row is remembered on the order, so changing the book later does not rewrite repairs that already closed.
Two things a row can carry beyond the flat price — an hourly rate for work beyond the scope and a markup on parts beyond the scope — are contract terms, not arithmetic. They are never added automatically. If the job went past the scope, a manager types the extra amount and says what it was for, and it is added as Beyond scope.
Levels and rates are catalogues, kept by a manager under Settings → Maintenance — see Settings: catalogues.
Maintenance plans
A repair order answers what did this cost. A plan answers the other question: when do we service it before it breaks. A plan is written for a category of equipment and a service level — "Downhole tools, Major rebuild, every 800 hours" — with an interval in one unit — hours, runs, calendar months or, for equipment that counts revolutions such as roller reamers, KREV — and a warning threshold. The form offers KREV only to categories whose Maintenance counters include it — roller reamer bodies and cutter sets do; a motor plan never sees it. See Add a category.
The clock starts at the last closed order of that same level; if there never was one, at the day the unit went into service. A cancelled order does not move it — the repair did not happen. An order of a different level does not move it either: a minor repair does not cancel a rebuild.
Every night the fleet is checked against the plans and two kinds of alert appear — see What the system tells you. An open order of that level silences the alert: the question when do we fix it is already answered.
A plan is the rule for a whole category, but one unit may be an exception — this engine goes 200 hours between rebuilds since its overhaul, not 300. That is set on the unit itself, in Next service on its card, and the plan row here is marked with how many units left it. The plan, the cycle start and the alert stay the same; only that unit's interval and threshold change — see Item card.
Some plans are housekeeping rather than a verdict on whether the equipment is fit to run — turning a motor shaft on the shelf every three months, for instance. Tick Reminder, not a gate on such a plan and two things change: past due, it still leaves the unit ready for work, and its alert stays amber instead of red. Without it a three-month plan turns a whole fleet red on the first day, and people learn to stop looking at red. A maintenance plan never blocks a unit either way — readiness is decided by inspections — but the colour is what people actually read.
Plans themselves are set up under Settings → Maintenance — see Settings: catalogues.
To read a plan against one unit rather than the whole fleet, open the unit and look at Next service on its card: the same count the alert uses, with the date, the plan and what it is counted on — see Item card.
How to
Find a work order
Who: Viewer and above.
- Pick the status you need in the Status menu — Open for the workshop's queue, To bill for what the office has not invoiced yet.
- Type into the search box, or pull out the filter panel by its handle on the left edge of the table and narrow by Level, Client and Opened.
- Click a column header to sort; use Columns to hide what you do not read.
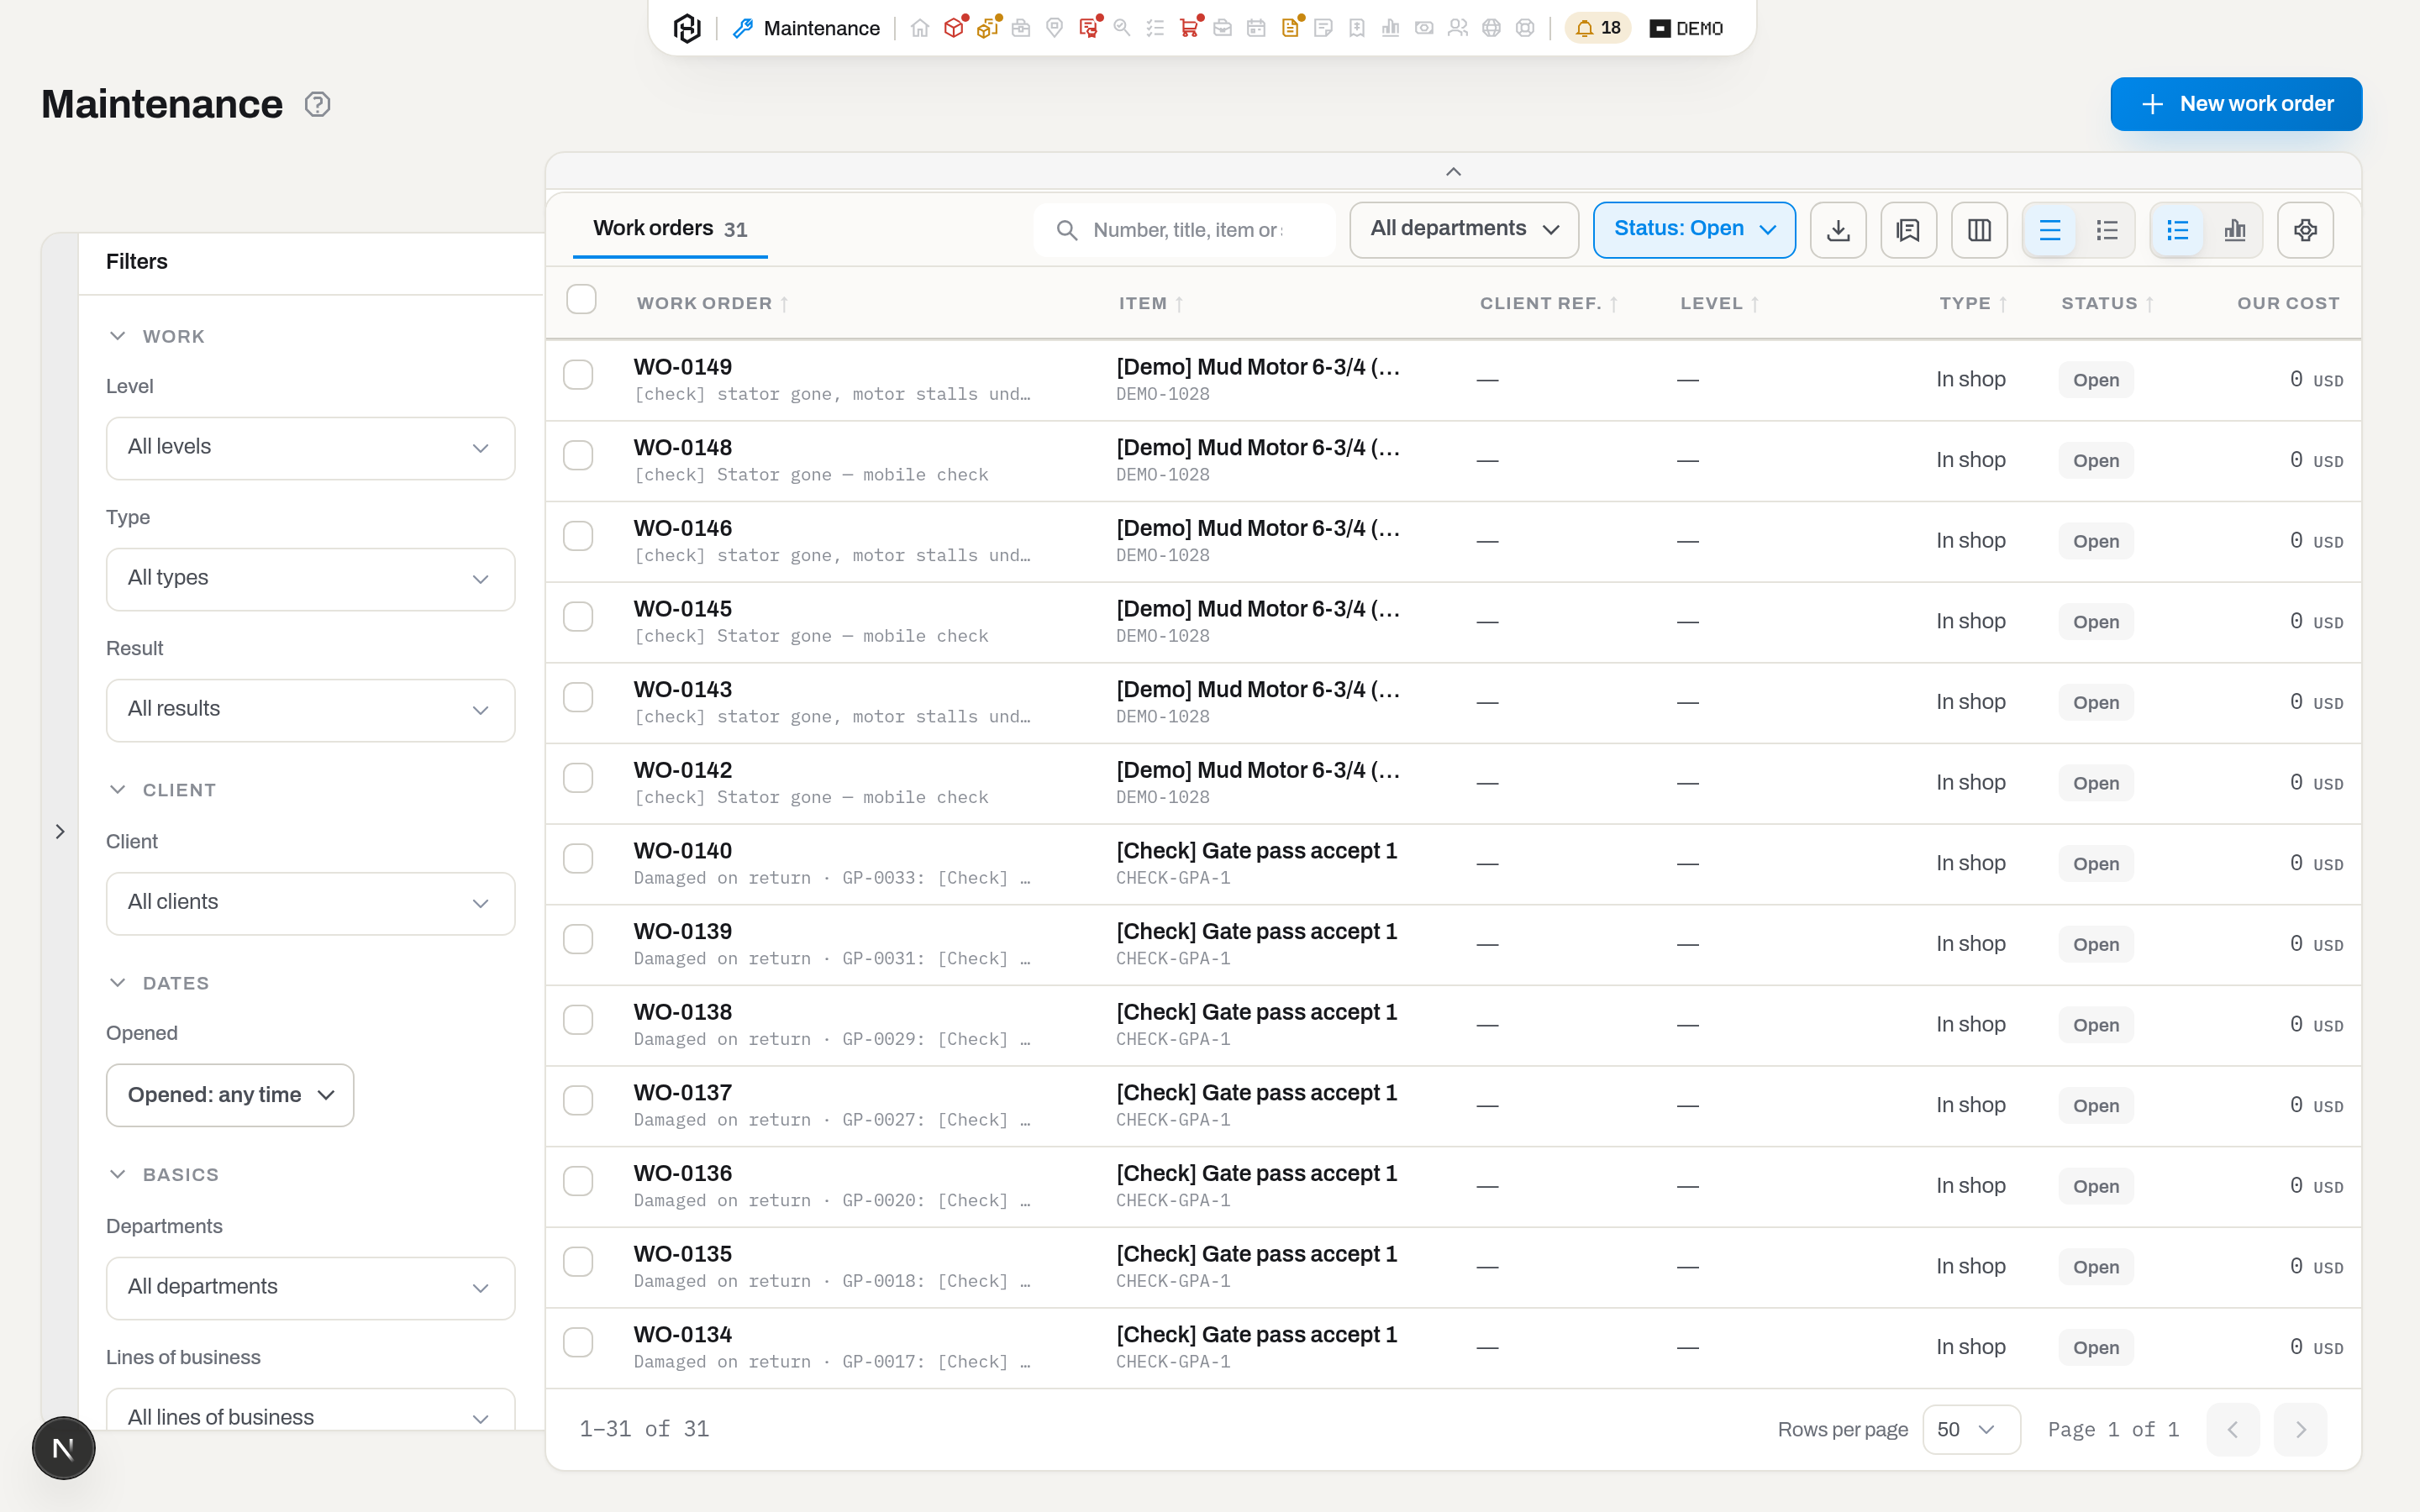
Result: the filters live in the address bar, so the list can be bookmarked and shared; the footer counts the rows.
If it fails: any empty result — including one your own filters produced — shows the same line: No work orders here. Repairs are logged from the item page — set up levels and rates first: with a link to Settings → Maintenance. Click Reset all, in the tray above the list, before believing it. The sentence is also out of date about one thing: a repair can be started right here with New work order, not only from an item. In the To bill view the empty message is Nothing waiting to be billed., which is good news, not an error. If you are an operator and the list is empty with no filters at all, you are simply not on a job yet — see The field sees its own jobs.
Open a work order
Who: Operator and above.
- Click New work order — or, from an item, use its Repair action, which opens the same dialog with the item already filled in.
- In Item, type a name, serial or asset ID and pick the unit from the list. Scrapped, lost and sold units are not offered, and neither are consumables — only serialized assets are repaired.
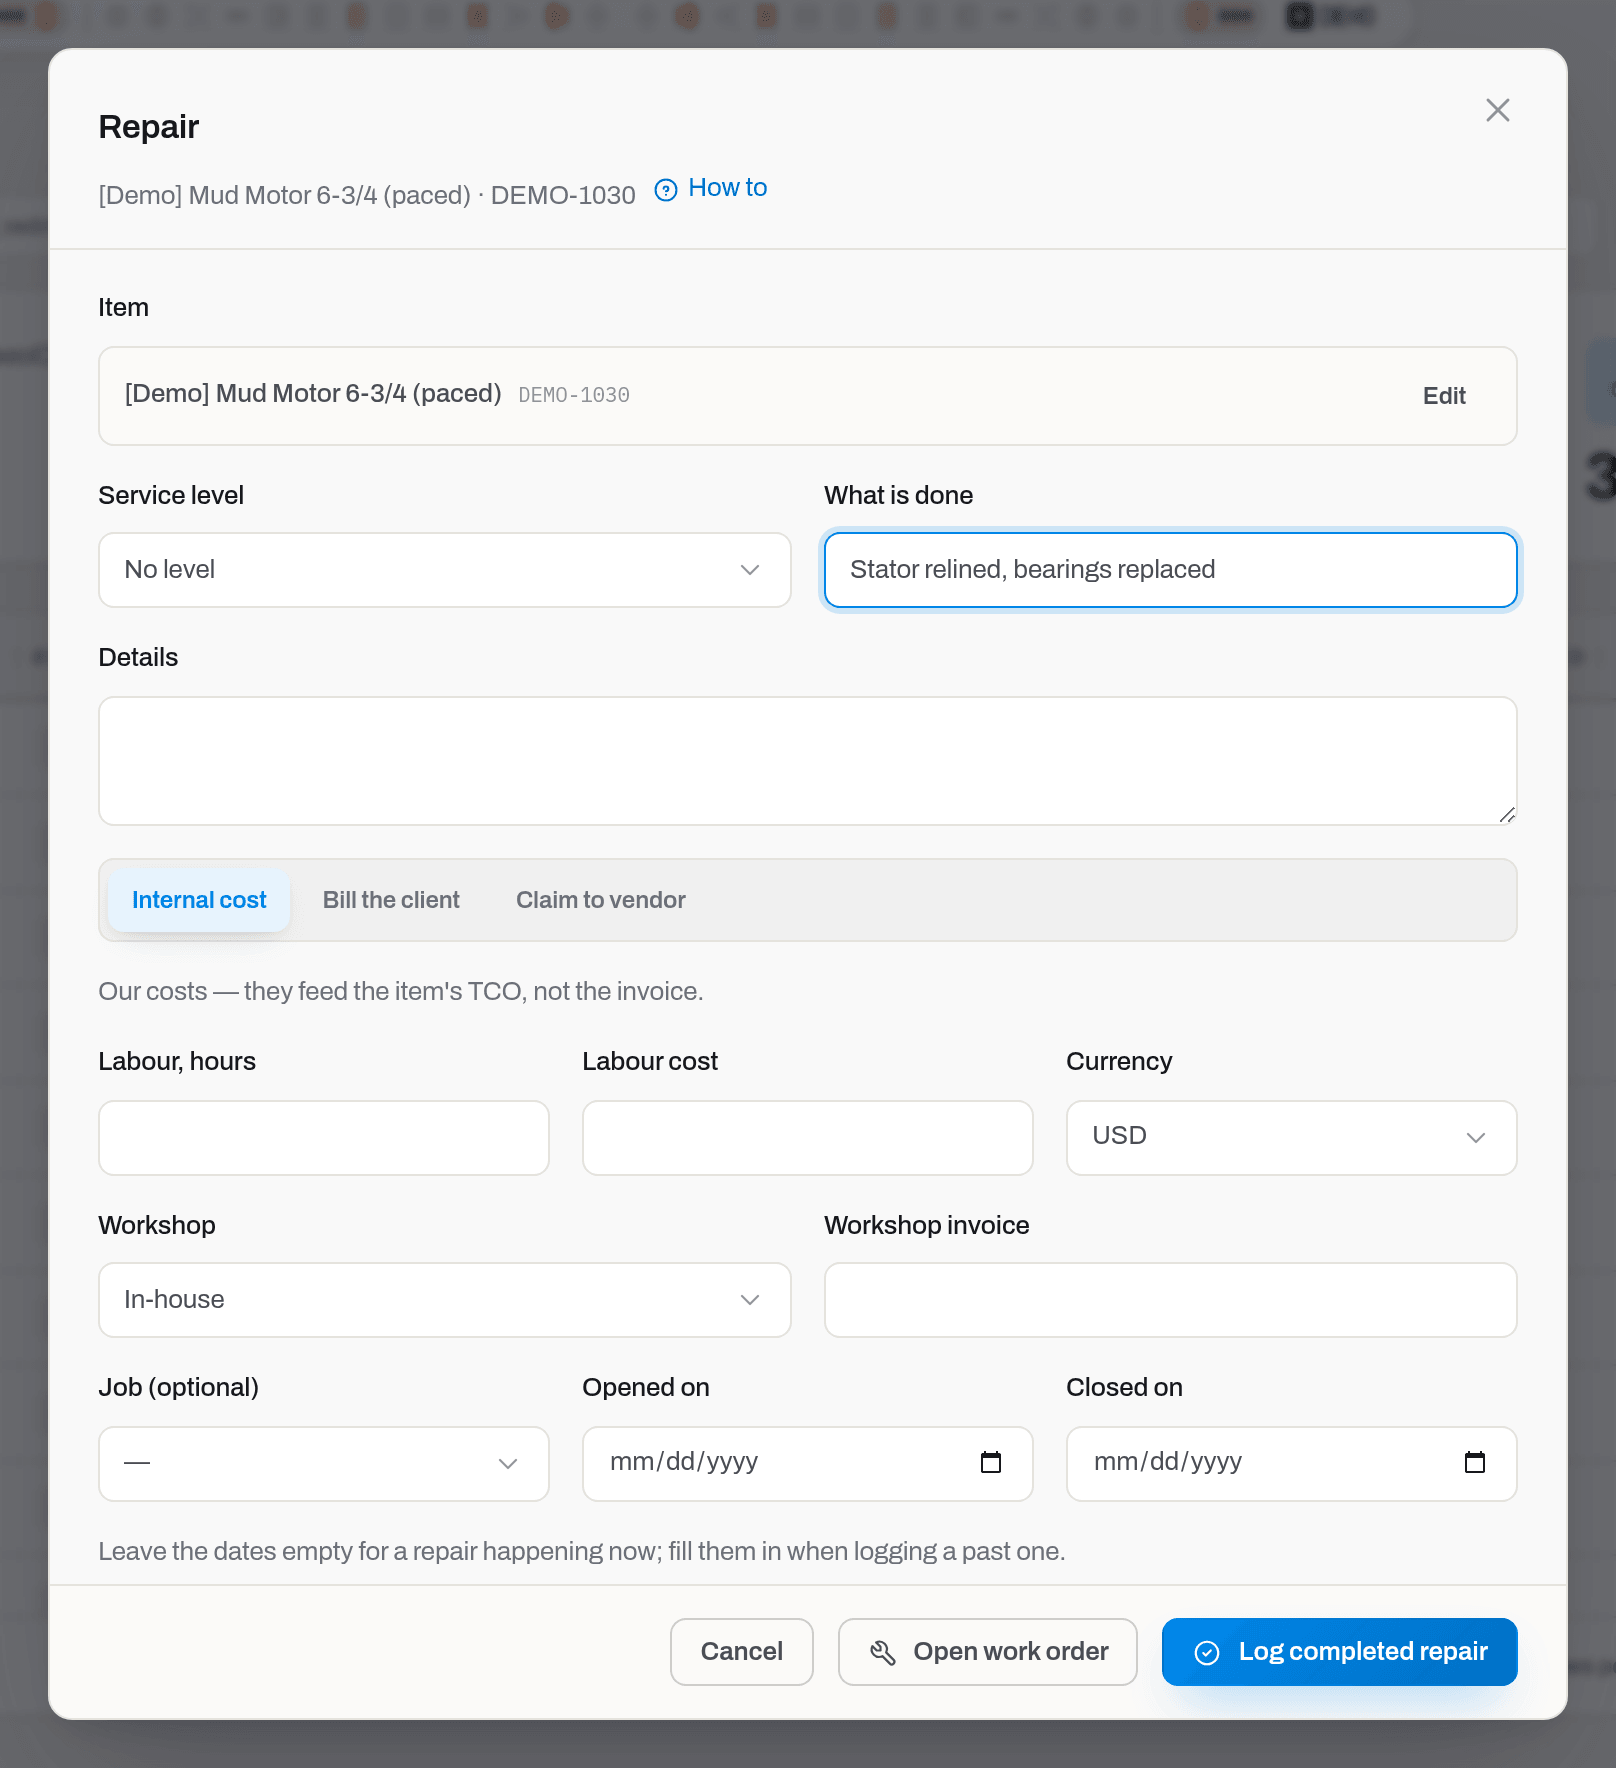
- Choose a Service level and write What is done (required) — Stator relined, bearings replaced…. Add Details if the sentence is not enough.
- Pick the Type — In field or In shop — and a Repair category from your catalogue, if it classifies the job. Choosing a category that names a service level sets that Service level for you; you can still change it. Set CapEx / OpEx if the repair belongs to one of your accounting buckets.
- Say who pays with the three-way switch: Internal cost, Bill the client, Claim to vendor. For the last two, pick the Client or the Vendor.
- Enter what you already know of the cost: Labour, hours, Labour cost, Currency, the Workshop (In-house by default) and its Workshop invoice. A Service filter next to it narrows Workshop to vendors that do that trade — see A contact's position, and what a vendor does — without dropping an already-picked workshop from the list. Link the Job (optional) where the failure happened.
- Leave Department, Line of business and Purpose blank to pick them up from the Job, or set them here — see Document dimensions.
- Click Open work order.
Result: the order gets its number (WO-0001 and up) and its page opens. An Active item goes to In repair, and its timeline records the status change with the order number. A unit already in another state — in inspection, disassembled — is left alone.
Note
A work order can also arrive from the rig: an operator with the Maintenance section opens one in the field app, with photos of the breakdown and no money on it at all — see Field app. It reaches you as a Repair opened at the rig row and an email, and its History card says Opened from the field app. The office part is the same as always: the level, who pays and the price.
If it fails: Requires tenant role 'operator' or higher — ask an admin for the role. Open work order stays disabled until an item is picked, What is done is filled and — for a billable repair — a client or vendor is chosen. A manager can tick Price agreed by quote (manager) to name the money here; an operator who tries gets A quoted price is entered by a manager — log the costs, and the office will set the price.
Tip
Once you have chosen Bill the client, a Service level and a client, a line appears under the switch with the rate that will apply — Price book: 5,200 USD ([Demo] Northwind Petroleum · any category · from 2026-01-01) — or the warning No rate covers this level for this client — the order will close without a price. You see the price before the client does. Pick only one of the two and the line stays away.
Log a repair that is already done
Who: Operator and above.
- Fill in the Repair dialog exactly as above, with the final costs.
- Fill in Opened on and Closed on — Leave the dates empty for a repair happening now; fill them in when logging a past one.
- Click Log completed repair instead of Open work order.
Result: the order is created and closed in one move, priced by the book as it stood on the closing day, and the repair lands in the item's history. This is how a backlog of paper job cards is entered.
If it fails: an order cannot close before it was opened — check the two dates.
Read a work order
Who: Viewer and above.
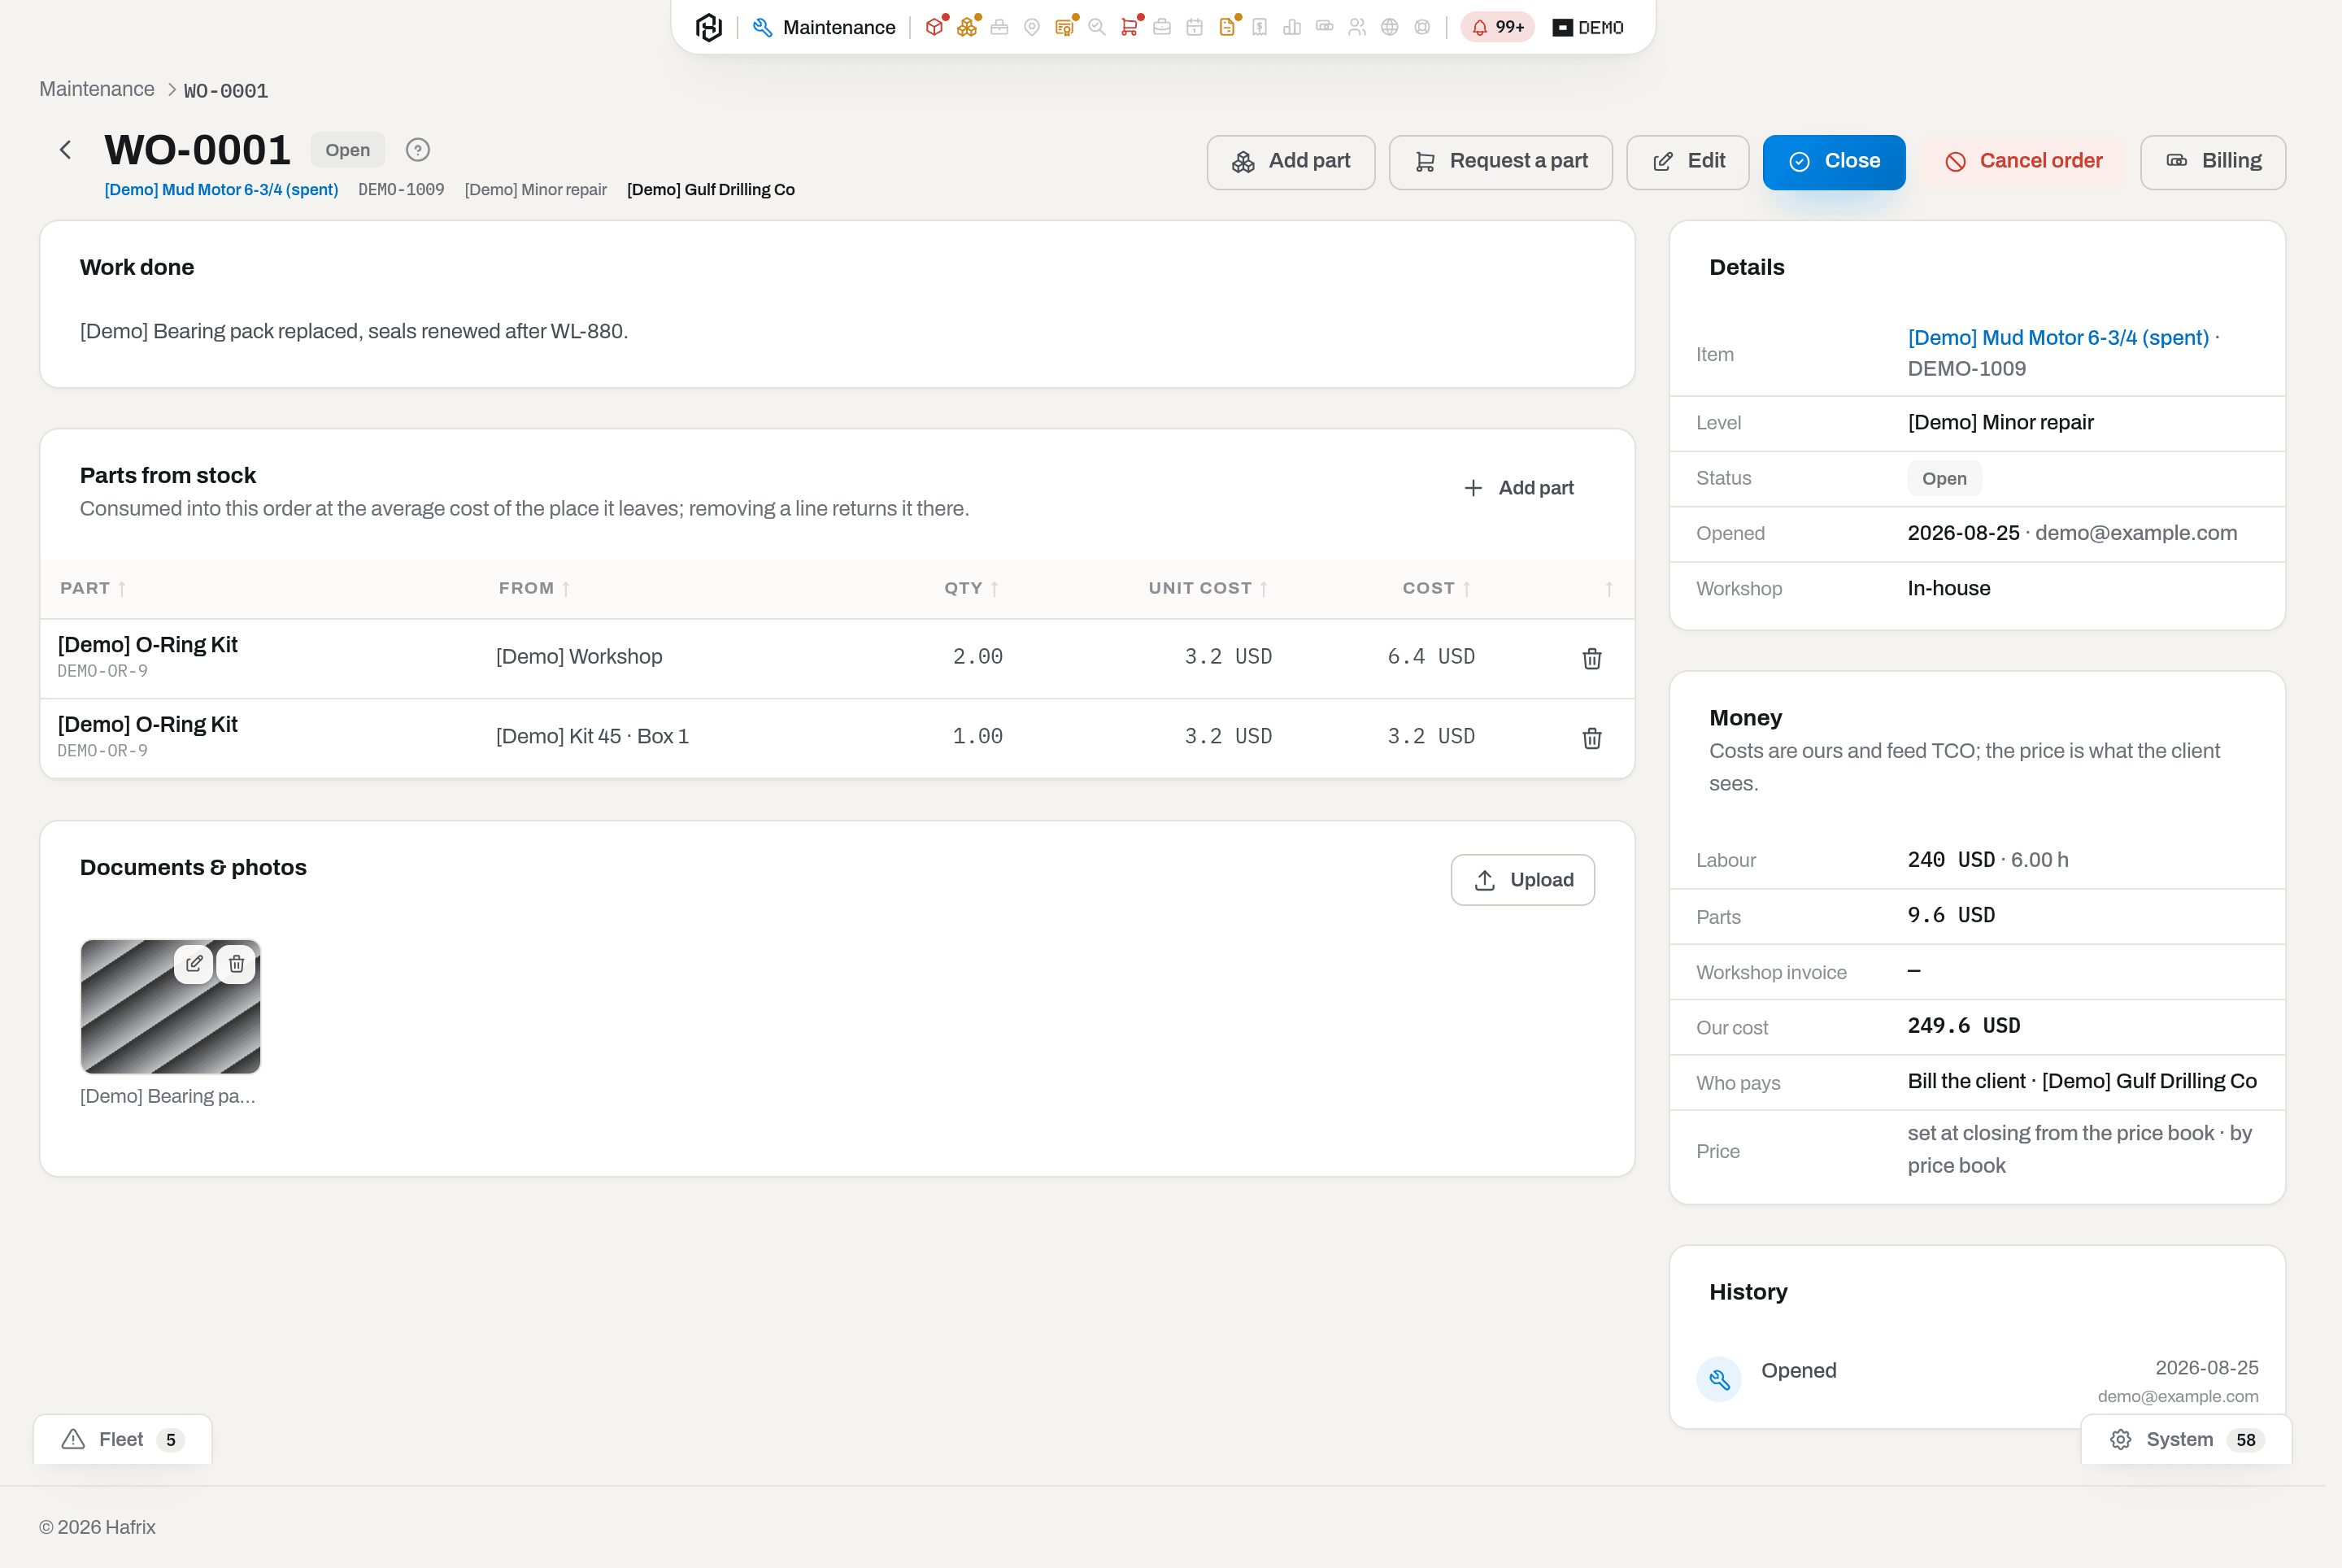
Two columns: what was done · what it costs and who did what.
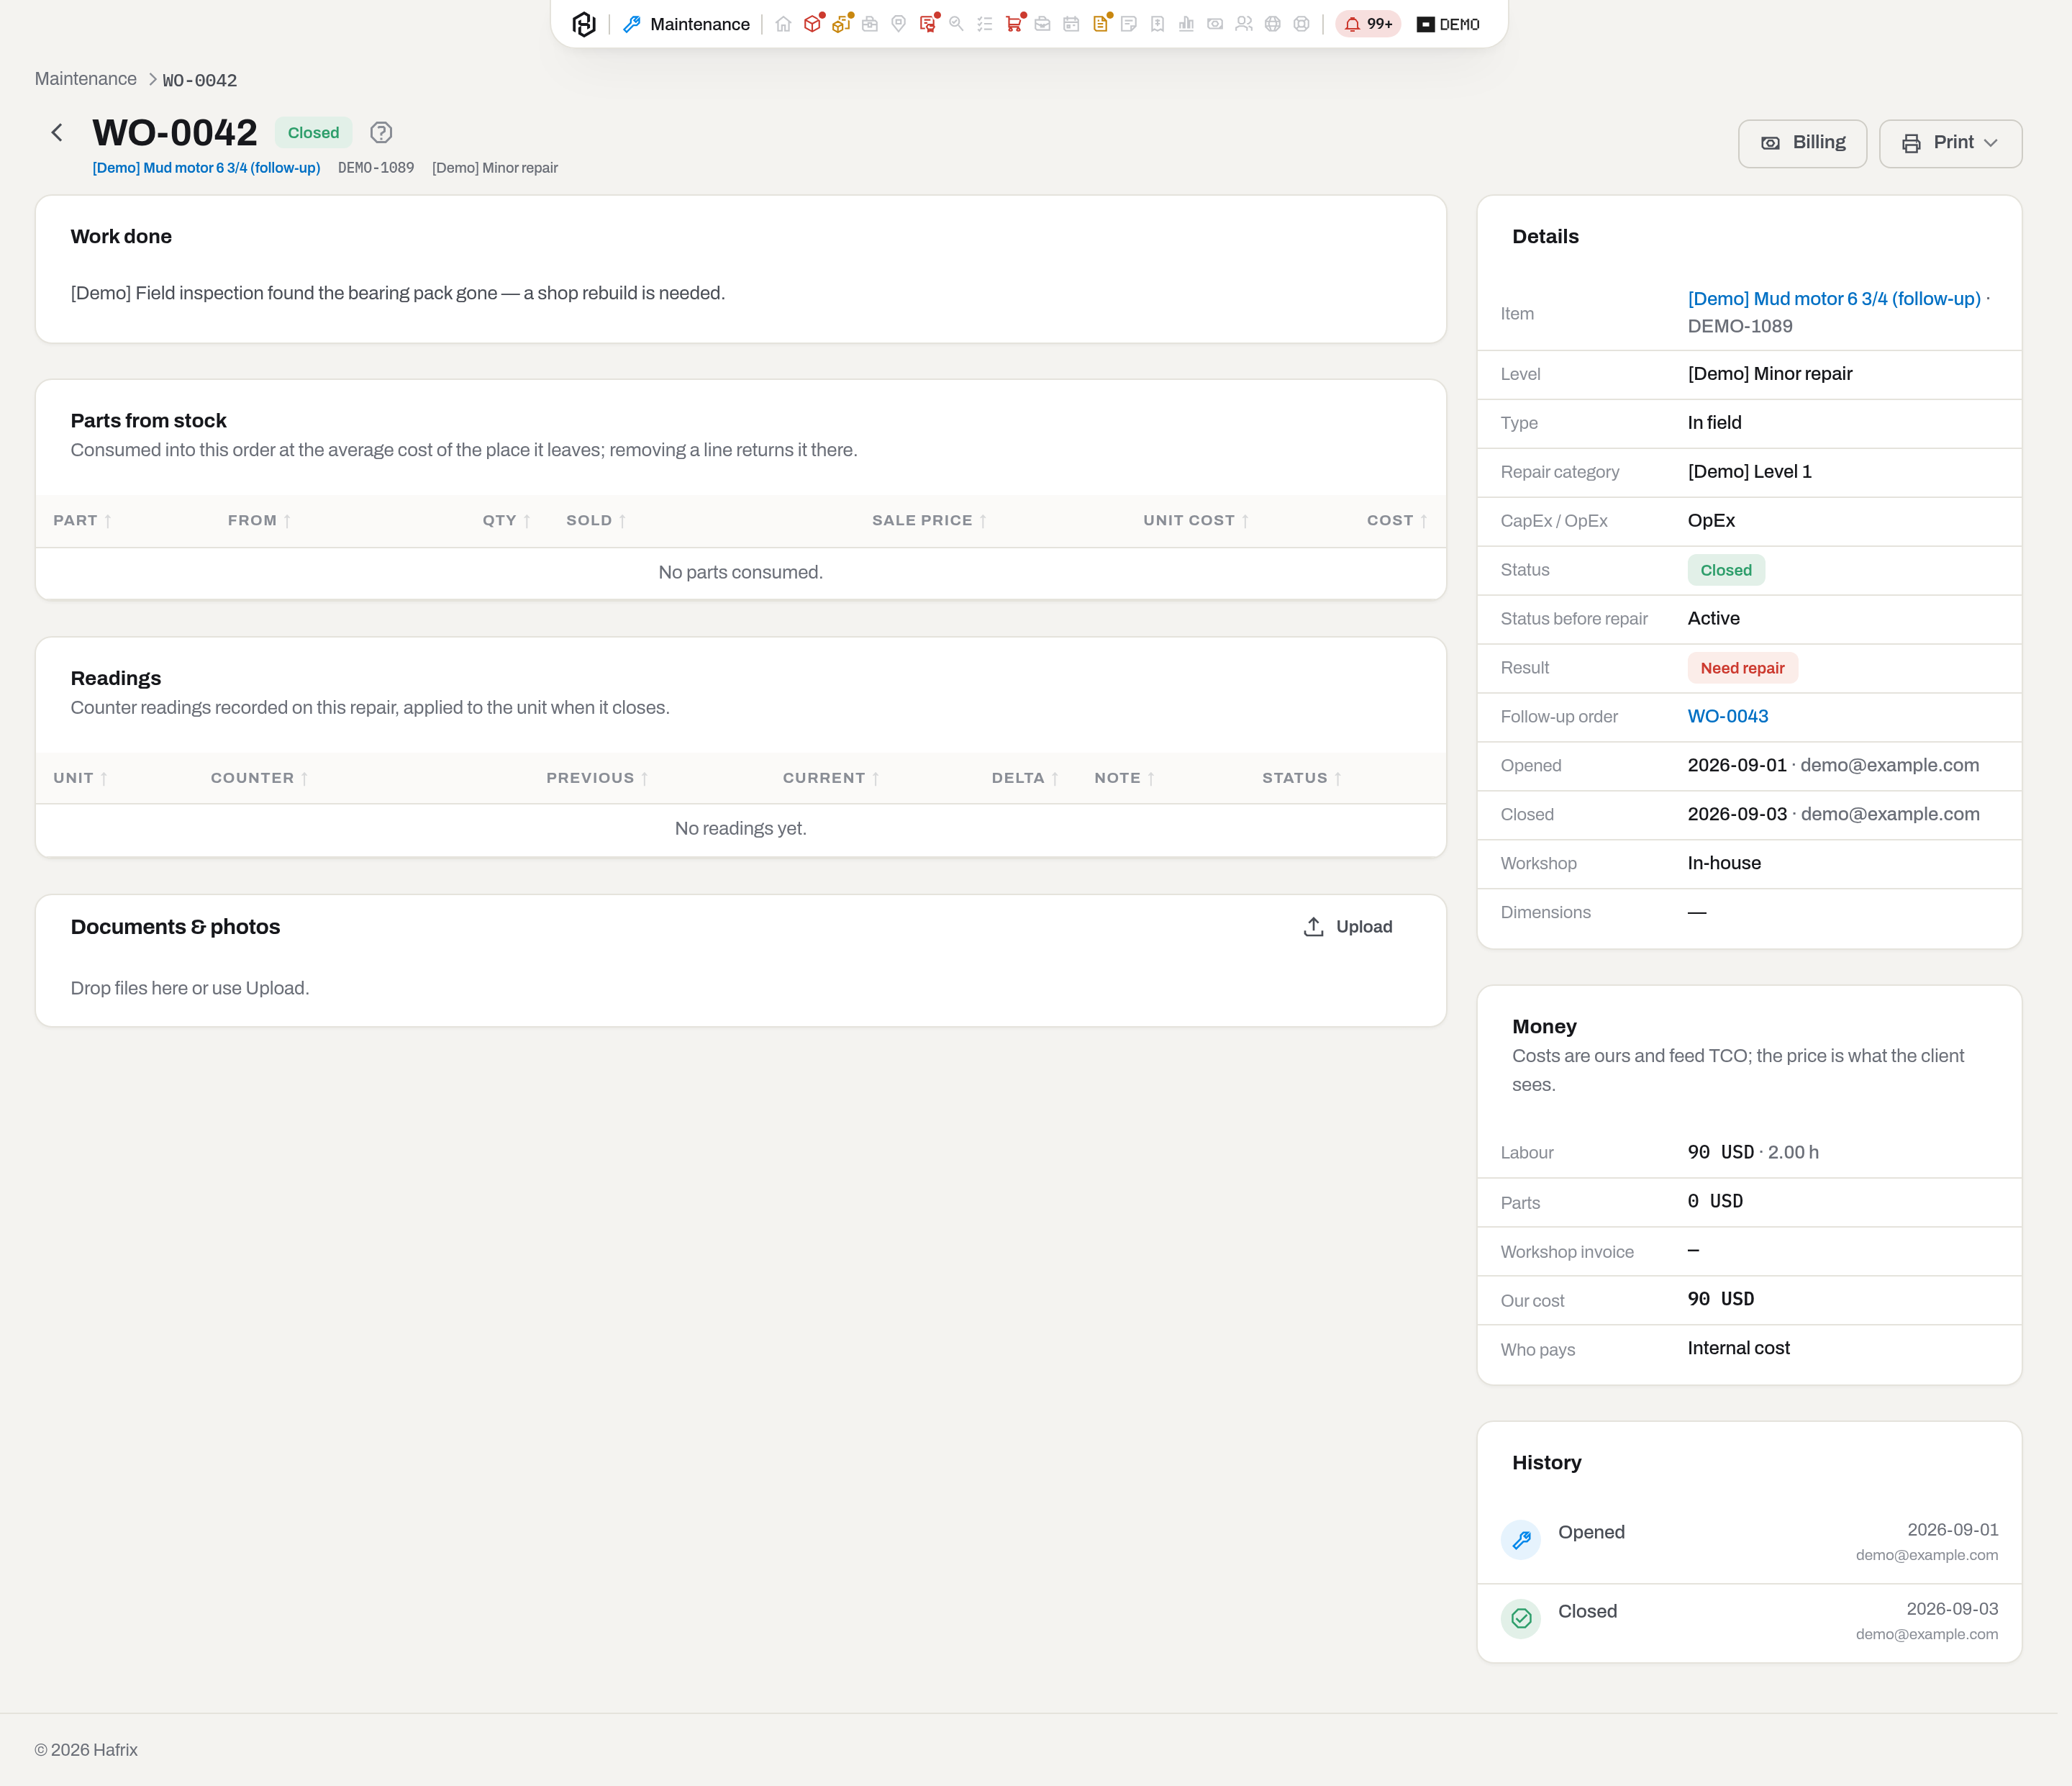
The header carries the number, the status badge and, under it, the item, its serial, the level and — in bold — who is billed. On the left: Work done, Parts from stock and Documents & photos for the before/after pictures and the workshop's paperwork — including the ones taken at the rig if the order came from the field app. On the right: Details (item, level, status, job, who opened and closed it and when, the Workshop), Money, and History with the Opened / Closed / Cancelled trail, marked Opened from the field app when it was.
The Job line in Details, and the Basis line that links to the service ticket an in-field order was opened from, appear only if you have access to the Jobs section. Without it the order shows no job at all — in the list, on the card, in the field app or on the printed Repair Card — and filtering orders by job has no effect.
Money is deliberately split. Our side is always there: Labour (with the hours), Parts, Workshop invoice, Our cost, and Who pays. The client's side appears only when somebody other than you is paying — an internal repair simply stops after Who pays. When it does appear it shows Price with its source, Rate used (the price-book row that won, spelled out), then Beyond scope and Total price only if an extra amount was recorded, the Billing badge only once the order is closed, and a link to the Invoice once one carries it.
Consume a part from stock
Who: Operator and above, while the order is Open.
- Click Add part, in the header or on the Parts from stock card.
- Search by part number or name and pick the consumable. The dialog reminds you up front: The part must be priced in USD, like this order.
- Choose From — every place that actually holds the part is offered, each with the quantity, and a shelf with its average cost as well. A location is named on its own; a kit box is named with the location it is standing in, so Box 1 · MWD Lab and MWD Lab are two different lines. A kit box shows no cost: what is in a kit has already been written off when it was issued. Set Qty.
- Tick Sold to the client with this repair if the part is not a cost of the job but goods the client buys — cutters fitted during a redress of their own housing, for instance. Leave Sale price empty and the sale price book prices it on the invoice; fill it in only where a figure was agreed for this repair alone.
- Click Consume.
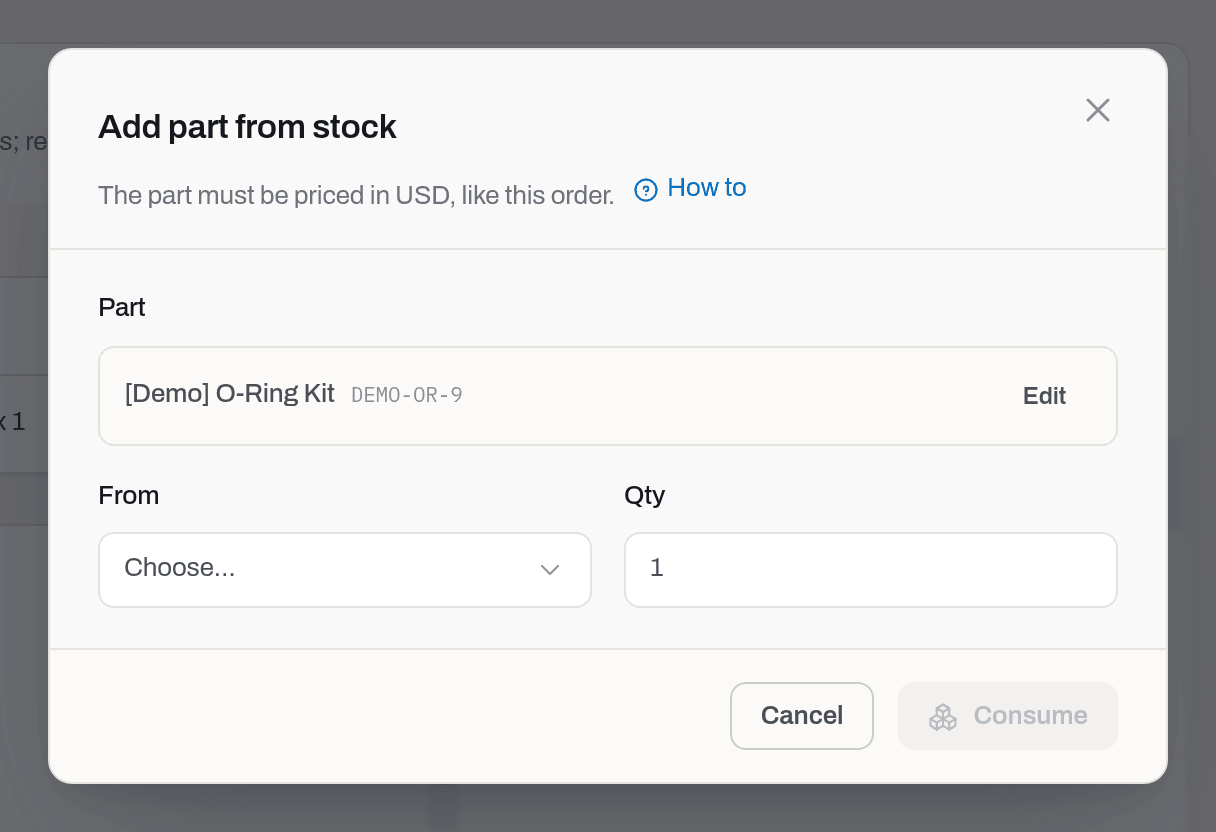
Result: the quantity leaves that exact place — the shelf and the kit box standing next to it are two separate balances — the line appears in the table with the place under From, and Parts in the Money card grows by it. Taken from a shelf, the part is costed at that shelf's rolling average; taken from a kit box, at the price it was issued to that box for, because a kit holds no cost of its own. A part marked Sold shows To the client in its own column and reaches the invoice as a line of its own, next to the repair: the repair price pays for the work, the sold part is goods.
If it fails: a part held in another currency is refused — [Demo] O-Ring Kit is priced in SAR, the work order counts costs in USD. — because otherwise the total would silently be wrong; a red currency badge marks such parts in the search list before you pick one. No stock anywhere. means there is nothing to consume, in any location or kit — receive it in Stock first. Asking for more than is on hand is refused too.
To take a line back, click the bin at the end of the row (Return to stock): the quantity goes back where it came from — into the kit box if that is where you took it — with a stock movement, not by deleting history. This only works while the order is open. Cancelling the whole order does the same for every line at once.
Add a service line
Who: Operator and above, while the order is Open.
- Click Add service on the Service lines card.
- Pick the Service from the catalog and the Unit it is measured in — picking a service fills in its own default unit, and you can still change it. Enter Qty and, if useful, who did the work under Technician and what exactly under Description.
- Tick Billed to the client with this repair for work that reaches the client's invoice; leave it unticked for a line that is only a record of what was done, such as warranty redo or internal upkeep. A billed line needs a Price — that field only shows up with the finance section, so a line billed without one is refused.
- Click Save.
Result: the line appears in the table, with Amount next to Price under the finance section. A work order with at least one billed service line prices itself as the sum of its billed lines instead of the price book, unless the price was set by quote, which always wins; an order whose lines are all non-billed is priced from the book as before. Sent to an invoice, each billed line becomes a line of its own, as on a RigER-style repair card, so the client can check the invoice against the card line by line; a non-billed line stays off the invoice and is printed on the repair card as (not billed).
If it fails: A billed service line needs a price. — tick off Billed or, with the finance section open, fill in Price.
To remove a line, click the bin at the end of the row. This only works while the order is open. The work order price is set from the lines when the order is closed, or when billing is updated on a closed order.
Technician on a service line can be picked from the order's crew instead of typed. The name then follows the crew line: rename the person there and the service line shows the new name; remove the crew line and the service line keeps the name as plain text.
Record the crew
Who: Operator and above, while the order is Open. Nobody needs the finance section to add a crew line — there is no money to enter.
- Click Add crew on the Crew card.
- Pick a Member of your company, or type a Name for somebody who has no account, such as a contractor. The name is kept as it was on the day, so the card still reads right after the person leaves.
- Pick the Role — the crew role the person worked in. It is required: the cost of an hour is set per role, never per person.
- Enter Start and End if you have them. Leave Payable hours empty to count the hours from start to end, or type the hours that are actually paid — for example a standard 12-hour shift for a technician who was on the job for nine.
- Click Save.
Result: the line appears on the Crew card. With at least one crew line, the order's Labour, hours is the sum of the payable hours and Labour cost is each line's hours times its role's hourly cost on the day of the work (its Start, or the day the order was opened), in the order's cost Currency. Both fields stop being typed by hand: they are recalculated on every change while the order is open and fixed when it closes. Remove the last crew line and they go back to empty, for you to fill in by hand as before. Under the finance section each line also shows its Rate and Cost.
The hourly cost comes from Labour cost rates under Settings → Finance — a dated book of what an hour of each role costs us. It is our cost, not the price to the client: the client is charged from Labour rates on a field ticket and from the repair price book here. A row with no role is the fallback for any role; a row for the role wins over it, and the latest From on or before the day of the work applies.
If it fails: Labour hours and cost come from the crew on this work order. — the order has a crew, so Labour, hours and Labour cost cannot be typed; change the crew lines instead. A line flagged No cost rate has no row in the book for its role on that day, and one flagged Rate in another currency has a rate in a currency other than the order's — either line is left out of Labour cost rather than guessed, so add the rate in Labour cost rates or change the order's Currency. Adding, editing or deleting a cost rate recalculates every open order with a crew straight away; a closed order keeps its cost.
To remove a line, click the bin at the end of the row. This only works while the order is open.
Record a reading
Who: Operator and above, while the order is Open.
- Click Add reading on the Readings card.
- Pick the Unit — the item under repair, or one of the components fitted into it.
- Pick the Counter — the kind of running measure it carries, such as amp-hours or flow hours. The dialog shows the unit's last reading for that counter and when it was taken.
- Enter the Current value. If it comes in lower than the last reading, a Reason field appears — say why (the counter was replaced, or reset to zero). A counter that only ever tracks a peak, such as a maximum temperature, does not ask for one.
- Add a Note if useful, and click Record.
Result: the line appears on the Readings card as Pending. Closing the order applies every pending line to the unit's counter — the difference for a running total, the value itself for a peak — and the line turns Applied; the item's own counters and life budgets pick up the new number right away.
If it fails: Counter X is switched off. — it has been retired in Settings; pick another. X is not on this document: readings go on its unit or a component. — the unit is neither the order's own item nor one of its fitted components. X for Y is already on this document. — one line per unit and counter; remove the existing one first if it needs correcting. Reading V is below the previous P — give a reason (counter replaced or reset). — fill in Reason.
To remove a line, click the bin at the end of the row. This only works while the order is open.
Attach photos and documents
Who: Operator and above, in any status. The before/after pictures and the workshop's paperwork are as much a part of the repair as its cost.
- On the order, drop files onto Documents & photos or click Upload.
- The pencil on a file opens File details — Name, File type (Photo, Document, Certificate), Description.
- The bin removes a file, after a confirmation.
Result: the files hang on the order and travel with it. Unlike a ticket, a work order is never frozen for documents: the scan of the workshop invoice usually turns up after the repair was closed, and it still belongs here.
If it fails: Only the person who uploaded this file, or a manager, can remove it. — the usual refusal; someone else put that file there. Removal is final: the file leaves storage, and the order keeps no undo for it.
Correct an open order
Who: Operator and above, while the order is Open.
- Click Edit.
- Change the Service level, Type, Repair category, CapEx / OpEx, What is done, Details, Labour, hours, Labour cost, Currency, Workshop, Workshop invoice and its Department, Line of business and Purpose — see Document dimensions.
- Click Save.
Result: a toast confirms the save; Our cost in the Money card is recalculated.
If it fails: who pays is not in this dialog on purpose — money has one door, and it is Billing. A closed order cannot be edited at all. Once parts are on the order, Currency is locked: the parts are already counted in it, so remove them first if the currency really has to change.
Save a revision of a repair card
Who: Operator and above, while the order is Open.
A repair card is a live document — parts and labour hours change on it while the work is in hand — so Save revision does not lock anything the way a sent order does. It is a snapshot taken on demand: the header, the parts and the work-list steps exactly as they stand right now, kept under a letter.
- Open the work order and click Save revision.
- Say what changed — a part swapped for a different size, a step redone, anything the client or your own records will ask about later.
- Click Save revision in the dialog.
Result: the header now carries a letter — WO-0001 Rev A the first time, Rev B the next — and a Revisions card gains a row with the date, who saved it and the reason. Printing a saved revision gives the repair card without costs: the client sees what was done, not what it cost us; the live card still prints costs to whoever is allowed to see them. Unlike the first revision on an order or a job, Rev A here needs a reason too — the order was already open when work started, so there is no earlier moment to snapshot silently — but like every first revision, it does not mail a letter or write a feed row; that starts with Rev B. From there, a repair billed to the client mails the revised card to the client's contact automatically, with the reason in the text; an in-house repair or a warranty job billed to the vendor has nobody on the other end to mail it to, so the revision is saved with no letter sent. To see exactly what moved between two letters, see Compare two revisions.
There is no undo. Once saved, a letter is history — printing an old one always shows exactly what the card was on that day, not what it is now.
If it fails: the button is missing — the order is already closed or cancelled; a finished repair is history, not a document still being written. Saving with no reason is refused.
Send a repair to a vendor
Who: Operator and above, on an open repair that has a Workshop (vendor) on it.
Some work your own bench cannot do — a power section relined, a housing re-cut, a specialist inspection. The repair stays yours; the work is bought.
- Put the vendor in Workshop — Edit the repair if it still says In-house. Without a vendor there is nobody to order from, and the button is not offered.
- Click Order repair from vendor. The usual Ask to buy dialog opens with this repair already attached and the work described for you — adjust the wording, put in the price you expect, and add it to a request.
- The request goes through approval and becomes an order like any other (Order a service). The vendor gets a printed order that says which unit is coming and on which repair — serial number included, so it can be booked in at their gate.
- When the work comes back, whoever accepts it posts a receipt against that order.
Result: the External cost on this repair fills itself in — you no longer type it by hand, and the number is the one that was ordered and accepted, not a figure from memory. Accept the work more than once and the amounts add up: stripping the unit down and rebuilding it are often two bills.
Why it still matters that the repair is open. A closed repair has already told the timeline what it cost, and that is what the cost of ownership reads. Money cannot be added to it afterwards, so accept the work before you close the repair. If the vendor bills late, open a new repair for the extra work rather than reopening a closed one.
Typing External by hand still works for the cases with no order behind them — a bill that arrived without one, a favour, a warranty job. Do not do both for the same work: the receipt adds to the number you typed rather than replacing it.
Where the unit is while the vendor has it. A repair at a vendor is a trip, not a status: the unit physically leaves. Click Send to vendor on the open repair and the unit moves to the vendor's own site — a location of type Vendor that belongs to that company (add one under Locations first; without it the button answers that the vendor has no site). The repair remembers where the unit left from and shows At vendor since on the card; on the register the unit reads At vendor, not In our shop. It comes back the same way it left — by Returned from vendor, by accepting the vendor's work on the receipt, or when the repair is closed or cancelled — and lands where it was before the trip.
Close a work order
Who: Operator and above.
- Click Close in the header.
- Confirm the final Labour, hours, Labour cost and Workshop invoice — this is the last word on the cost.
- Leave Closed on empty for now, or set the day the work actually finished.
- Pick the Result — Good, Need repair or Non repairable — it defaults to Good.
- Click Close.
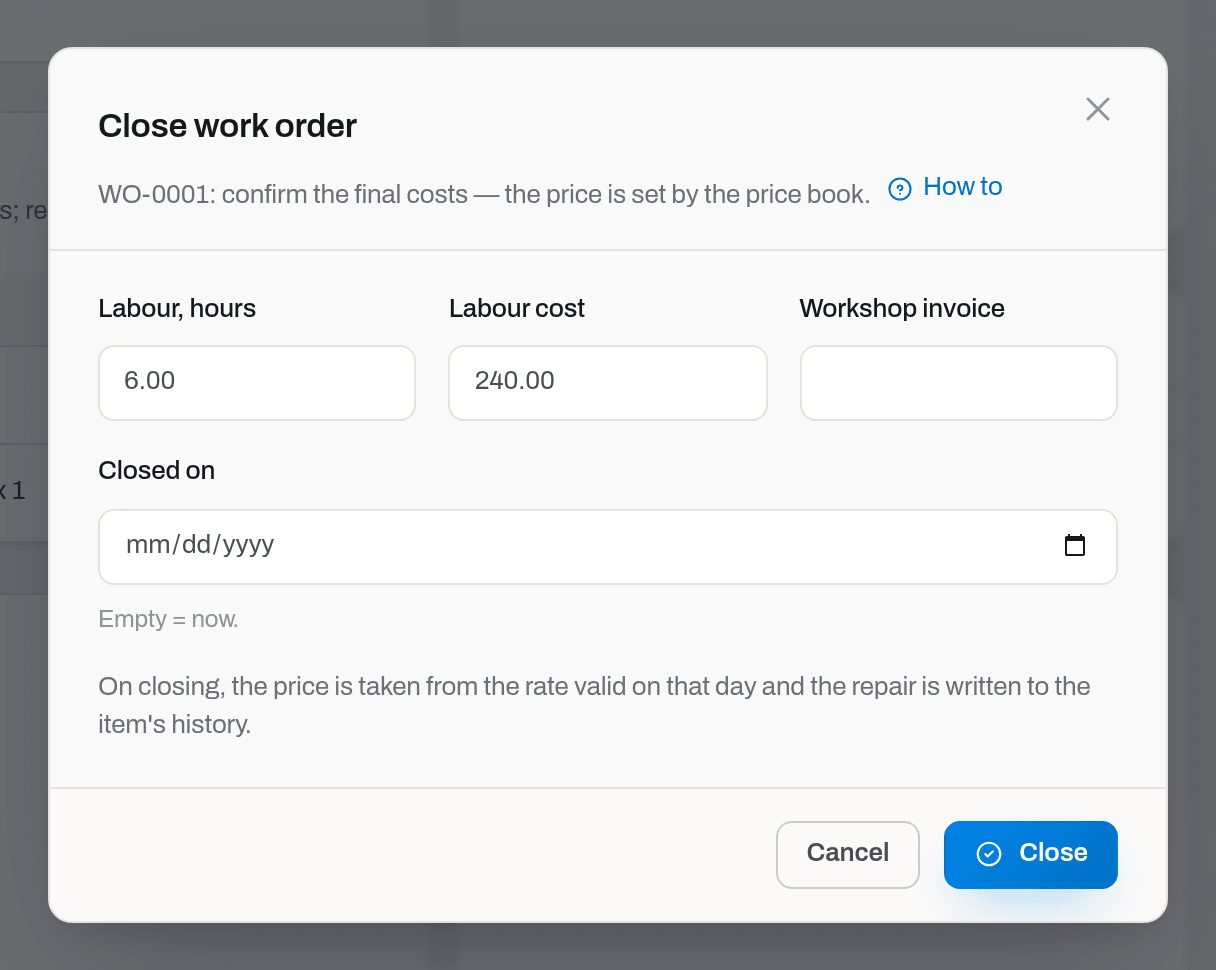
Result: the price is taken from the rate valid on that day, the repair is written to the item's history with both the cost and the price. What happens to the unit depends on the Result:
- Good — the unit goes back to the status it had before the repair, unless another order on it is still open.
- Need repair — the job is not finished: a follow-up work order opens on the same item automatically, carrying the same level, category, type and who pays, titled Follow-up: …; the unit stays In repair, and both orders link to each other.
- Non repairable — the unit is retired, with the reason Damaged beyond repair and a note pointing at this order.
A billable order becomes To bill; everyone who manages the fleet gets a letter and a feed row naming the result — with the follow-up order's number, or that the unit was retired.
If the repair was an overhaul — a relined stator, a rebuilt assembly — see Start the life budget over after an overhaul before you close.
If it fails: an order cannot close before it was opened. If the price book has nothing for that level and client, the order still closes — the workshop should not have to wait for the office — but it closes without a price; see Fix a repair that closed without a price.
Fill in redress steps
Who: Operator and above, while the order is Open.
A redress — cutters pulled and reset on a client's housing, a stator relined, any repair with a fixed checklist — is not one line of text. It is a small form of its own, one field per step of the job, and the order will not let you close it with a required step left blank.
The Redress steps card only shows up when the order's Service level carries a step list (set up once per level in Settings: catalogues). Each step is one of five kinds:
- Yes / No — a three-way switch: not answered, yes, no.
- Count — a number, sometimes with a ceiling (Jammed cutters, max 4).
- Text — a short note.
- Certificate — a result (PASS / FAIL / NA), a date and an inspector's name; closing the order writes it to the item's certificates for you.
- Components — a Done tick and a note, plus Install component / Remove component right on the step (needs the Items operator right, same as the item card). A jammed cutter comes off with a reason and a destination location — quarantine, most often — the same as removing it from the item card. Installed and removed cutters show up in this step's own lists and on the item card's Components table, each row stamped with the work order's number.
- Fill in each step that applies.
- Click Save. The card only saves the steps — the rest of the order still has its own Edit.
Result: a step marked required and left empty carries a small Missing flag; the order can still be edited and saved with steps missing, but not closed.
If it fails: Required steps are not done: … on Close — the Close a work order dialog lists which ones by name. Fill them in on the card and close again; nothing else about closing changes.
Track a client's tool in the shop
Who: Operator and above; Receive tool while the order is Open, Release tool once it is Closed. Both only exist on a repair billed to the client — internal work never leaves the yard's own custody.
A client's own tool sitting on your bench is not yours, and the shop needs the same paper trail a rig gate keeps: what came in, on whose reference, and what went out again.
- PO/TO number — put the client's own reference for the job in Client ref. (via Edit), if they gave you one.
- Receive tool, when the item physically arrives — who signed for it, their position, and their own reference number if it differs from the PO/TO. No paper for it — the tool came in before the order existed, or the receipt was signed elsewhere? Set the date in Received (via Edit) instead; the note is not needed for the date to show. Once an RC-… is issued, Received is locked in Edit when the date came from the RC; a date set by hand before the RC stays editable.
- Work the order as usual; the Redress steps and parts consumed are the same regardless of who owns the tool.
- Release tool, once the order is Closed — the same details, this time for who is taking it back.
Result: each movement writes a numbered note — RC-… for a receipt, RL-… for a release — to the Notes card, with a Print button for the paper itself, and stamps Received / Delivered on the order's Details.
If it fails: Release tool is refused before the order closes — the tool leaves once the work is signed off, not before. Receive tool is refused on an internal repair — there is no paper for equipment that never left the yard.
Print the repair card
Who: Viewer and above, in any status.
The repair card follows the paper shop travellers use — RigER's Repair Card among them: what the unit was, what kind of job it was, who is paying, and where it stands, in one printable sheet with two signature lines. Unlike the service report, it is not tied to a closed order: an open one prints as a blank for a technician and the owner's representative to sign on the spot.
- Open Print ▾ in the header.
- Choose Repair card.
Result: a PDF opens with the order number, dates, the client's own reference (Client ref.) and the Job it came off, the client's name, address and phone if the repair is billed to one, the unit in a table with its serial number, the Repair category and Service level, CapEx / OpEx, the Billable / Internal flags, the description and findings, the work list, parts and labour with their amounts (the client's address and phone show only if you can see Clients, the Job only with Jobs, amounts only with Finance), the Result and — for Need repair — the follow-up order's number, or — for Non repairable — that the unit was retired, and two blank signature lines: Service provider and Client representative, the latter with a marked space for a stamp.
If it fails: nothing refuses this — an order without a result yet simply prints without one, ready to be filled in by hand once the work is done.
Print the service report
Who: Viewer and above, once the order is Closed.
The service report is the one document that tells the client's story of the repair on its own: the tool, what was checked off the redress steps, the parts fitted, and the price — without the internal cost figures that never leave the yard.
- Open Print ▾ in the header.
- Choose Service report.
Result: a PDF opens with the item, the client's reference, the redress steps as filled in (certificates with their result and inspector, components as installed/removed tables), the billable parts, the price, and up to six photos from the order's Documents & photos. Prices appear only for people with the Finance section; everyone else gets the same report with the parts listed and no price column. The same menu lists any receipt or release note issued on the order, each printing its own paper.
If it fails: the option is not offered before the order closes — a report that changes after it is handed to the client would be worse than none.
Start the life budget over after an overhaul
Who: Operator and above — the same right as closing the order. Tick it in the Close dialog.
A rebuilt rotor, a re-dressed cutter block or a repaired bearing pack starts a new life, while its hours and history do not. A relined stator is a new elastomer in the same old tube — see below. Without this, the unit stays Life budget exceeded for ever, and people learn to ignore red.
- Close the work order as usual.
- Tick Overhaul: count life from zero — it is on by default when the order's Service level is set up as an overhaul (in Settings: catalogues); untick it if this particular repair is not one.
- Click Close.
Result: the hours, runs and kRev counters are not touched — the item worked them, and depreciation and TCO stand on them. What moves is the point the life budget is counted from. From that day the item card shows both numbers: what it has run since the overhaul, and the lifetime total; the work order's Details show the date under Life counted from. The Life budget exceeded alert clears at the next run, and the calendar part of the budget restarts too. The decision is written into the item's history with the counters as they were, so the card and the timeline never argue.
On a stator the same tick means a reline, and it restarts only the Elastomer hours: the liner is new, the metal tube is not. The tube's hours and its life budget carry on counting every run, and the history records the elastomer hours as they were before the reline.
If it fails: nothing here can fail on its own — but do not tick it for an ordinary repair. A seal change does not give a motor a new life, and the box is the only thing that says otherwise.
Count life from a repair that already closed
Who: Operator and above — the same right as closing the order.
The tick above only works while the order is still open on your screen. When an overhaul closes without it — the box was missed, or the level did not carry the flag yet — the unit is stuck showing Life budget exceeded for good, and re-opening the order is not an option once it is closed.
On the item's page, the Maintenance card marks such an order with Life not reset — click it to open the order.
- Open the closed work order. If it looks like an overhaul with no reset — its level is set up as one, or the title says "reline" — a banner reads Life was not reset at this repair.
- Click Count life from this repair in the header.
- Read the confirmation — the base moves to the order's Closed date, not to today — and confirm.
Result: the same reset as the tick at close, dated to when the repair actually finished: runs logged after that day stay counted, not lost. On a stator only the elastomer hours move; the tube's hours carry on. The item's history gets a Life reset entry naming this order, and the work order's Details now shows Life counted from; the banner and the button both disappear.
If it fails: the button is not offered once life has already been reset from this order, or before the order is closed — there is nothing to fix twice. It is not offered either when the unit already has a later reset (a newer overhaul was ticked at its close): counting from the older order would roll that one back, so the server refuses it too, and the item page no longer marks the order with Life not reset.
Mark a plan done without a work order
Who: Operator and above. On the unit's card, in Next service, on a row that is Due now or Due soon.
Some service costs nothing and takes two minutes — turning a motor shaft at the rack. Opening a work order for it means asking for a number, a service level and a price for something done by hand, and nobody does that fourteen times a quarter; the alert then just hangs there.
- Open the unit and find Next service.
- On the row that is due, click the tick.
Result: the cycle starts again from today, exactly as it would after a closed work order of that level, and the alert clears on the next run. The row keeps the date but shows no order number — it was not one. The tick is written into the unit's history, so who said it was done, and when is on the record.
If it fails: the tick is only there while the plan is due or nearly due — marking a plan done early would move its cycle forward for no reason. It also only closes its own plan: two plans on one motor are two independent cycles. Anything that costs money still goes through a work order — this tick books no cost and no price.
Cancel a work order
Who: Operator and above, while the order is Open.
- Click Cancel order. The dialog warns you what it will do: Parts go back to stock, the item returns to its previous status; the order stays with the reason.
- Give a Reason — it is required, and the red button stays disabled without it.
- Click Cancel order.
Result: the parts return to stock as stock movements, the unit gets its old status back, and the order keeps a yellow Cancelled: … notice from then on. You land back where you came from.
If it fails: there is no delete, for anyone — an order that consumed parts and touched an item's history is evidence. Cancelling is the way out.
Set who pays and how much
Who: Manager and above. This is the only door to the money, and it stays open after closing.
- Click Billing in the header.
- Choose Internal cost, Bill the client or Claim to vendor, then the Client or Vendor.
- Choose the Price source: by price book — The price is taken from the price book on the closing date — or by quote, which asks for a Quote / document ref, an Agreed price and a Currency.
- If the job went past the scope, fill in Beyond scope, amount and Beyond scope, what for. The explanation is not optional: it is what the invoice will print as a note.
- Click Save.
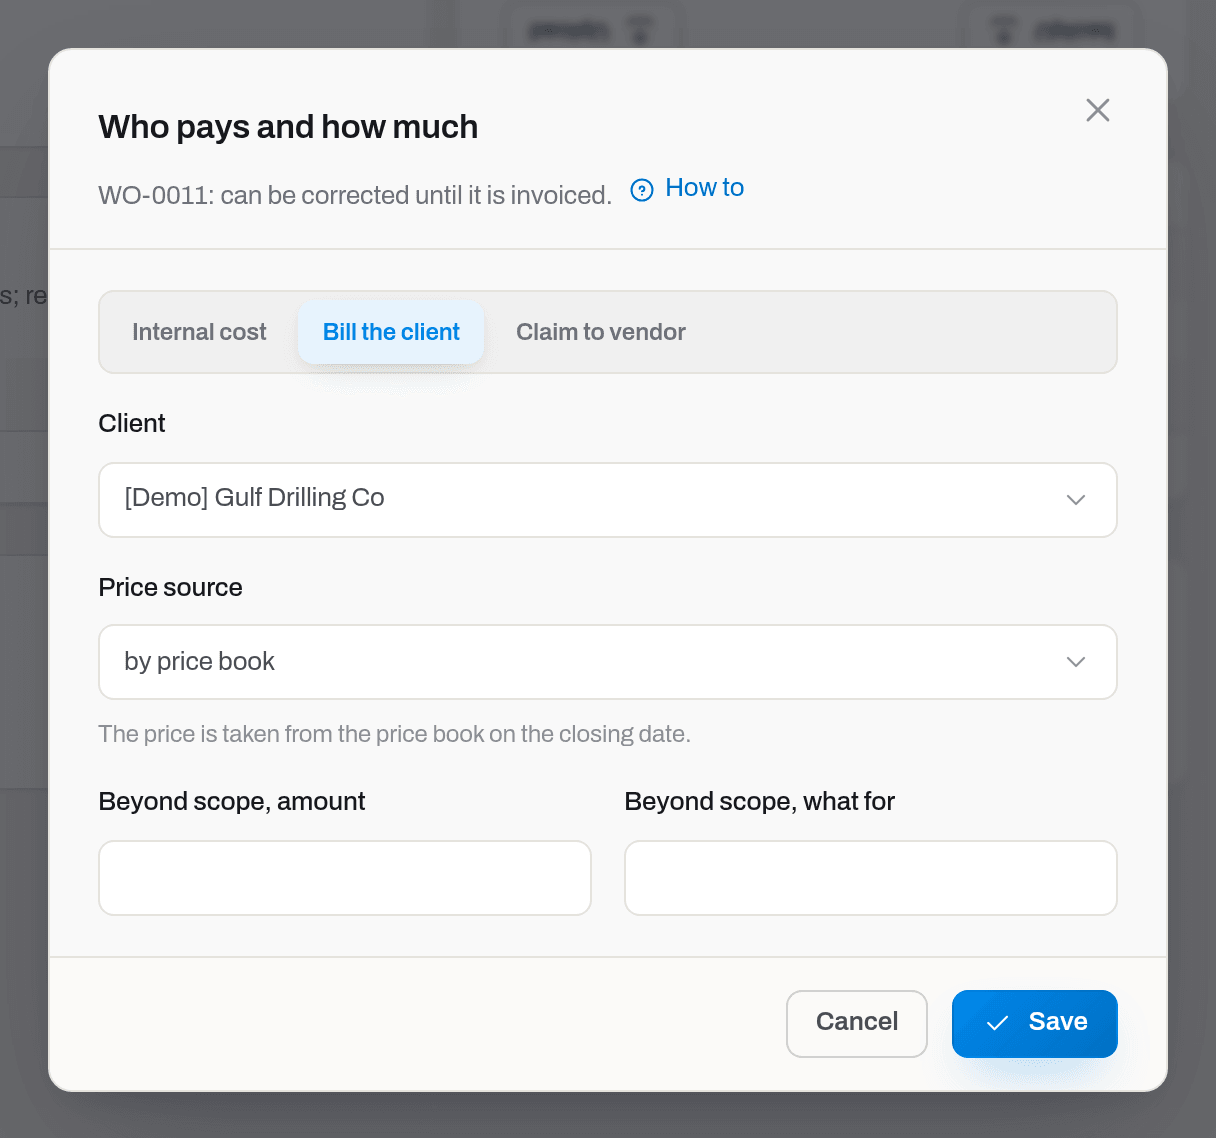
Result: on a closed order the price is recomputed from the book as it stood on the closing date; the Money card and the Billing badge follow.
If it fails: the usual failure is that the Billing button is not there at all, and there are exactly three reasons — the order was Cancelled, its invoice has already been sent, or it is sitting on an invoice, including a draft. The last one is the common surprise: changing a price under a line the document has already counted would put the two quietly out of step. Take the line off that invoice, or void it, and the button comes back. An invoice that has gone to the client is corrected with a credit note instead.
Fix a repair that closed without a price
Who: Manager and above. Do this before anyone builds the client's invoice.
- Find them by the Closed without a price number on the queue, or by the red badge in the Price column (shown in the To bill view; elsewhere tick it under Columns).
- Open the order. A yellow notice says Billable, but no rate covers it — it cannot be invoiced until a price is set. with a Set a rate link.
- Either add the missing rate under Settings → Maintenance and re-save the order through Billing, or set the price on this one order by quote.
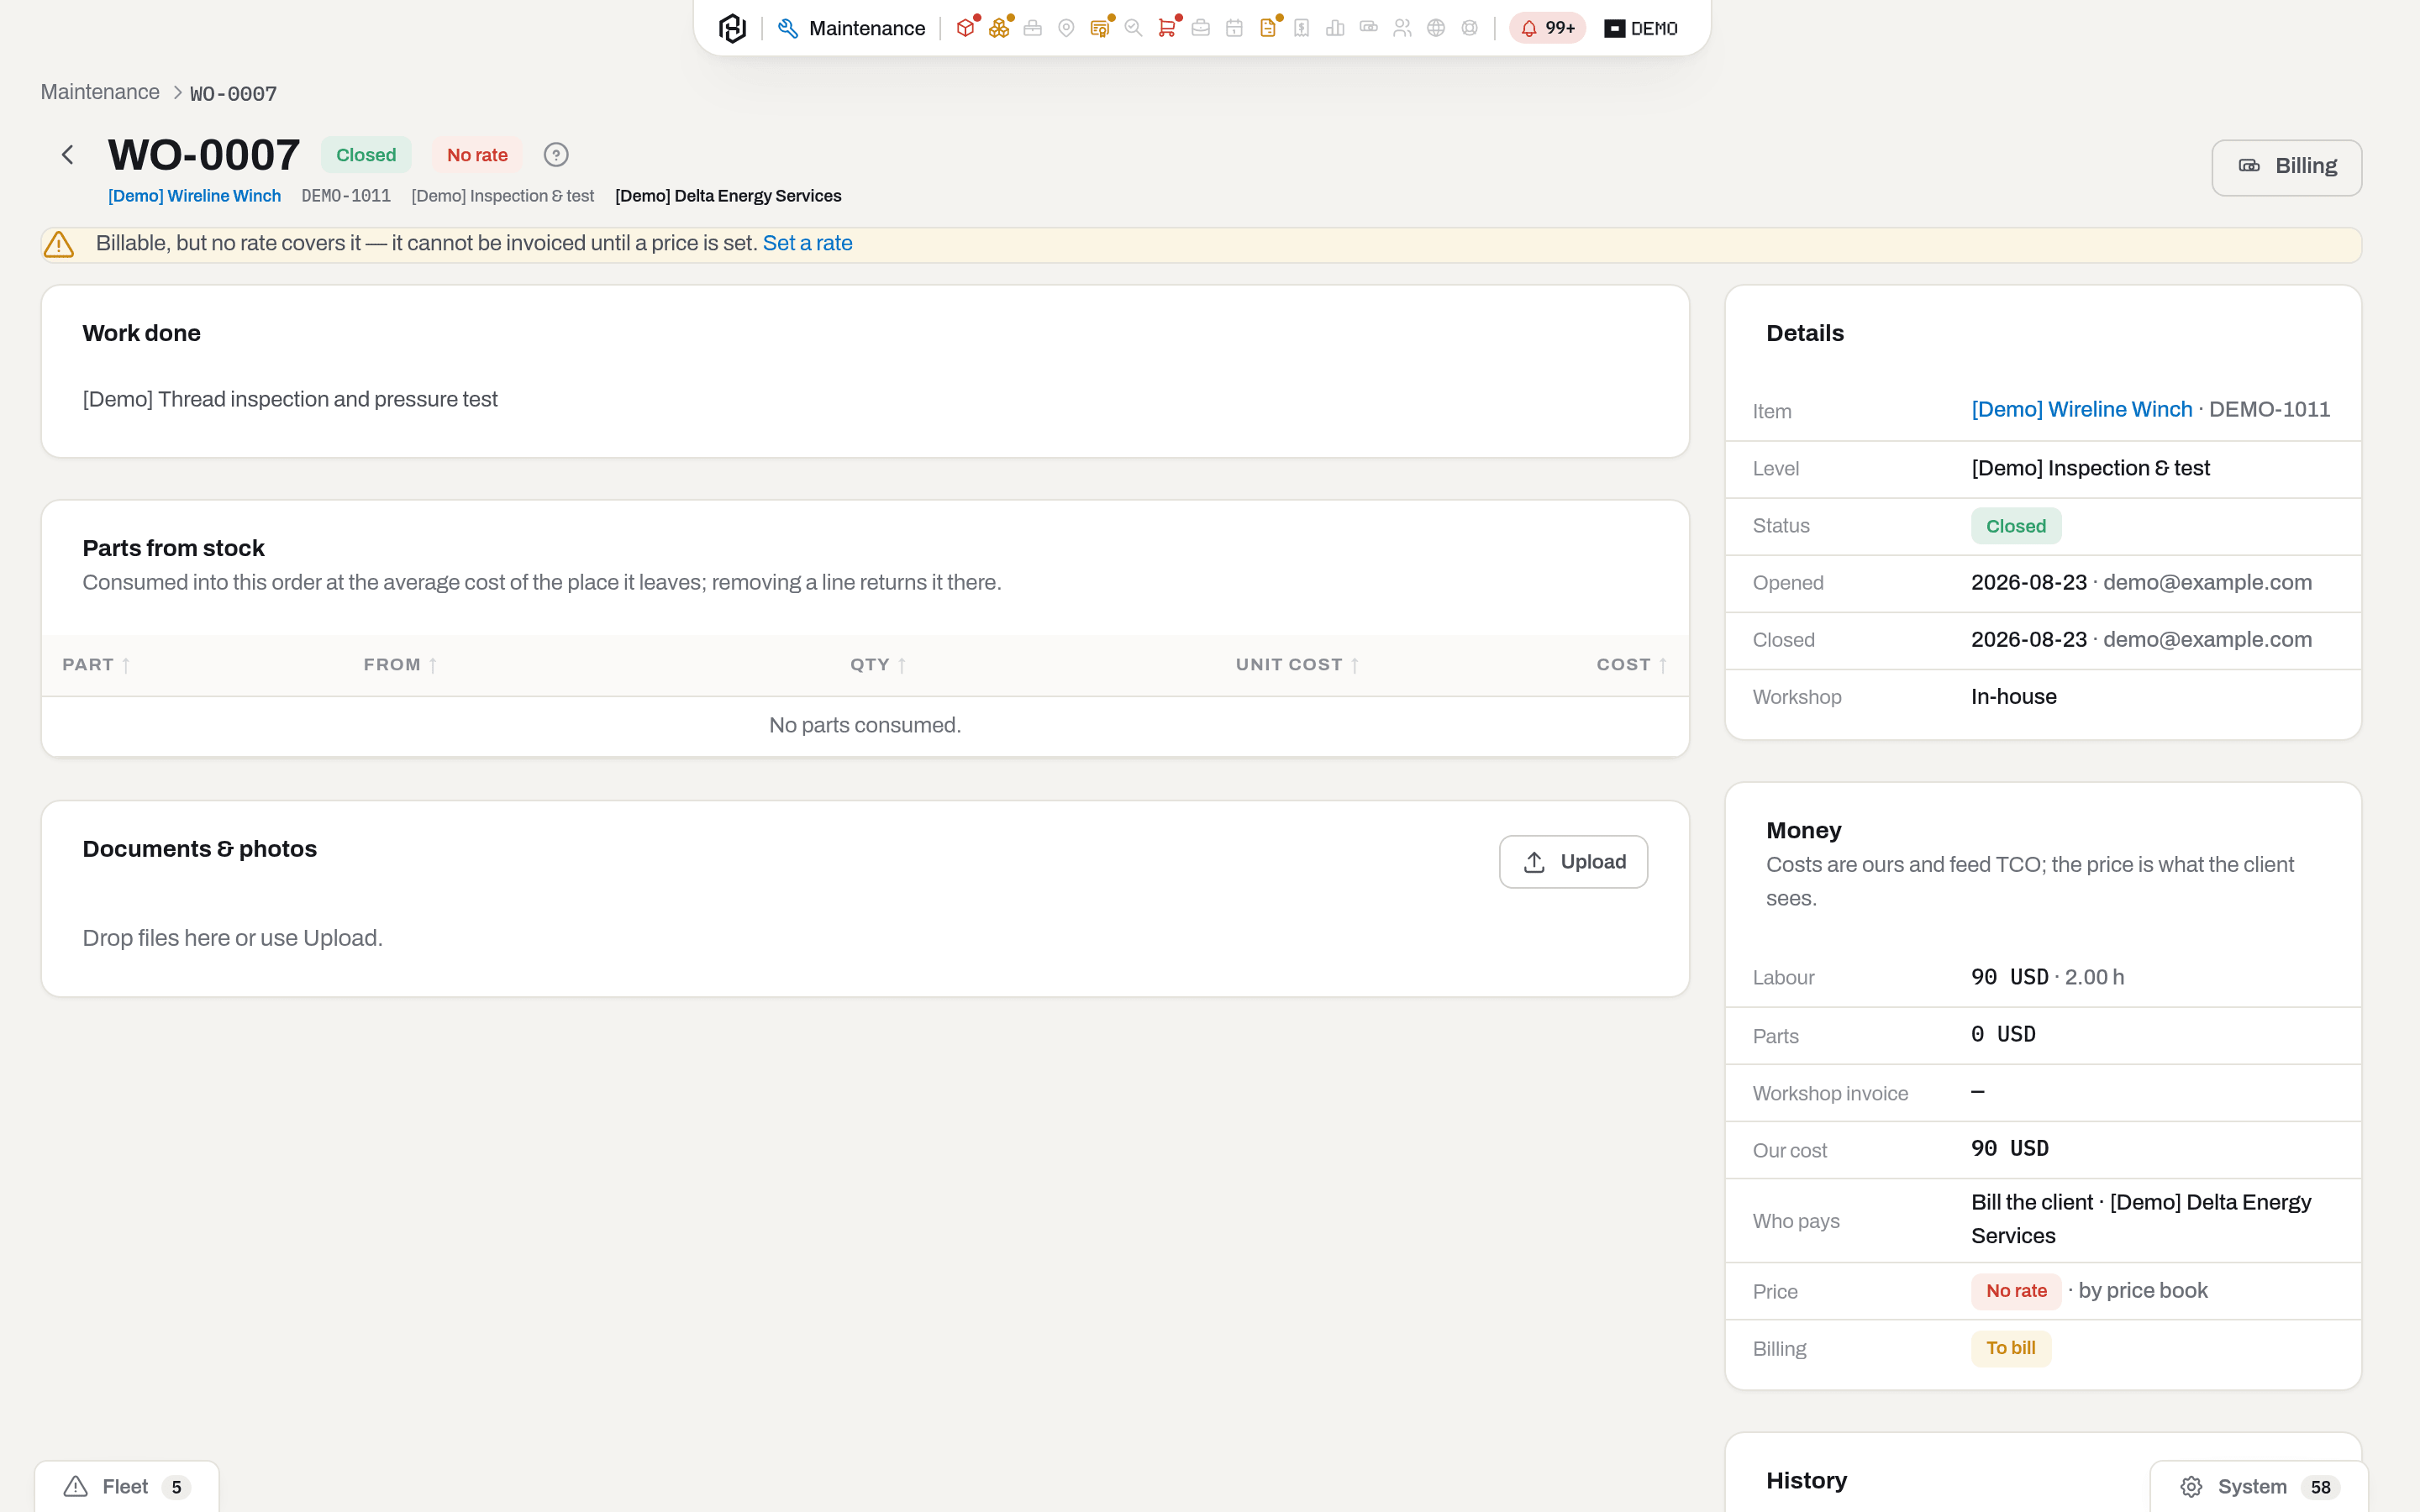
Result: the order finally carries a price, and the invoice built from it carries a real amount.
Warning
A repair with no price is not held back from the invoice. It already counts as To bill, and building a draft for that client pulls it in as a line with no amount. The draft cannot be sent while such a line is on it, so nothing wrong reaches the client — but somebody then has to price the line by hand or delete it from the document. Setting the price here, first, is much cheaper.
Note
On this screen the missing price is spelled two different ways. In the queue it is a short red No rate chip. On the work order — in the header next to the number, and in the Price row of Money — the same chip is filled with the whole sentence from the Repair dialog, so it reads as a paragraph and gets cut off. It is the same condition, and the long wording is a known defect (issue #164), not a different state.
Work on several orders at once
Who: Operator and above for Close and Cancel…; Manager and above for Billing…. A viewer has no checkboxes.
- Tick the rows. A bar appears at the bottom with the count.
- The To bill view at month end is longer than one page. Tick the heading checkbox to take the page, then click Select all {count} matching — the server works from your filters (view, client, service level, dates) instead of a list of rows.
- Pick Close, Cancel… (one reason for the batch) or Billing…, which puts the whole batch on one client as Bill the client.

Result: every order is processed on its own, and the dialog reports {done} done, {failed} failed; failed rows stay selected so you can fix the reason and repeat. Fifty closings raise one letter and one feed row, not fifty — and that stays true when the batch came from Select all matching.
If it fails: rows that cannot take the action are greyed out before you send anything — Not open for closing and cancelling, Cancelled for billing. With Select all matching on nothing can be greyed out in advance — the rows are counted on the server — so choose the view that matches the action (Open for closing, To bill for billing) and read the failures afterwards. One action takes at most 500 rows, so above that the bar offers no Select all matching — it says Up to 500 rows at a time — narrow the filter. Bulk closing asks for nothing at all: every order closes now, and labour, parts and the workshop invoice stay whatever each order already had. An order whose final costs still need typing has to be closed on its own.
Open a work order from a maintenance alert
Who: Operator and above, with the Maintenance section granted as well as Alerts.
- Go to Alerts and find a Maintenance due or Maintenance due soon row.
- Click Open work order on the row.
- The Repair dialog opens with the unit chosen, the Service level from the plan, and What is done already filled with that level's name. Correct the wording, add the costs, and open the order.
An Inspection due row has the same button. There the Service level is the one whose Certificate step writes the certificate the unit is waiting for. If no level or more than one level does that, the field stays empty and What is done holds the certificate type. The alert goes quiet while that order is open, and closing it with the certificate filled in answers the inspection.
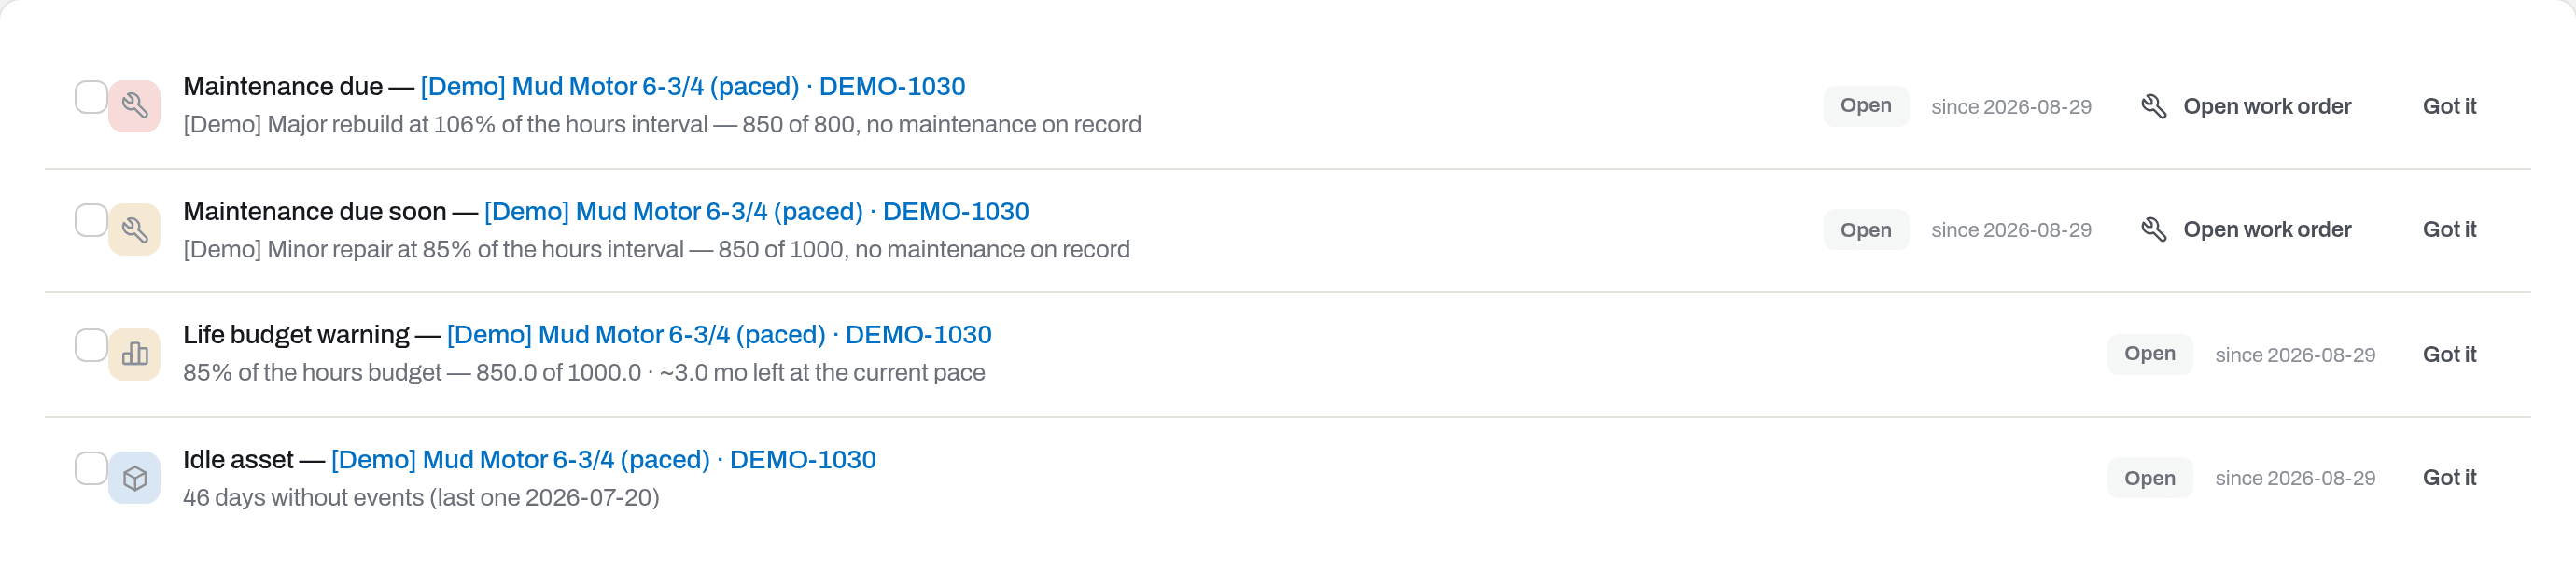
Result: the alert goes quiet as soon as an order of that level is open on the unit. Cancel the order and the alert comes back on the next nightly check; close it and the plan's clock moves forward, so the alert closes itself.
If it fails: there is no second way to start a repair — the button opens the same dialog as everywhere else, so a repair always begins in one place. A Work order open too long alert has no such button: it carries a link to the order that is stuck.
Send a repair to an invoice
Who: Manager and above, with the Invoices section granted — a work order is not billed from this screen.
- Close the order with Bill the client and make sure it has a price (see above).
- In Invoices, build a draft for that client over a period. Closed repairs join the client's approved tickets in the same document — work first, repairs after. The window is counted by the closing date: a repair started in March and finished in April is April's.
- Check the draft, then send it.
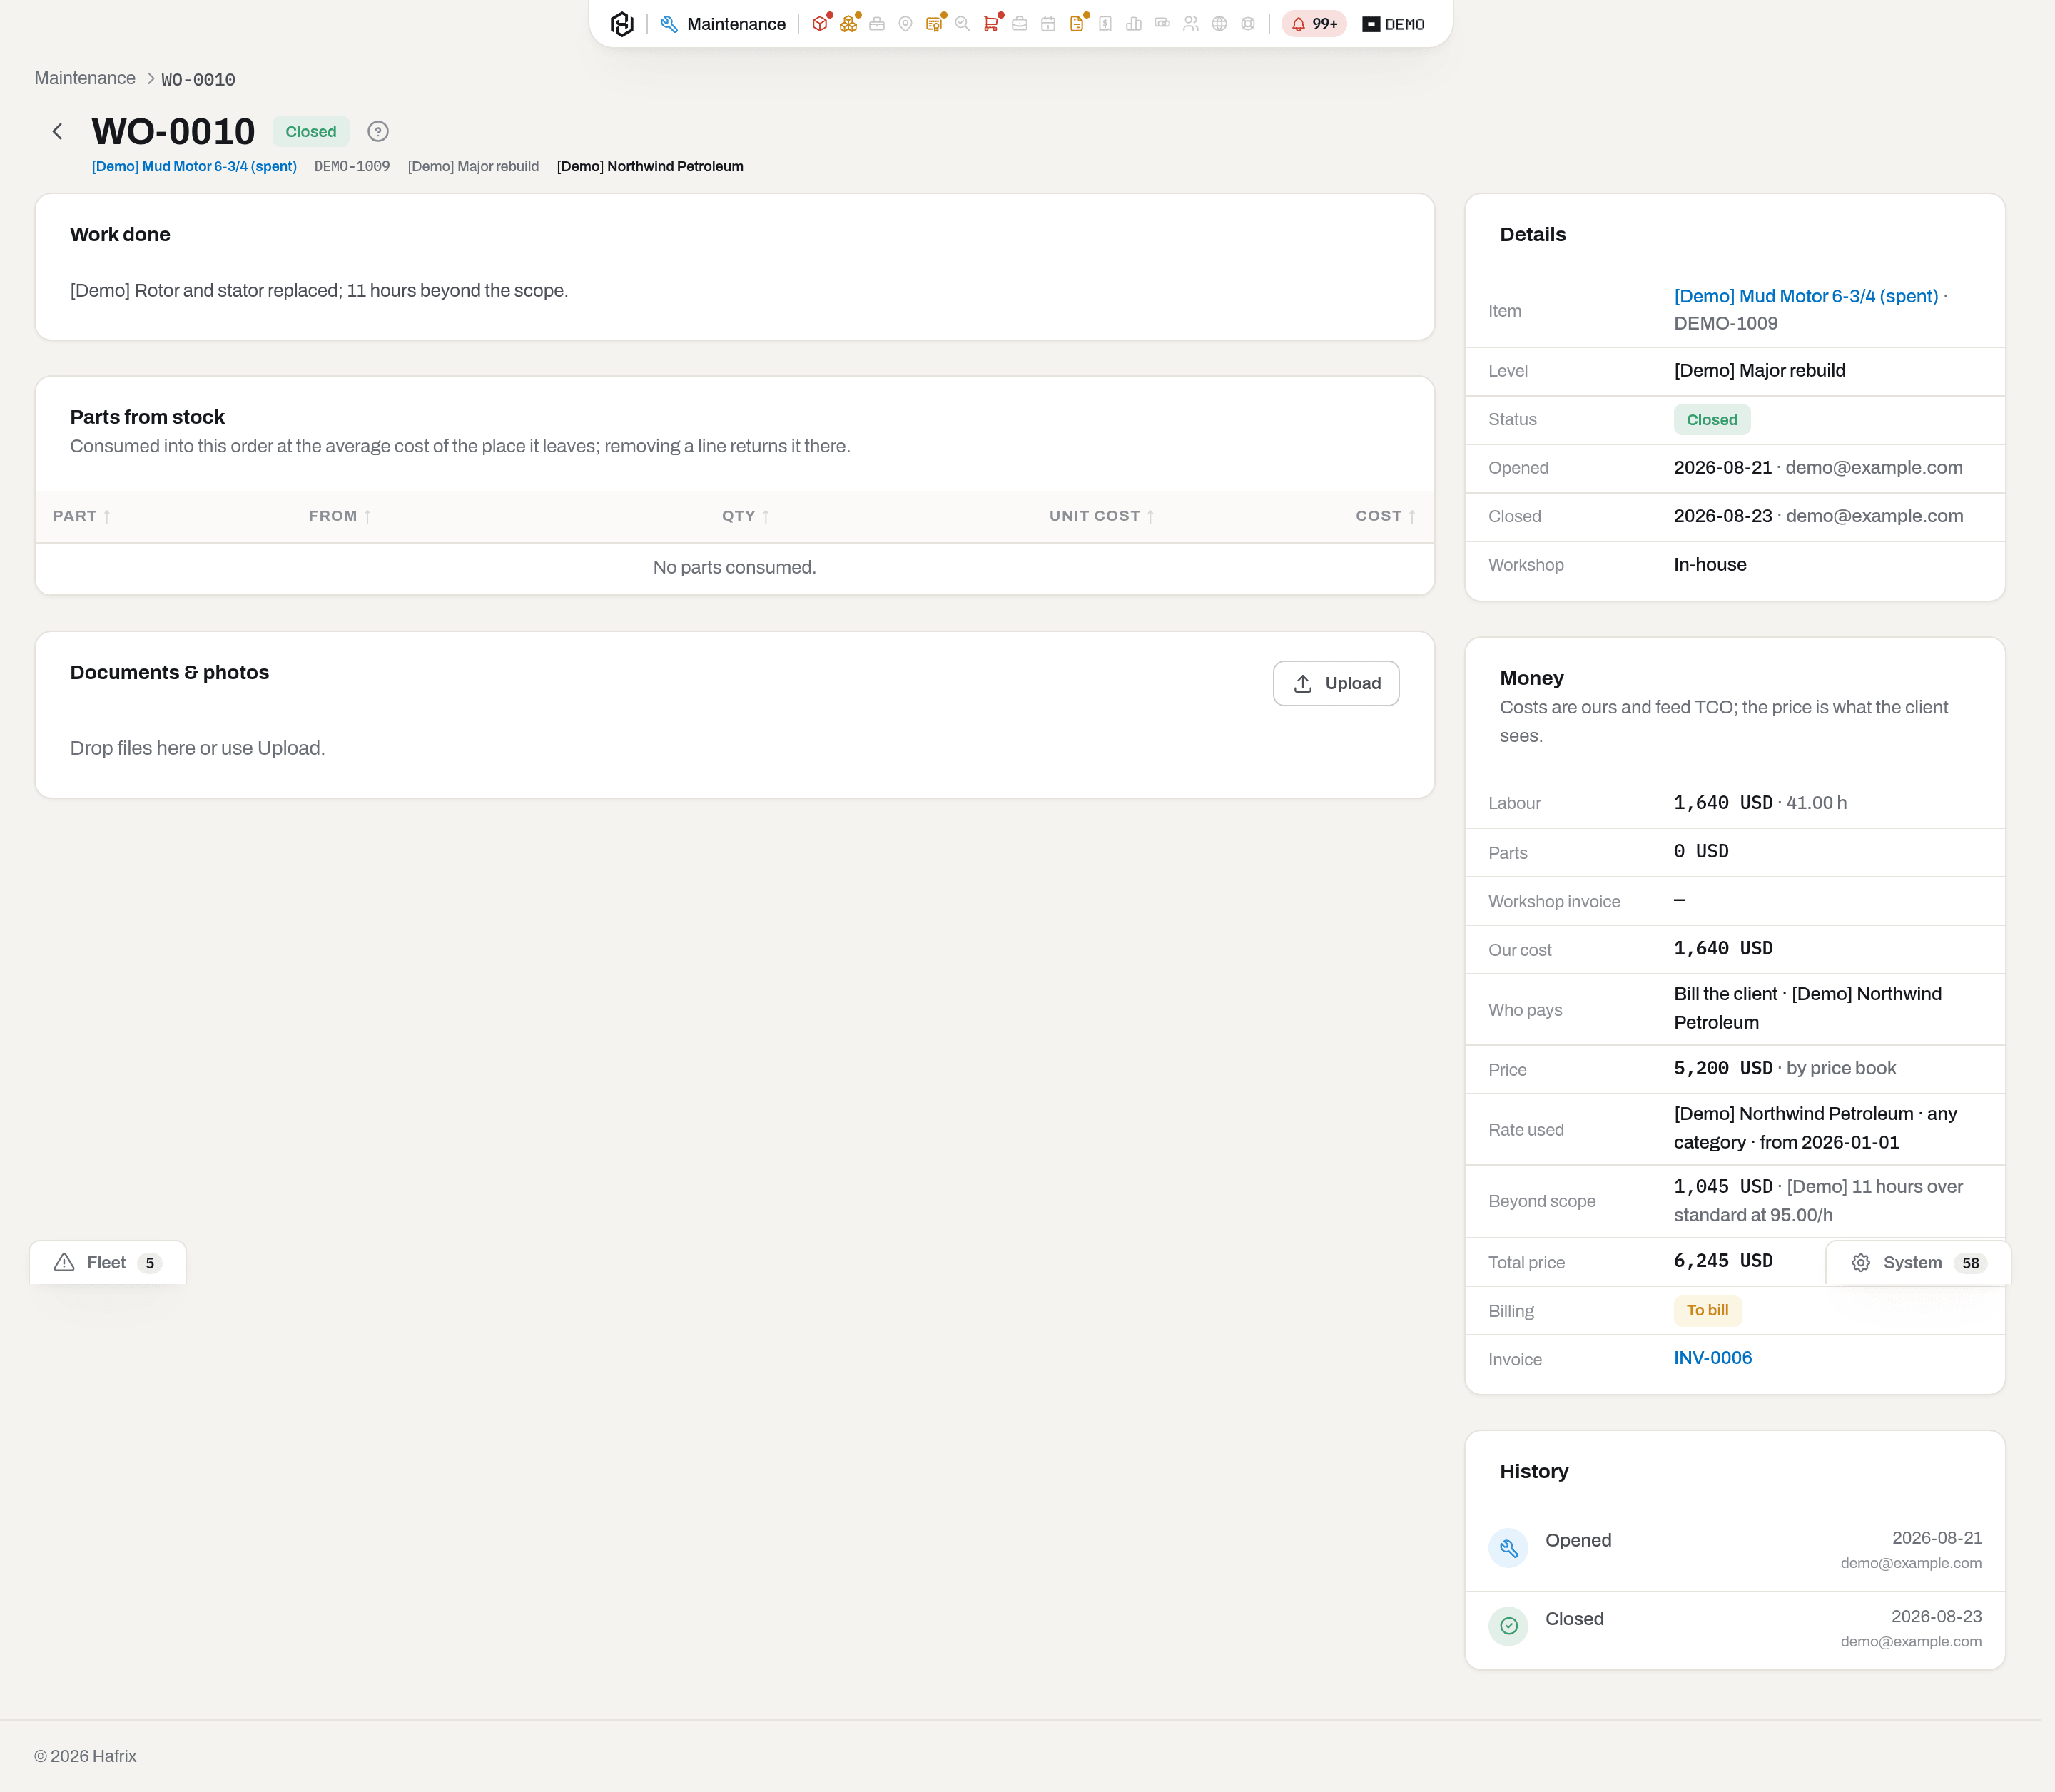
Result: the repair is one line on the invoice, at Total price, described as WO-0010 · [Demo] Major rebuild — [Demo] Mud Motor 6-3/4 (spent) · DEMO-1009; anything Beyond scope goes into the line's note. The order's Money card grows an Invoice row linking to the document, and from that moment its Billing cannot be edited. Sending the invoice flips the badge to Invoiced; voiding it puts the repair back into To bill.
If it fails: internal service never goes on an invoice, and a claim to a vendor is not a client's bill — neither is collected. A repair with no price is collected but comes in without an amount, and the draft will not send until that line is priced or removed.
See the section as a board
Who: Viewer and above.
The layout switch has a second position, Overview: instead of the queue, the section shows a board of widgets — the repairs in numbers, and every number a link back into the queue or into the order it names. The queue is still the section: Overview is a view you switch into, and Maintenance opens on List.
- Switch to Overview on the two-way List / Overview icon switch, at the right of the list's header (hover an icon to see its name — the switch carries no text label). Quick views, search and filters belong to the queue, so the header keeps only the department button and the switch.
- Read the board. The department lens applies: each number is counted over the orders of the department you have chosen, and a link from a widget opens the queue narrowed to the same department.
- Switch back to List to return to the queue.
| Widget | Shows | Links to |
|---|---|---|
| Counters | Open, Closed, 30 days, Ready to bill, Price missing and, to roles that see money, Open, cost so far | The queue, on the matching quick view |
| By status | Open, closed and cancelled orders, and open orders by who pays — internal, the client or a vendor | The queue, on the matching quick view |
| Ready to invoice | The closed orders waiting to be billed, with the item and who pays; a No price badge marks one still missing an amount | The order's card |
| In the shop | The open orders that have waited longest, oldest first, with how many days each has sat in the workshop | The order's card |
| Recent | The latest orders opened, within the department you are looking at | The order's card |
| Repair downtime by category | Average hours from opened to closed for shop repairs closed in the last 90 days, by repair category, and the open orders past their Ready by (more) | — |
A widget you have no right to is neither on the board nor on offer — the same rule as everywhere else in Maintenance. The board is yours to arrange — drag by the header, resize or remove through the header menu, bring back through Add widget — exactly as on Overview, and the arrangement is saved for you and follows you to another computer. The board you start from is the department's: an admin can set the order and sizes a department opens the board with (Set a view for a department), and Reset to department layout brings you back to it — your own arrangement is cleared, the department's stays.
Result: the address carries the tab (/maintenance?tab=overview), so the link opens the board for a colleague too, with the same department lens.
Add or remove a widget on the board
Who: Viewer and above.
- To remove one: open its header menu (the ⋮ next to the drag handle) and choose Remove from board.
- To bring one back: click Add widget above the board, find it in the list and click Add.
Result: the widget leaves or joins the board right away, and the change is saved. The board of Maintenance is its own: removing a widget here does not touch the board on Overview or on any other section, and Reset to department layout clears only this section's arrangement.
Fields
| Field | Meaning | Required | Who edits |
|---|---|---|---|
| Item | The unit being repaired; serialized assets only, and not scrapped, lost or sold ones | yes | Operator+, at creation only |
| Service level | The kind of repair, from your catalogue — it is what the price book charges for | no, but a repair without one cannot be priced by the book | Operator+, while open |
| Type | In field or In shop | no; defaults to In shop | Operator+, while open |
| Repair category | How the repair is classified for reporting, from Repair categories; may set the Service level for you | no | Operator+, while open |
| CapEx / OpEx | Which accounting bucket the repair belongs to | no | Operator+, while open |
| Status before repair | A snapshot of the item's status when the order opened, shown on the card and the printed repair card | — | set automatically, read-only |
| What is done | The one line that names the repair everywhere else | yes | Operator+, while open |
| Details | The longer story, shown as Work done | no | Operator+, while open |
| Who pays | Internal cost · Bill the client · Claim to vendor | yes | Operator+ at creation; after that Manager+ via Billing |
| Client / Vendor | Who is billed or claimed against | when not internal | Operator+ at creation; after that Manager+ |
| Price source | by price book or by quote | yes | Manager+ |
| Quote / document ref | The agreement or claim document behind a quoted price | when quoted | Manager+ |
| Agreed price / Currency | The quoted amount | when quoted | Manager+ |
| Beyond scope, amount / what for | One extra sum with a mandatory explanation | no; the explanation is required if the amount is | Manager+ |
| Labour, hours / Labour cost | Our workshop's time and what it cost us — counted from the crew when the order has one | no | Operator+, while open; by hand only without a crew |
| Currency | The currency of all costs on this order; parts must match it | yes; defaults to the item's | Operator+, while open |
| Workshop | In-house, or the outside shop that did the work | no | Operator+, while open |
| Workshop invoice | What the outside shop charged us | no | Operator+, while open |
| Job (optional) | The job where the failure happened | no | Operator+, at creation |
| Opened on / Closed on | Empty for a repair happening now; filled in when logging a past one | no | Operator+ |
| Ready by | The promised completion — the ETTC; see Ready by, downtime and mileage | no | Operator+, while open |
| Mileage, mi | The trip to the rig, in miles; In field orders only | no | Operator+, while open |
| Result | Good · Need repair · Non repairable — set on Close, defaults to Good | yes, on closing | Operator+, at close only |
| Follow-up order | The order opened automatically on a Need repair result, or the order this one follows | — | set automatically, read-only |
| Reason | Why the order was cancelled | when cancelling | Operator+ |
| Unit (reading) | The order's item, or one of its fitted components | yes | Operator+, while open |
| Counter (reading) | The kind of running measure — amp-hours, flow hours and so on, from Counter types | yes | Operator+, while open |
| Current value (reading) | The number read off the unit now | yes | Operator+, while open |
| Reason (reading) | Why the value is lower than the previous reading — a counter replaced or reset | when the value is lower and the counter runs a total | Operator+, while open |
| Note (reading) | A free-text remark on the line | no | Operator+, while open |
What the system tells you
| When | Feed row | Who gets it | |
|---|---|---|---|
| A repair is opened from the rig | Repair opened at the rig: … | Repair {number} opened from the field on {item} | Feed: every manager and admin who can see Maintenance. Email: the fleet mailing list from the alert settings, or every manager and admin if that list is empty |
| A billable order closes with a price | Repair closed — ready to bill | Repair {number} closed on {item} | Feed: every manager and admin who can see Maintenance, except whoever closed it. Email: the fleet mailing list from the alert settings, or every manager and admin if that list is empty |
| A billable order closes without a price | Repair closed without a price | the same letter, with a red band instead of the amount | as above |
| A batch is closed at once | Repairs closed — ready to bill, with the count and how many have no price | {count} repairs closed and ready to bill | as above — one row and one letter for the whole batch |
| A plan's interval is past its warning threshold | Maintenance due soon alert | in the daily fleet digest (07:30 workspace time) | Alert: everyone who can see Alerts. Digest: the same fleet mailing list |
| A plan's interval is over | Maintenance due alert (critical) | in the same digest | as above |
| An order stays open too long — two weeks unless the workspace threshold says otherwise | Work order open too long alert | in the same digest | as above |
A work order opened in the office says nothing — the person who opened it is sitting with the people it would tell; one opened at the rig is the only case where nobody here knows yet. Internal repairs closing say nothing either: the item's history records them, and a letter about every workshop job would only teach the office to filter its mail. You never get a feed row about your own closing — a toast already told you.
Alerts are evaluated once a night (07:00 workspace time), so a plan you satisfy today stops shouting tomorrow morning — or right away if a manager with the Alerts section presses Check now in Alerts.
Related
- Items — the fleet the orders are written against.
- Item card — one unit: its Maintenance card lists the last orders, and Repair opens a new one.
- Stock — where the parts come from and where a cancelled order returns them.
- Invoices — where a closed, priced repair becomes a line on a client's bill.
- Alerts & notifications — the queue that says when to service before it breaks.
- Settings: catalogues — service levels, repair rates and maintenance plans.
- Field app — how a work order is opened at the rig, with no signal.
- Roles & access — why a button or a whole section may be missing.
FAQ
Why can I not type the price? — Because then it would be a number someone remembered, not a number the contract says. The price comes from the price book on the closing date. If the money was agreed separately, a manager records it as a quote with the document reference — the exception is visible, not hidden.
Why did the order close without a price instead of refusing? — The workshop finishes work in the yard; the price book is kept in the office. Blocking the closing would make one wait for the other. The order closes, lands under Closed without a price, and shouts until someone sets a rate. Nobody is stopped, but nobody should leave it there either: it will be collected into the next draft invoice with no amount on it.
I changed a rate — why did the closed repairs keep the old price? — Because the row that priced them is remembered on each order. A new rate is a new row with its own effective date; it applies to what closes after it, not to what already went out on paper.
Why is there no Delete? — An order consumed parts, moved an item's status and wrote a line in its history. Cancelling it with a reason undoes the stock and the status and keeps the record; deleting it would leave a hole where the money used to be.
The item is still In repair after I closed the order. — There is another order open on the same unit. The status comes back when the last of them is closed or cancelled.
Where do the alerts about upcoming service come from? — From maintenance plans, which are written per category and service level. A single unit can be given its own intervals on top of the plan, from Next service on its card. See Maintenance plans.
Can a repair end up on its own invoice? — It is not built that way on purpose: a rig working one month should get one bill, so repairs join the tickets in the same document, after the work. But if the window you choose has no unbilled tickets in it, the draft will contain repairs alone — that is a consequence of the window, not a separate kind of document.
Updated 2026-09-29
New to Hafrix?
See this workflow in your operation
Connect inspections, workshop work and equipment readiness. Walk through your maintenance workflow with the Hafrix team.